GamesRadar+ GamesRadar+
US EditionUS CA EditionCanada UK EditionUK AU EditionAustralia
Sign in
  • View Profile
  • Sign out
  • Games
    • Game Insights
      • Games News
      • Games Features
      • Games Reviews
      • Games Guides
      • Big in 2026
      • The Big Preview
      • On The Radar
      • Indie Spotlight
      • Future Games Show
      • Golden Joystick Awards
    • Genres
      • Action Games
      • RPGs
      • Action RPGs
      • Adventure Games
      • Third Person Shooters
      • FPS Games
    • Platforms
      • PS5
      • Xbox Series X
      • PC
      • Nintendo Switch
      • Nintendo Switch 2
      • Tabletop Gaming
    • Franchises
      • Grand Theft Auto
      • Pokemon
      • Assassin's Creed
      • Monster Hunter
      • Fortnite
      • Cyberpunk
      • Red Dead
      • The Elder Scrolls
      • The Sims
  • Entertainment
    • TV Shows
      • TV News
      • TV Reviews
      • Anime Shows
      • Sci-Fi Shows
      • Superhero Shows
      • Animated Shows
      • Marvel TV Shows
      • Star Wars TV Shows
      • DC TV Shows
    • Movies
      • Movie News
      • Movie Reviews
      • Big Screen Spotlight
      • Superhero Movies
      • Action Movies
      • Anime Movies
      • Sci-Fi Movies
      • Horror Movies
      • Marvel Movies
      • DC Movies
    • Streaming
      • Apple TV Plus
      • Disney Plus
      • Netflix
      • HBO
      • Amazon Prime Video
      • Hulu
    • Comics
      • Marvel Comics
      • DC Comics
    • Toys & Collectibles
    • Lego
    • Dungeons and Dragons
    • Merch
  • Hardware
    • Insights
      • Hardware News
      • Hardware Reviews
      • Hardware Features
    • Computing
      • Desktop PCs
      • Laptops
      • Handhelds
    • Peripherals
      • Headsets & Headphones
      • TVs & Monitors
      • Gaming Mice
      • Gaming Keyboards
      • Gaming Chairs
      • Speakers & Audio
    • Accessories & Tech
      • Gaming Controllers
      • Tech
      • SSDs & Hard Drives
      • VR
      • Accessories
      • Retro
  • Deals
    • Game Deals
    • Tech Deals
    • TV Deals
    • Buying Guides
  • Video
  • Newsletters
    • Quizzes
    • About Us
    • How to pitch to us
    • How we score
    • Newsarama
    • Retro Gamer
    • Total Film
  • home
  • Games
    • View Games
      • Games News
      • Games Features
      • Games Reviews
      • Games Guides
      • Big in 2026
      • The Big Preview
      • On The Radar
      • Indie Spotlight
      • Future Games Show
      • Golden Joystick Awards
      • Action Games
      • RPGs
      • Action RPGs
      • Adventure Games
      • Third Person Shooters
      • FPS Games
    • Platforms
      • View Platforms
      • PS5
      • Xbox Series X
      • PC
      • Nintendo Switch
      • Nintendo Switch 2
      • Tabletop Gaming
      • Grand Theft Auto
      • Pokemon
      • Assassin's Creed
      • Monster Hunter
      • Fortnite
      • Cyberpunk
      • Red Dead
      • The Elder Scrolls
      • The Sims
  • Entertainment
    • View Entertainment
    • TV Shows
      • View TV Shows
      • TV News
      • TV Reviews
      • Anime Shows
      • Sci-Fi Shows
      • Superhero Shows
      • Animated Shows
      • Marvel TV Shows
      • Star Wars TV Shows
      • DC TV Shows
    • Movies
      • View Movies
      • Movie News
      • Movie Reviews
      • Big Screen Spotlight
      • Superhero Movies
      • Action Movies
      • Anime Movies
      • Sci-Fi Movies
      • Horror Movies
      • Marvel Movies
      • DC Movies
    • Streaming
      • View Streaming
      • Apple TV Plus
      • Disney Plus
      • Netflix
      • HBO
      • Amazon Prime Video
      • Hulu
    • Comics
      • View Comics
      • Marvel Comics
      • DC Comics
    • Toys & Collectibles
    • Lego
    • Dungeons and Dragons
    • Merch
  • Hardware
    • View Hardware
      • Hardware News
      • Hardware Reviews
      • Hardware Features
      • Desktop PCs
      • Laptops
      • Handhelds
    • Peripherals
      • View Peripherals
      • Headsets & Headphones
      • TVs & Monitors
      • Gaming Mice
      • Gaming Keyboards
      • Gaming Chairs
      • Speakers & Audio
      • Gaming Controllers
      • Tech
      • SSDs & Hard Drives
      • VR
      • Accessories
      • Retro
  • Deals
    • View Deals
    • Game Deals
    • Tech Deals
    • TV Deals
    • Buying Guides
  • Video
  • Newsletters
    • Quizzes
    • About Us
    • How to pitch to us
    • How we score
    • Newsarama
    • Retro Gamer
    • Total Film
Trending
  • Pokemon Winds and Waves
  • New Games for 2026
  • GamesRadar+ Replay
  • Mario Day deals
Don't miss these
Resident Evil Requiem detonator location and how to find all parts guide
Resident Evil How to get all Resident Evil Requiem detonator parts
resident evil requiem joint plugs
Resident Evil How to get all three Resident Evil Requiem joint plugs
Deforesters in Arc Raiders
Third Person Shooters How to find Deforesters in Arc Raiders for A Prime Specimen
Resident Evil 2 Remake medallion locations
Resident Evil All Resident Evil 2 medallion locations to escape the Police Station
resident evil requiem final puzzle
Resident Evil How to the solve the final puzzle in Resident Evil Requiem
Resident Evil 4 stone dias code combination symbols
Resident Evil All Resident Evil 4 Cave Puzzle Shrine codes and solutions
Kingdom Come: Deliverance 2 screenshot of Henry washing his face at a trough
Action RPGs 11 Kingdom Come Deliverance 2 tips and tricks to help you serf on
Leon approaches one of the Resident Evil Requiem BSAA containers
Resident Evil Resident Evil Requiem BSAA container key and crate locations
resident evil requiem puzzle boxes
Resident Evil All Resident Evil Requiem puzzle box solutions
Assassin's Creed Odyssey Sphinx
Assassin's Creed Assassin's Creed Odyssey Sphinx: Location and riddles
Arc Raiders keeping an eye out
Third Person Shooters How to find the collapsed highway for Keeping an Eye Out in Arc Raiders
inscryption sliding puzzle
Games Inscryption sliding puzzle answers to solve the first cabin puzzle
Alan Wake 2 cultist stashes
Survival Horror Games Alan Wake 2 stash locations, codes and solutions
resident evil requiem fuse
Resident Evil How to get the fuse in Resident Evil Requiem
Baldur's Gate 3
RPGs Baldur's Gate 3 Dank Crypt walkthrough and guide
  1. Games
  2. Action
  3. The Legend of Zelda
  4. Legend of Zelda: Breath of the Wild

All The Legend of Zelda Breath of the Wild Shrine locations and solutions

Guides
By Bradley Russell, Shabana Arif last updated 17 January 2023

Maps and walkthroughs for all 120 shrine locations in Breath of the Wild

When you purchase through links on our site, we may earn an affiliate commission. Here’s how it works.

  • Facebook
  • X
  • Pinterest
  • Flipboard
  • Email
Share this article
Join the conversation
Follow us
Add us as a preferred source on Google
Get the GamesRadar+ Newsletter

Weekly digests, tales from the communities you love, and more


By submitting your information you agree to the Terms & Conditions and Privacy Policy and are aged 16 or over.

You are now subscribed

Your newsletter sign-up was successful


Want to add more newsletters?

GamesRadar+

Every Friday

GamesRadar+

Your weekly update on everything you could ever want to know about the games you already love, games we know you're going to love in the near future, and tales from the communities that surround them.

GTA 6 O'clock

Every Thursday

GTA 6 O'clock

Our special GTA 6 newsletter, with breaking news, insider info, and rumor analysis from the award-winning GTA 6 O'clock experts.

Knowledge

Every Friday

Knowledge

From the creators of Edge: A weekly videogame industry newsletter with analysis from expert writers, guidance from professionals, and insight into what's on the horizon.

The Setup

Every Thursday

The Setup

Hardware nerds unite, sign up to our free tech newsletter for a weekly digest of the hottest new tech, the latest gadgets on the test bench, and much more.

Switch 2 Spotlight

Every Wednesday

Switch 2 Spotlight

Sign up to our new Switch 2 newsletter, where we bring you the latest talking points on Nintendo's new console each week, bring you up to date on the news, and recommend what games to play.

The Watchlist

Every Saturday

The Watchlist

Subscribe for a weekly digest of the movie and TV news that matters, direct to your inbox. From first-look trailers, interviews, reviews and explainers, we've got you covered.

SFX

Once a month

SFX

Get sneak previews, exclusive competitions and details of special events each month!


An account already exists for this email address, please log in.
Subscribe to our newsletter

 Hebra Tower 

Select map to view full size

Select map to view full size

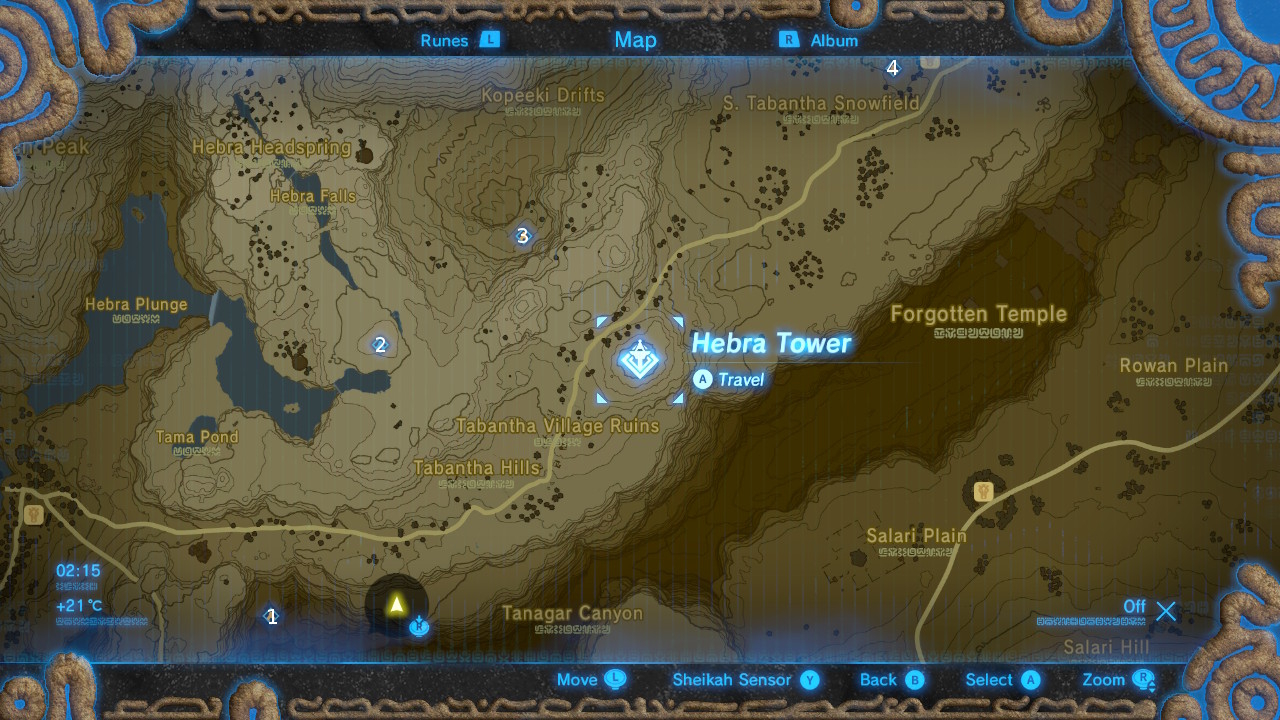
#1 - Dunba Taag Shrine

This shrine is southwest of Hebra Tower, in Tanagar Ganyon.

If you glide down into the canyon from opposite the Footrace Check-In, you'll see two windmills.

Look down and you'll get a glimpse of the shrine beneath the tower on the Hebra side. 

You may like
  • Where Winds Meet An Unholy Prophecy guide Where Winds Meet An Unholy Prophecy walkthrough guide
  • Avowed Totem of Rightful Rulership in camp How to find all Totem of Rightful Rulership pieces in Avowed
  • Avowed Totem of Defiance schemer's offering How to find all Totem of Defiance pieces in Avowed

Once inside, use Stasis on the cog to fix the platform in a horizontal position so that the boulder rolls across and presses the switch, opening the gate to the next area.

In this room, go through the first archway on the left and position yourself next to the gate. From here you can throw bombs at the rocks to reveal another switch.

Pick up a barrel and place it on the edge of the platform opposite the switch. Use Stasis and beat the daylights out of it so that it hits the switch and opens the gate in front of the treasure chest.

Back in the main room, go through the second archway on the left.

Sign up to the GamesRadar+ Newsletter

Weekly digests, tales from the communities you love, and more

By submitting your information you agree to the Terms & Conditions and Privacy Policy and are aged 16 or over.

To open the gate to this chest, drop down and push the boulder to the bottom of the ramp. Place one of each bomb type next to it, stand back, and detonate them. The boulder will be propelled up the ramp and onto the floor panel, allowing you to access the chest.

Return to the main room and follow the path around to the right to find more barrels opposite a vertical stone slab. Use Stasis to whack the barrel into the slab full pelt and it'll tip over onto the switch behind it, opening the gate to the altar.

#2 - Lanno Kooh Shrine

West of the Tower is the Hebra Plunge lake. At the eastern tip, you'll spot an enemy outpost. 

You may like
  • Where Winds Meet An Unholy Prophecy guide Where Winds Meet An Unholy Prophecy walkthrough guide
  • Avowed Totem of Rightful Rulership in camp How to find all Totem of Rightful Rulership pieces in Avowed
  • Avowed Totem of Defiance schemer's offering How to find all Totem of Defiance pieces in Avowed

Ignore that and swing the camera around. You'll see a large rocky area peeking out of the snow. 

Follow it around to the right and you'll spy the shrine inside a hidden cave that can only be accessed via the pool of icy water.

You'll have to bite the bullet and swim for it, healing on the way if need be.

You can go straight to the altar when you get inside.

#3 - Gee Ha'Rah Shrine

South of Kopeeki Drifts is a sunken area surrounded by mountains. At the bottom is a gate leading to the shrine.

Head up the slope leading away from the gate to find a bunch of snowballs at the top.

Pick up a snowball and go over to the left side of the hilltop where the rock it. Drop the snowball into the second track to the right from the rock.

It'll roll down, getting bigger on it descent, and break down the gate.

Inside the shrine, cut the rope the boulder is dangling from with an arrow, dropping it onto the switch below, opening the gate.

Head through and take the left path. Cut the left rope to swing the boulder into the switch. You can now access the chest. Follow the path back around and continue to the right.

Use Stasis on the boulder and cut the ropes holding it up. When it unfreezes, it'll drop straight down onto the switch, opening the gate to the altar. 

#4 - Rin Oyaa Shrine

You can see this shrine from Hebra Tower when you look northeast towards the Snowfield Stable.

Enter the shrine and use Magnesis to the metal cube by the far wall up to the ledge on the right above the fan. Place it in the middle as you'll be using it as a stepping stone later.

You need to get the orb onto its pedestal, and be standing on the light coloured floor tiles at the top of the ramp as it falls into place.

Grab the other metal cube and place it on the walkway in front of the pedestal, as close to the top of the ramp as you can, while leaving room for the orb.

Pick up the orb and drop it down next to the cube, then head up the ramp on the right side of the room. Use Magnesis to lift the cube and the orb will blow into place.

You can now reach both the chest and the altar.
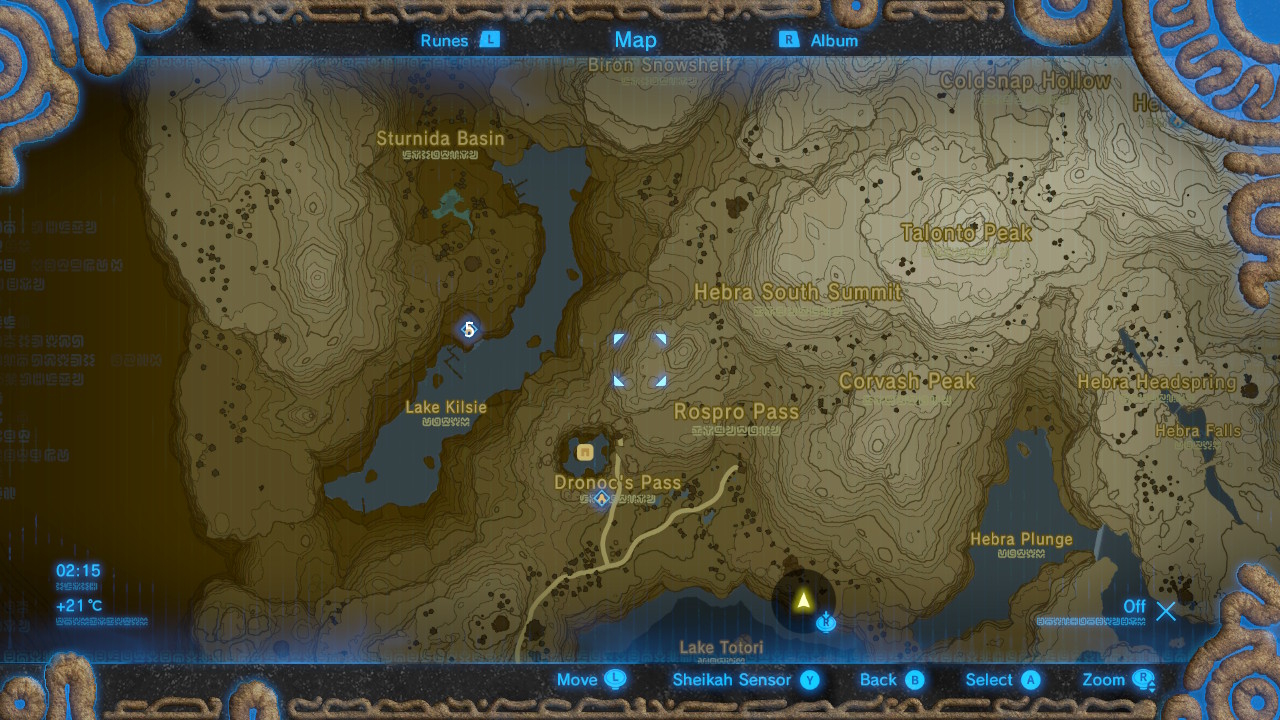
Select map to view full size

Select map to view full size

#5 - Maka Rah Shrine

Zoom in on Lake Kilsie and you'll see docks on the west side, halfway up.

From the docks, you can see the shrine through a crack in the cliff. To the left of the crack is an updraft. 

Ride it up and continue to climb upwards, keeping roughly in line with the shrine.

At the edge of the top plateau, look down to see a cave entrance in the cliff, lit up by torches.

Follow the path downwards until you reach the shrine. 

Once inside, go straight ahead and light the torch on the left to open the gate.

Navigte the rotating spiked platform and step on the floor switch to reveal four Guardian Scouts in the room beyond. Shoot the water in the middle of them with a shock arrow to take them all out.

Use Cryonis to reach both the chest and the floor switch. A second floor switch will be revealed that will set a spiked boulder rolling towards you. Either avoid it or use Magnesis to stop it smashing into you.

Head up the ramp, turn around at the top, and use a bomb to blow up the destructible wall to reveal a chest. Grab it with Magnesis.

Follow the path around to the right and step on the floor switch to send more spiked boulders hurtling down a second slope. You need to grab on and leave it on the platform to stop them rolling down continually.

Use Magnesis to grab the chest on the ledge across the lava pool before heading up the slope and clearing the shrine.

Select map to view full size

Select map to view full size

#6 - Rok Uwog Shrine

The shrine is located in the northeast of Pikida Stonegrove. If you're floating down from the mountains above, you'll get a peek at it through cracks in the rock above.

Enter the shrine and Use Magnesis to grab the chest on the ledge in front of you, then destroy the ivy on your left with a bomb or fire arrow to reveal a hole in the wall. Hop through and take care of the Guardian Scout in the next room.

There are two stacked crates in here. Destroy the wooden one with a bomb to create a ramp. Head up and over to the other side, and destroy a second Guardian Scout.

Proceed to the gate at the end and peek through the bars next to it to see a floor switch with some barrels on. Get the barrels off the switch using a spear or fire arrow and the gate will open.

Open the chest on the right to get the small key, climb the ladder, and drop down into the main room. Use the key to open the locked door and reach the altar.

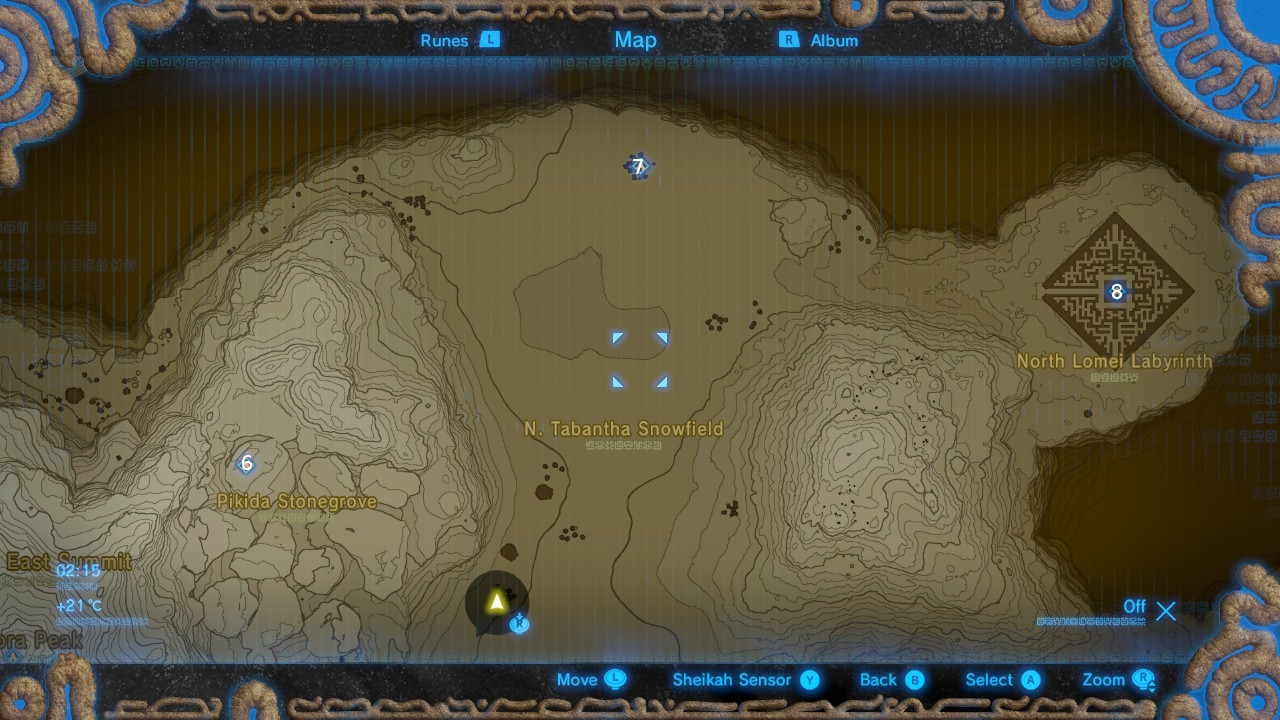
#7 - Sha Gehma Shrine

This shrine is out in the open to the north of Tabantha Snowfield. 

You need to get the key from the chest under the metal cube. Head up the first two ramps and use Magnesis to lift the metal cube as high as it will go. Release it when the platforms move underneath it, and then use Stasis to freeze it in place, giving you enough time to glide down and open the chest.

Head up to the top catwalk and glide down to open the second chest on the pillar below. 

Now drop down to the floor and open the door to the altar.

#8 - Qaza Tokki Shrine

As soon as you enter the North Lomei Labyrinth, the Trial on the Cliff shrine quest will begin. 

Select map to view full size

Select map to view full size

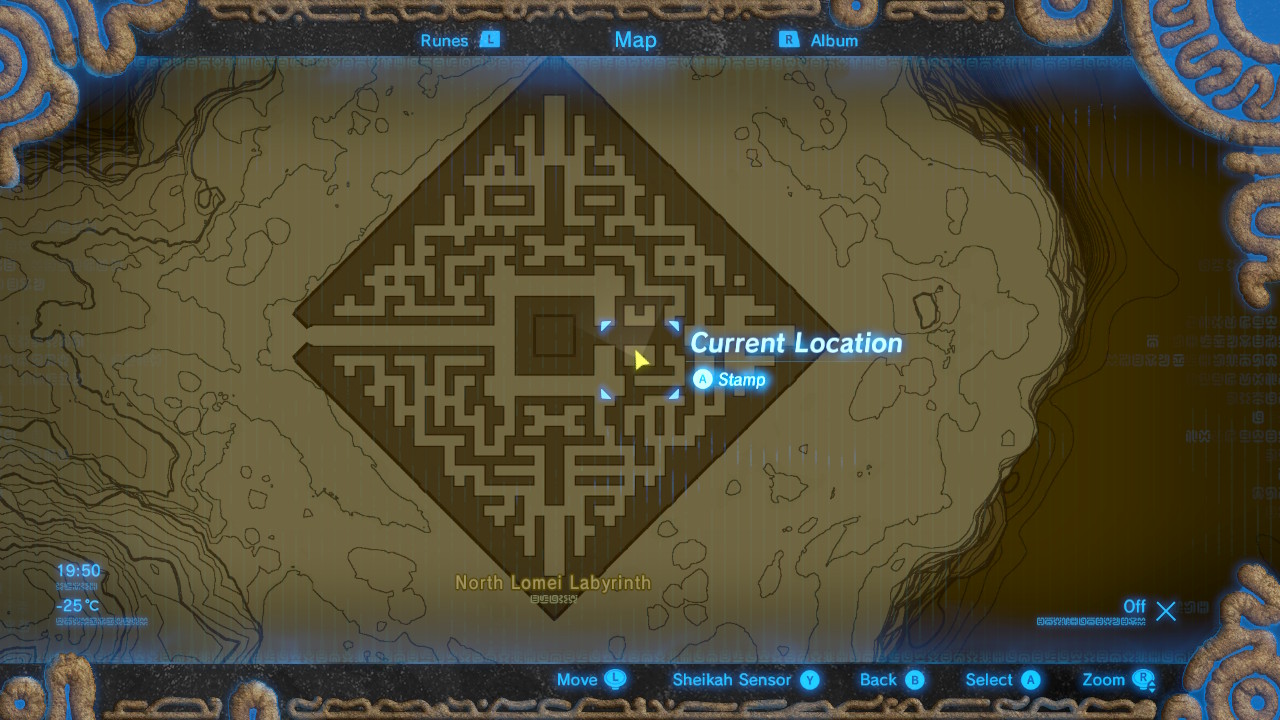
As with the last labyrinth, the quickest and easiest way to solve it is to scale the walls to reach the top and get yourself to the position above.

You'll want to glide down towards the electric Chuchus below, but land on the wall next to them as you descend.

If you fall off or miss the wall, you can scooch up the ladder to get back up.

There are some stairs leading up from here. 

Follow the path to find the shrine at the end.

Select map to view full size

Select map to view full size

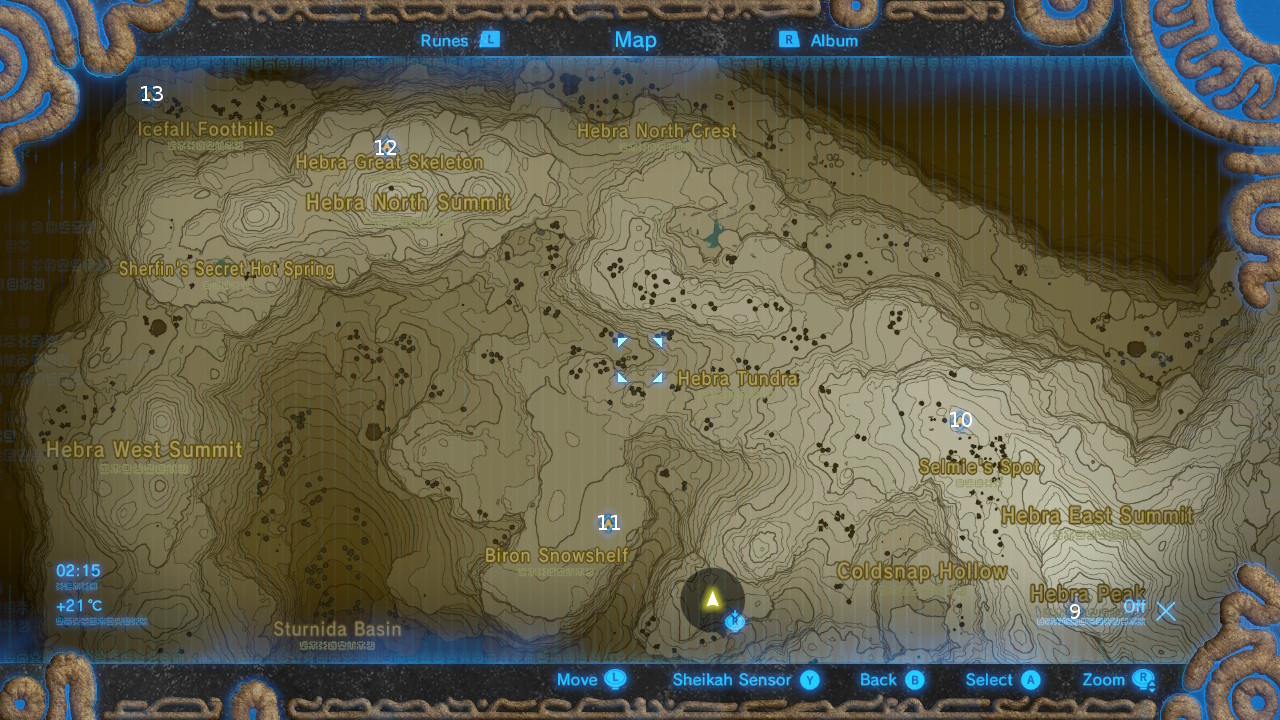
#9 - Goma Asaagh Shrine

Select map to view full size

Select map to view full size

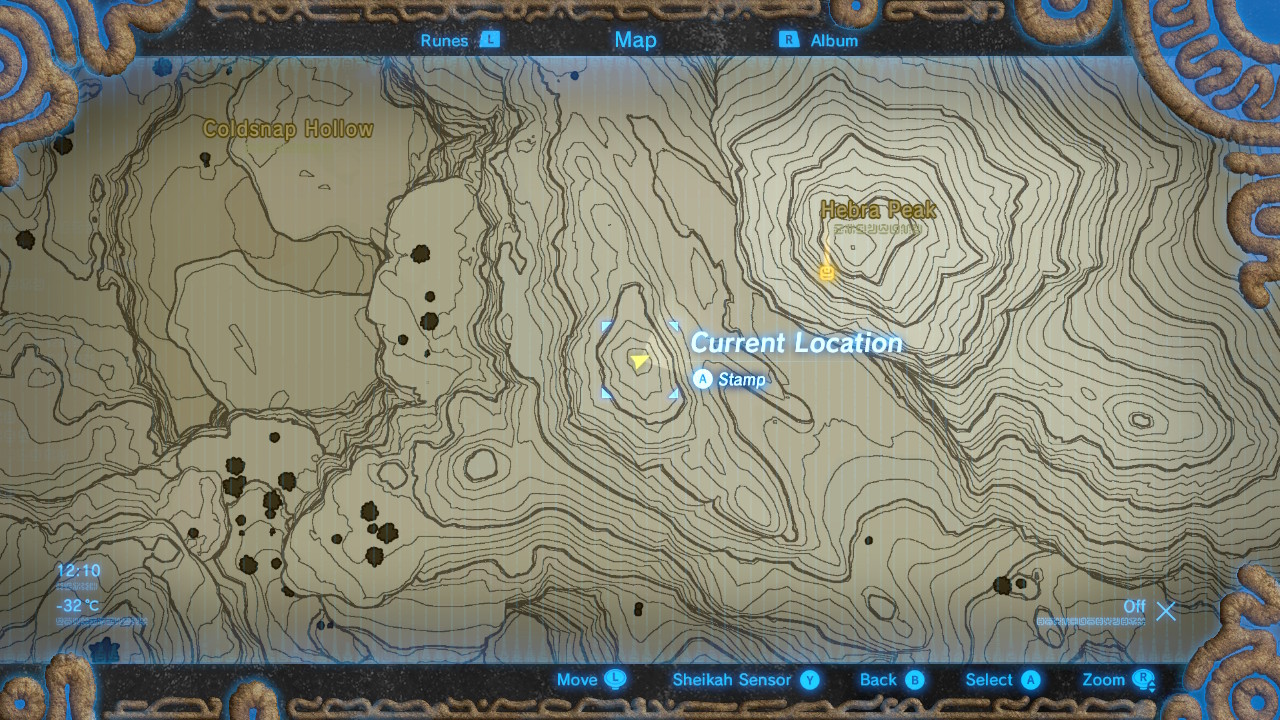
The shrine is located on the southwest side of Hebra Peak, where the yellow marker is in the picture above.

You can see it from the top of the peak to the southwest.  Melt the ice blocks to gain access to it.

Inside you'll find a Guardian Scout IV with 3000 HP and three '++' melee weapons.

#10 - Shada Naw Shrine

The shrine is just north of Selmie's Spot. 

If you haven't discovered this location yet, zoom in on the smattering of trees west of Hebra East Summit. You'll notice a large diamond shape in the middle of them. That's Selmie's cabin.

Looking north from here, you'll see a large rock to the left of a couple of flag poles.

The shrine is underneath it.

Once you're inside, follow the ledge around the to the other side of the room and use Magnesis to grab the chest. Glide back to your starting position, look down to the left, and use Magnesis again to pull the metal block out of the wall.

To reach the altar, you need to be standing on the light coloured tiles next to the entrance when the orb reaches the pedestal.

The quickest and most reliable way to do this is to toss the orb into the enclosure through the hole in the fence. Carry it to the top of the ramp and position yourself so that when you put it down, your body will stop it from rolling down the slope.

After you place it on the ramp, quickly cast Stasis on it and run or glide back to the launcher. When it unfreezes, you'll be lifted to the platform above, a short stroll away from the altar.

#11 - Mozo Shenno Shrine

Talk to Molli in Rito Village to start The Bird in the Mountain shrine quest.

Look out to the north from Revali's Landing to see the lone cedar she told you about. It's at the top of Talonto Peak.

From the cedar, look to the northwest to the bird-shaped Biron Snowshelf. As you glide down towards it, you'll see the shrine where its 'wings' meet, in a cave under the eastern edge of the plateau. 

There's a Guardian Scout IV inside with 3000 HP and three '++' melee weapons.

#12 - To Quomo Shrine

Select map to view full size

Select map to view full size

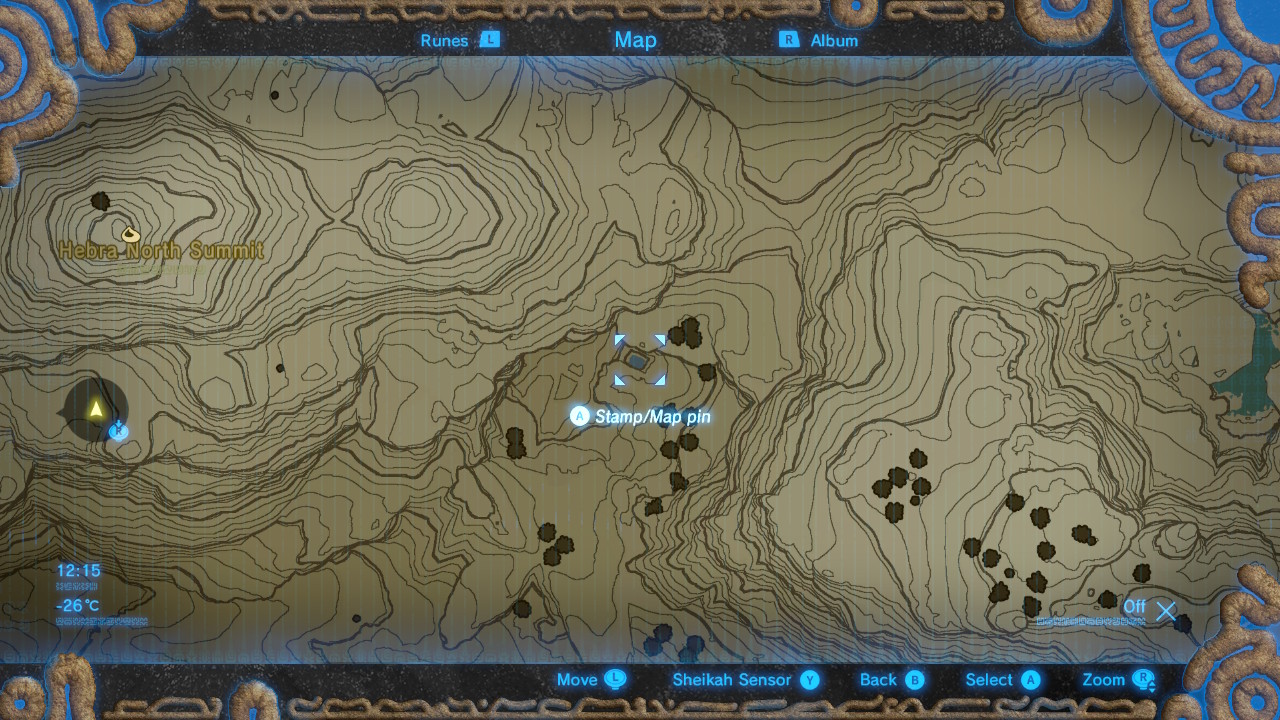
Make your way to the pond east of Hebra North Summit.

Use Cryonis to make two ice pillars in the water, essentially forming a bridge over the pond.

Head up the slope to the ledge overlooking the pond, grab a big snowball, and let it rip. 

The snowball should navigate the pond using the ice pillar bridge smash into the gate at the bottom of the hill. Head through to find the shrine.

You can go straight to altar inside.

#13 - Hia Miu Shrine

Climb to the top of Hebra North Summit and look to the west to spot this shrine. You can glide straight down to it.

There's a Guardian Scout IV inside with 3000 HP and three '++' melee weapons.

Jump to Section:

  • Dueling Peaks Tower
  • Hateno Tower
  • Lanayru Tower
  • Faron Tower
  • Lake Tower
  • Wasteland Tower
  • Gerudo Tower
  • Central Tower
  • Ridgeland Tower
  • Tabantha Tower
  • Hebra Tower
  • Woodland Tower
  • Eldin Tower
  • Akkala Tower
  • 1
  • …
  • 4
  • 5
  • 6
  • 7
  • 8
  • 9
  • 10
  • 11
  • 12
  • 13
  • 14

Current page: Legend of Zelda: Breath of the Wild: Shrine solutions: Hebra Tower

Prev Page Legend of Zelda: Breath of the Wild: Shrine solutions: Tabantha Tower Next Page Legend of Zelda: Breath of the Wild: Shrine solutions: Woodland Tower
CATEGORIES
Nintendo Switch Wii-u Platforms Nintendo
Shabana Arif
Shabana Arif
Social Links Navigation
Freelance Writer

Shabana was born looking like a girl wearing a Pikachu hoodie, so when such things became popular, she fitted right in. She writes guides, reviews and features for GR+ when she isn't screaming at Dark Souls 2 on YouTube.

Read more
Where Winds Meet An Unholy Prophecy guide
Where Winds Meet An Unholy Prophecy walkthrough guide
 
 
Avowed Totem of Rightful Rulership in camp
How to find all Totem of Rightful Rulership pieces in Avowed
 
 
Avowed Totem of Defiance schemer's offering
How to find all Totem of Defiance pieces in Avowed
 
 
Baldur's Gate 3
Baldur's Gate 3 Dank Crypt walkthrough and guide
 
 
Resident Evil 4 stone dias code combination symbols
All Resident Evil 4 Cave Puzzle Shrine codes and solutions
 
 
Where winds meet wall puzzle
How to solve the Where Winds Meet wall puzzle
 
 
Latest in The Legend of Zelda
Screenshot from Ratcheteer DX, showing a GBC-style cave with four pixelated characters finding warmth around a fire.
The Legend of Zelda-esque game mimics the GameBoy to GameBoy Color transition, goes from retro handheld to PC and Switch
 
 
The Legend of Zelda: Breath of the Wild blood moon in a red sky
A total lunar eclipse will cause a real blood moon tonight, exactly 9 years after Zelda: Breath of the Wild's blood moon
 
 
A scene in The Legend of Zelda: Twilight Princess HD on the Wii U showing Link talking to Midna before the Triforce
Princess Zelda actor "started practicing" Twilight Princess' Hylian language "over coffee" and is now fluent
 
 
The Legend of Zelda: Tears of the Kingdom
Sorry, ZeLink shippers, Zelda actor still thinks the 40-year-old pairing is better left "ambiguous"
 
 
The Legend of Zelda: Breath of the Wild
The Legend of Zelda actor would love to see Ocarina of Time remade in Breath of the Wild's engine: "What's not to love?"
 
 
The Legend of Zelda Skyward Sword screenshot
Challenges in emulating Zelda titles demonstrates the series' knack for reinvention
 
 
Latest in Guides
Sorcerer Incremental codes: A white-haired ninja.
Sorcerer Incremental codes (March 2026) for weapon rolls and more
 
 
Helldivers 2 Entrenched Division warbond helldivers in sapper armor running across no-man's-land
All weapons and items in the Helldivers 2 Entrenched Division Warbond
 
 
The Minecraft Live logo over a promotional image for the Tiny Takeover drop.
How to watch Minecraft Live 2026
 
 
Bizarre Lineage codes
Bizarre Lineage codes (March 2026) for free Stat Point Essence, Rare Chests, and more
 
 
Hoppip at the till in the Pokemon Centre in Pokopia
How to access the Pokopia Limited Event and get Hoppip
 
 
Marathon Introducing Sekiguchi agent Nona weaveworm
Marathon Introducing Sekiguchi contract walkthrough and how to find the Necrotic Sample and scan your shell
 
 
LATEST ARTICLES
  1. One Piece
    1
    One Piece season 2 is a live-action adaptation to treasure as it debuts to perfect Rotten Tomatoes score
  2. 2
    Overwatch lead says using Steam player counts to dunk on multi-platform releases like Marathon is "big unemployed, maidenless behavior"
  3. 3
    Nier: Automata creator Yoko Taro sees it "as a form of respect" when devs "say outright that they copied" his action RPG, but he's not sure "how Square Enix would feel about that"
  4. 4
    D&D's most annoying rule helped Fallout co-creator Tim Cain get his big break at legendary RPG studio Interplay after he flexed on the job interview
  5. 5
    Resident Evil Requiem director acknowledges the Leon thirst and marriage debate all in one as he jokingly lets slip a mock-up of the hot unc starring in The Bachelor: "Whoops..."

GamesRadar+ is part of Future US Inc, an international media group and leading digital publisher. Visit our corporate site.

Add as a preferred source on Google Add as a preferred source on Google
  • Terms and conditions
  • Contact Future's experts
  • Privacy policy
  • Cookies policy
  • Accessibility statement
  • Careers
  • About us
  • Advertise with us
  • Review guidelines
  • Write for us
  • Accessibility Statement

© Future US, Inc. Full 7th Floor, 130 West 42nd Street, New York, NY 10036.

Please login or signup to comment

Please wait...