
 Join The Community


My Dead Island 2 tips will help keep you alive as you battle the zombies that now roam the streets of Hell-A. There's a lot to understand as you progress through Dead Island 2, and the multitude of undead types means there's always a fresh danger ahead, but if you follow the advice listed here you can avoid the worst of it and get a head start on vital knowledge to stay alive. From stocking up on cash and materials, to the most useful combat techniques that can actively keep your health topped up - you can become a top Slayer with these Dead Island 2 tips.
1. Collect every weapon to scrap or sell

You're going to find a huge number of Dead Island 2 weapons during your zombie-slaying journey, and you should grab every one. You can carry up to 16 so hang on to the most valuable ones you find as spares, stashing them in Storage Lockers where possible so you can sell them to the next Trader you meet. You can also scrap weapons for parts through your inventory, which is useful to ensure you have enough crafting components to apply your favorite Dead Island 2 perks. Basically there's a use for every weapon you're not using.
2. Check the Storage Locker's Unclaimed Property tab for missed weapons

When you access Storage Lockers, make sure to check the Unclaimed Property tab, as this is where any special weapons you may have missed from missions or rewards end up. They often have decent stats and mods so are always worth investigating, but if they don't improve on your current gear you can always transfer them to your inventory and sell to the Trader for a quick buck.

3. Don't choose your weapon purely on Power

When selecting a weapon, you'll naturally be drawn to the biggest Power number. However, this shouldn't always dictate which one you choose to use - take a look at the other stats too as, although Damage is important, you should also consider Force (how much stamina you'll drain from enemies) and Speed, as you don't want to be waiting a long time between swings. Elemental upgrades are also an important consideration, as some zombies are immune to certain damage types and the wrong weapon could barely register on them – even if you're hitting them with a huge hammer!
4. Stomp on downed zombies for instakills

Every time you knock down an enemy, look out for a prompt over their head for a Skull Stomp move. Not only will this kill the zombie instantly, but it won't reduce the durability of your weapon and you can't take damage from other enemies or elements while the stomp animation is running. This option won't always appear, as you can only Skull Stomp a zombie with less than half of its health remaining, but it's a hand shortcut to thinning out groups.
5. Practice block/dodge and counter combos

Even with all the weapons you can wave around, one of the most devastating moves you have is a well-timed block or dodge just as an enemy hit comes in. Get it right and you'll stun them and open up a counter attack involving a couple of quicktime trigger presses that will usually kill a zombie straight away. While you're in the counter animation you can't be attacked by other zombies or take elemental damage either, which makes this move great for crowd control or when you're in the thick of a big fight. When combined with the right Skill Cards you can also regain a decent chunk of health for each counter you perform, which is very useful for keeping your HP up.
6. Don't always aim for the head

Don't be distracted by the old zombie cliche of always aiming for the head, as the best point of attack is determined by the type of weapon you have equipped - which you can find listed above the name on the weapon wheel and inventory screens. Headhunter weapons do deal critical hits to the head, but Maiming weapons generate critical hits on the limbs, so you should target them instead. Other weapon types include Frenzy that delivers critical hits with rapid attacks, and Bulldozer that converts all heavy attacks into critical hits. Get to know your current weapon, so you can tailor your approach to combat accordingly.
7. You can level up weapons but it's expensive

As you earn XP and level up your character, the zombies you face off against will also level up to become more challenging. Your weapons have levels too, and if it's more than a couple below the enemies you're fighting then you'll struggle to deal damage. At Workbenches you'll see the option to Match Level for weapons that have dropped below the current level, as well as a preview of what Power it will increase to, but this can be an expensive process and often costs between $10,000-$20,000 to complete. Hence the earlier tip to sell weapons you're not using.
8. You don't need to fear death

You shouldn't stress too much about dying here as it doesn't have much actual impact on your progress. All that happens is you'll respawn just before the area you died in, so you can get straight back in for another attempt. Ideally with a different approach to get a better outcome.
Dying will send you back to the start of a scripted boss fight, but if you're battling with a tough enemy in the more open-world areas then they won't regenerate health, so you can keep going back and chipping away at them until they're done. If you find yourself being unable to progress further, you have the option to turn around and complete some different missions until you've levelled up.
9. Examining Keys reveals a clue for where to use them
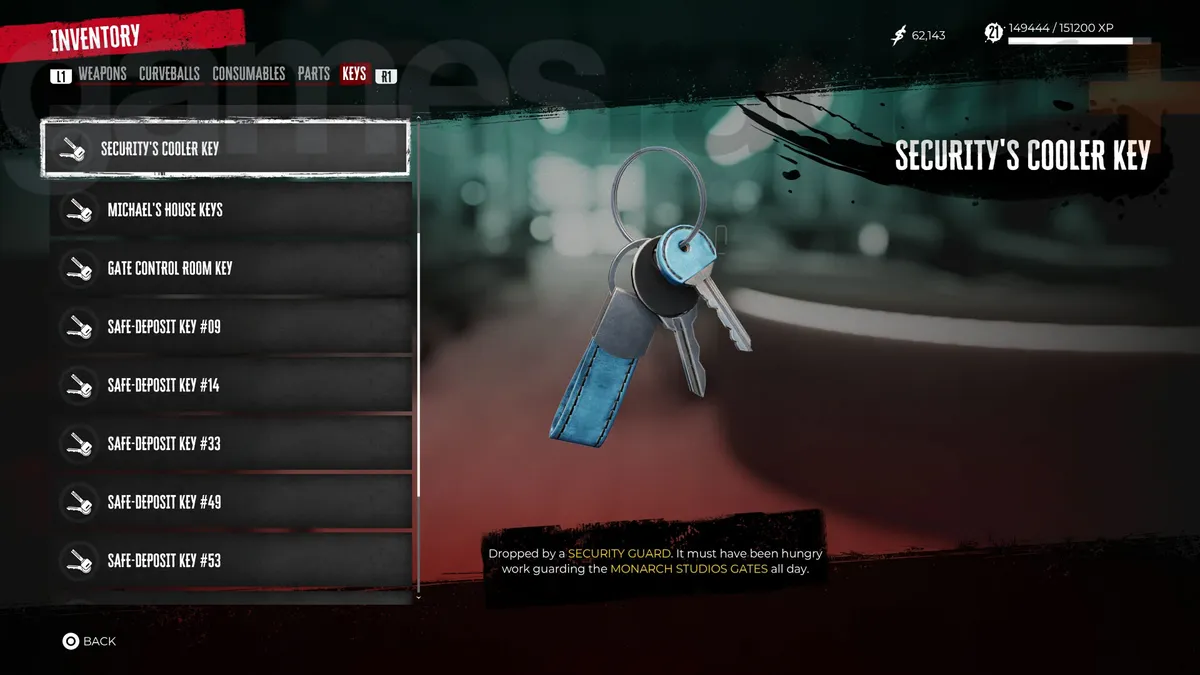
You'll find many Dead Island 2 keys on your travels, and while some have an immediate use there are plenty that require backtracking to reconnect them with their lock. If you open your Inventory, move over to the Keys tab then scroll through your collection, you'll see a little note against each one saying which area of LA they can be used in, along with a clue to point you to the actual location – making it much less of a wild goose chase to work out where they can be utilized. Any safes you've previously encountered should be marked with a lockbox icon on your map, which can also help identify where to head to once you have the key. We also have individual guides for where to find these keys specifically:
- Dead Island 2 Coach's Car keys
- Dead Island 2 Curtis' Safe key
- Dead Island 2 GOAT Pen Master keys
- Dead Island 2 Mailman keys
- Dead Island 2 Obi's key
10. Grab all of the supplies and cash you can

Always take the time to look around each new area for crafting supplies, searching all drawers, containers etc, as you can carry up to 99 of each type of material and they're all useful for upgrading your weapons. You should also keep an eye out for wallets containing cash, which you can just walk over to collect and don't need to interact with, as cash is key for repairs and upgrades. After clearing out a big group of zombies, make sure to take a quick lap of the area to grab any supplies and cash they dropped before you move on to the next area. If you find you're dropping supplies from searched containers or are unable to pick them up as you've maxed them out, sell some of them to the next merchant you meet for some extra cash and to free up storage space.
11. Check Side Quest rewards to prioritize time

There's almost 50 Side, and Lost & Found, quests to discover, so they can be difficult to keep on top of when you start racking them up. To help with this, head to the Quests section of the Player menu then move to the Side or Lost & Found tab and hover over each quest to see the rewards available on the right of the screen. All quests grant XP, but some also provide cash, blueprints, curveballs, and even exclusive weapons for your trouble, so this can help you decide which assignment will benefit you most to tackle first. Once you've picked a quest, you may need to use Dead Island 2 fast travel to reach the appropriate area of LA so you can begin.
12. Glass can be broken to open new paths

Although you'll regularly encounter locked doors that can temporarily halt your progress, you'll also find glass windows blocking your path that put up much less resistance. A swift kick or weapon swing should be enough to shatter the pane and open a new path for you to proceed into an otherwise inaccessible area – though have a quick scan around for alarm boxes that may be triggered first, as otherwise the breakage could set off an alarm that will draw any nearby zombies to your location.
© GamesRadar+. Not to be reproduced without permission.

