Silksong walkthrough for the best start and where you should go first
Here's where you should go in Hollow Knight Silksong in the first few hours
Weekly digests, tales from the communities you love, and more
You are now subscribed
Your newsletter sign-up was successful
Want to add more newsletters?
Knowing where to go first in Silksong is quite simple at first but there are several paths you can take once you reach The Marrow. It's a large area packed with enemies, so it's not easy to get through but there are some incredibly useful upgrades you can buy and unlock that will massively improve your Hollow Knight Silksong experience. If you're lost or confused about where you should be going, I've laid out a walkthrough covering the first four areas of Silksong to help you get off to a good start.
Hollow Knight Silksong opening walkthrough
The opening half-hour or so of Silksong is very linear, taking you from the depths of the Moss Grotto to the decrepit village of Bone Bottom where your quest can begin properly. But beyond that, many paths appear to present themselves, and while they often converge, you can still end up feeling rather lost and without any help as you face all sorts of enemies.
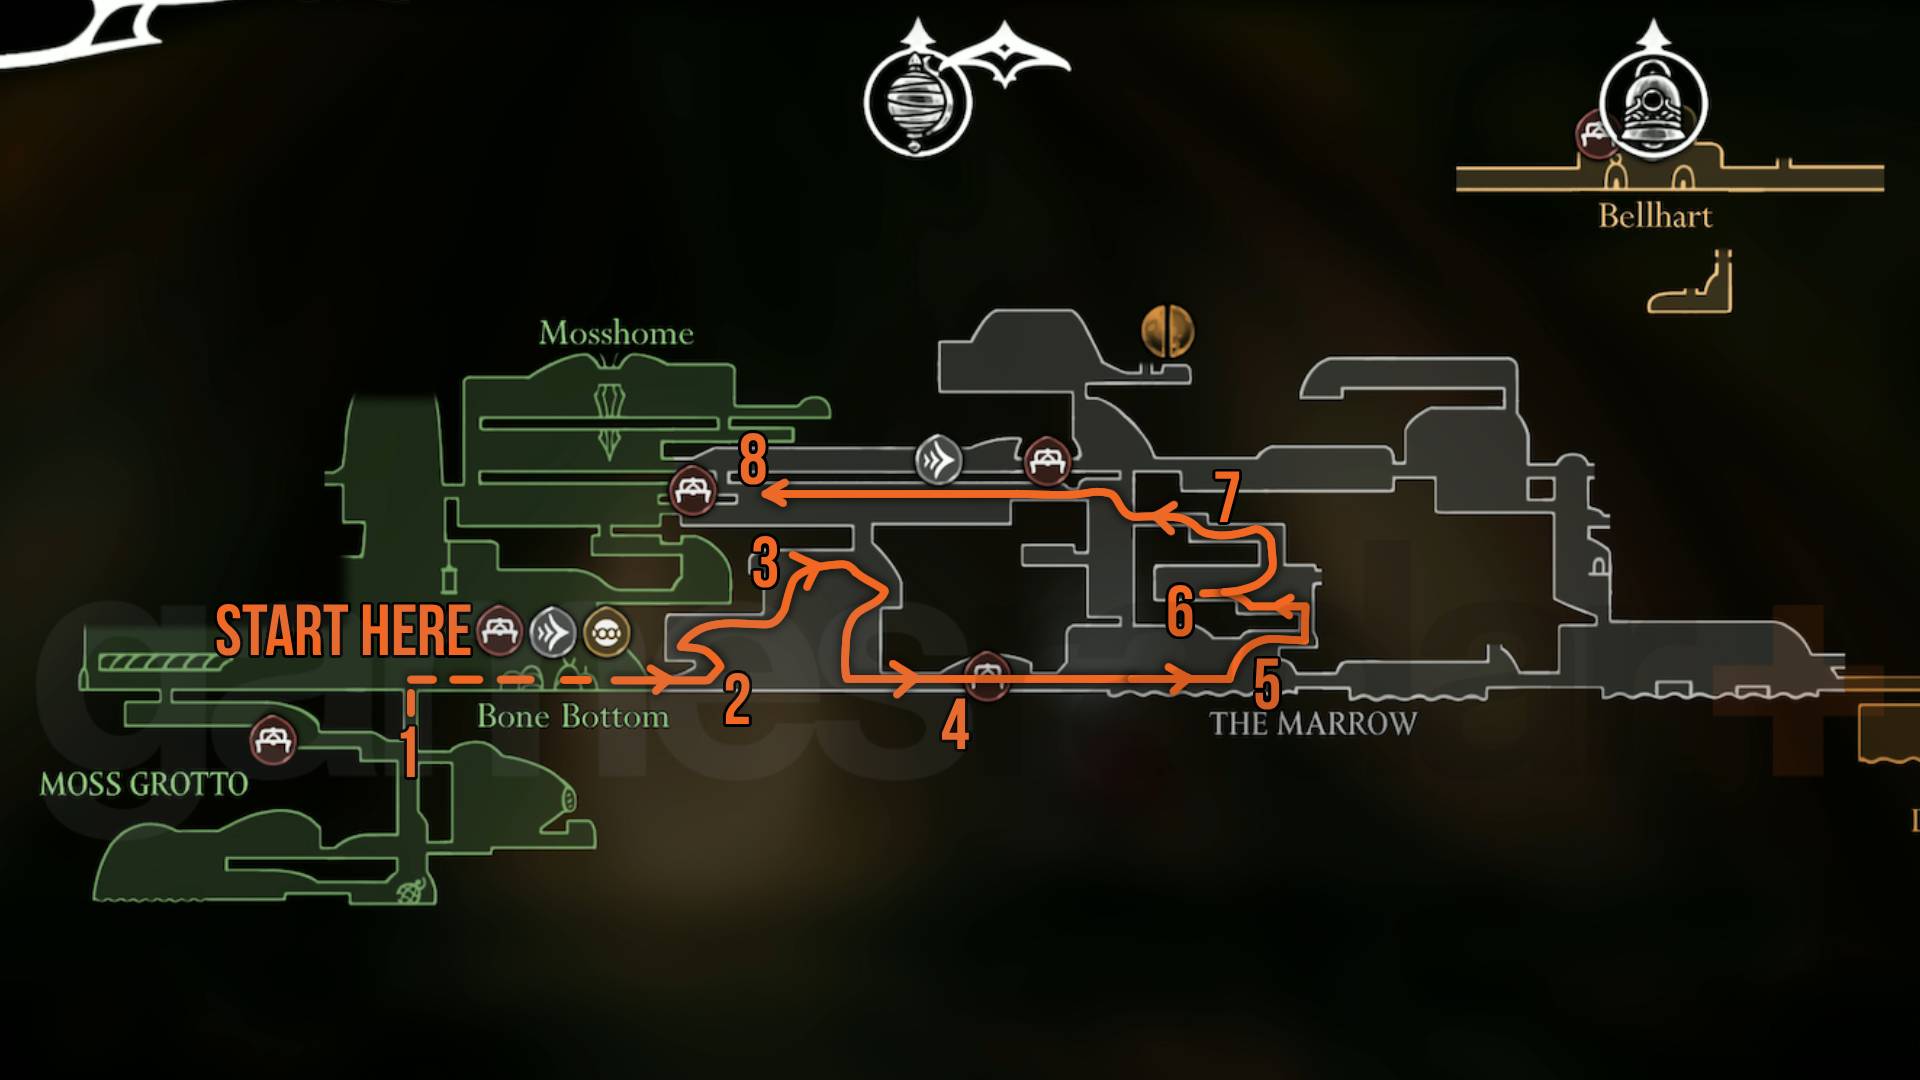
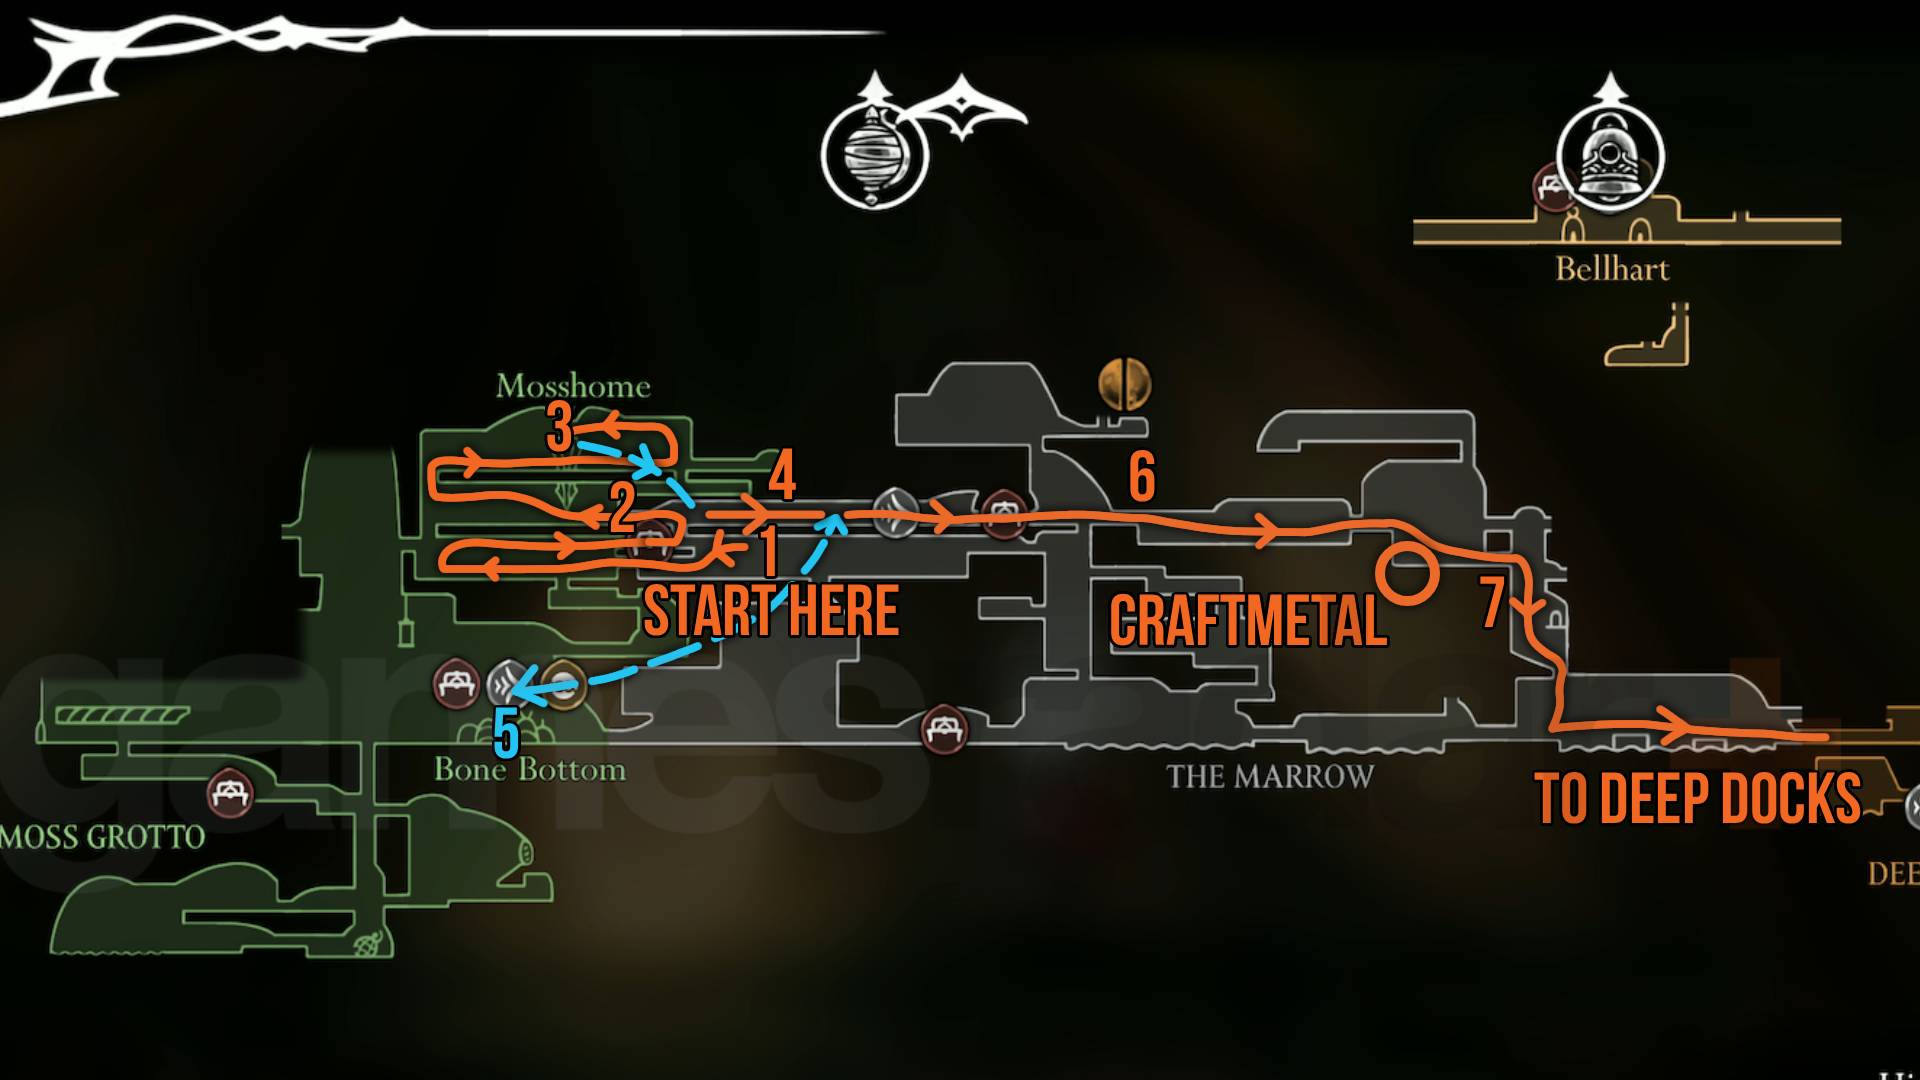
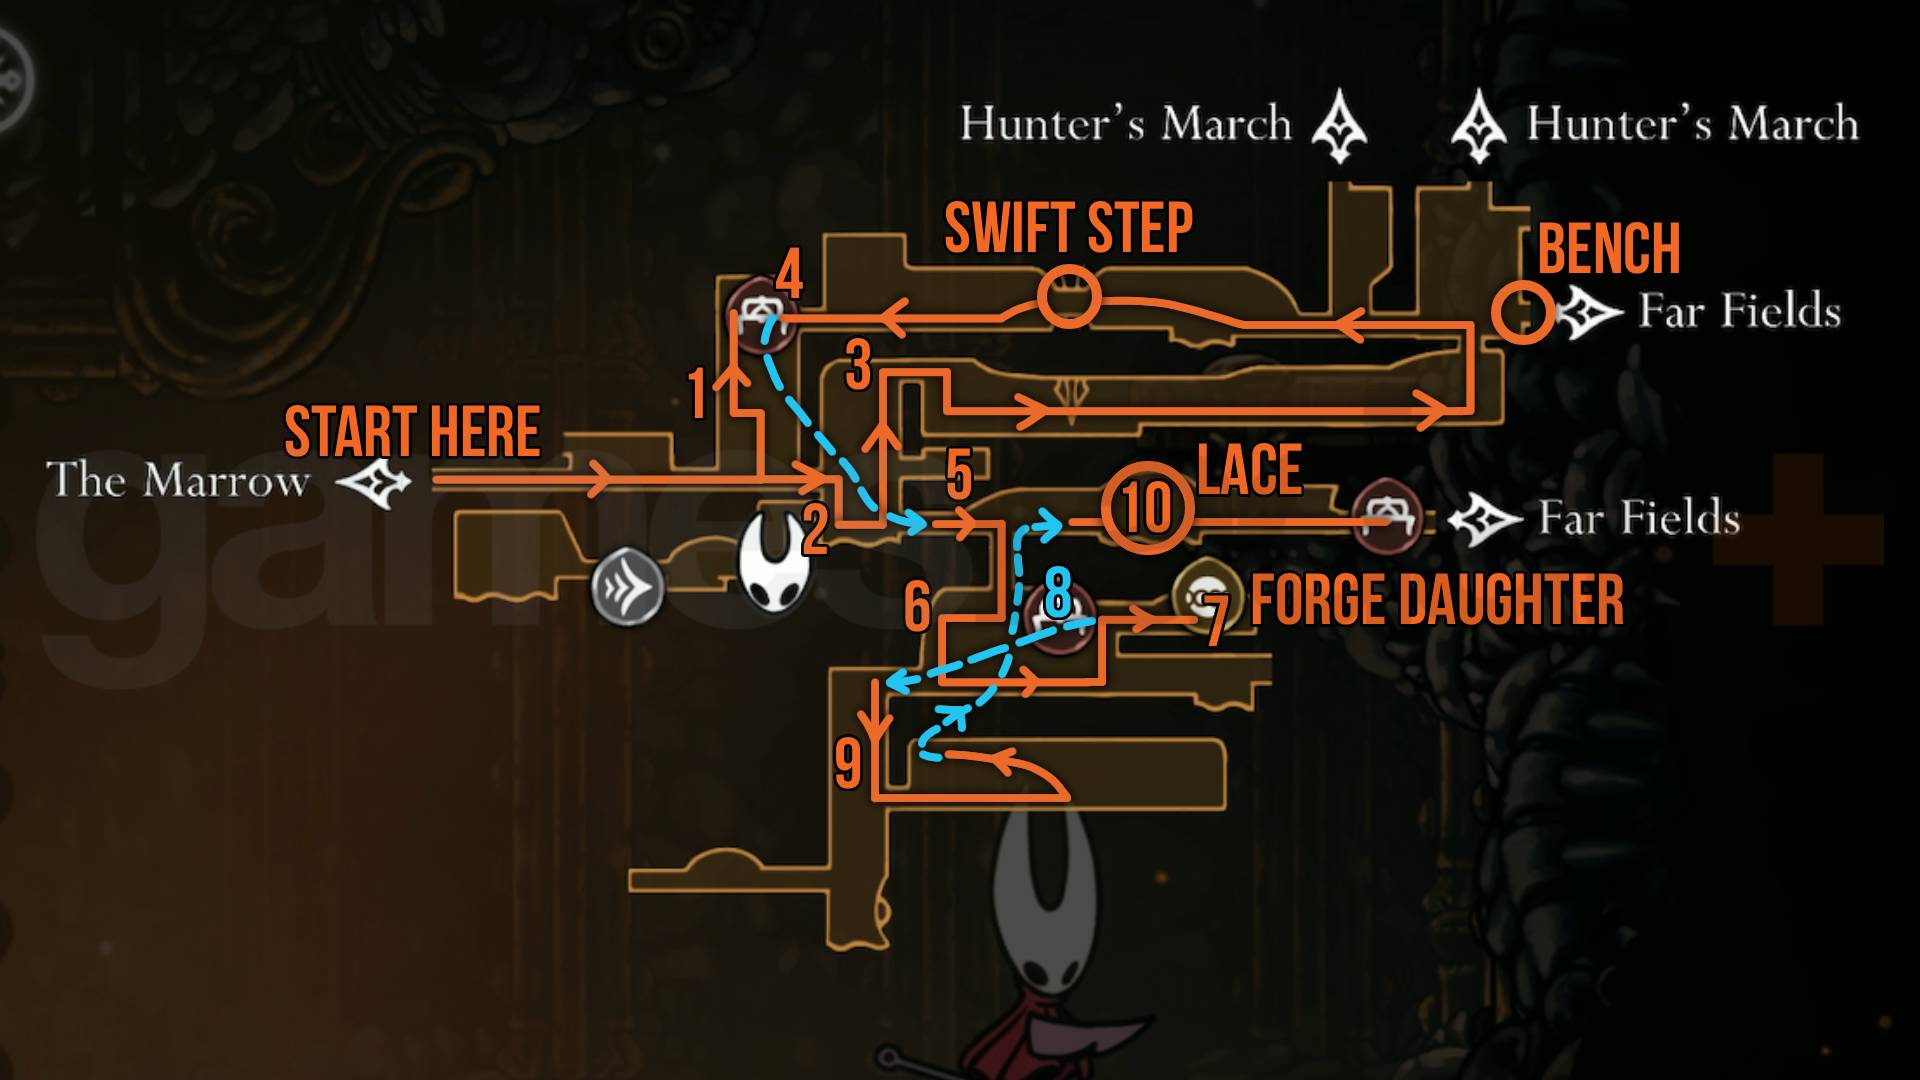
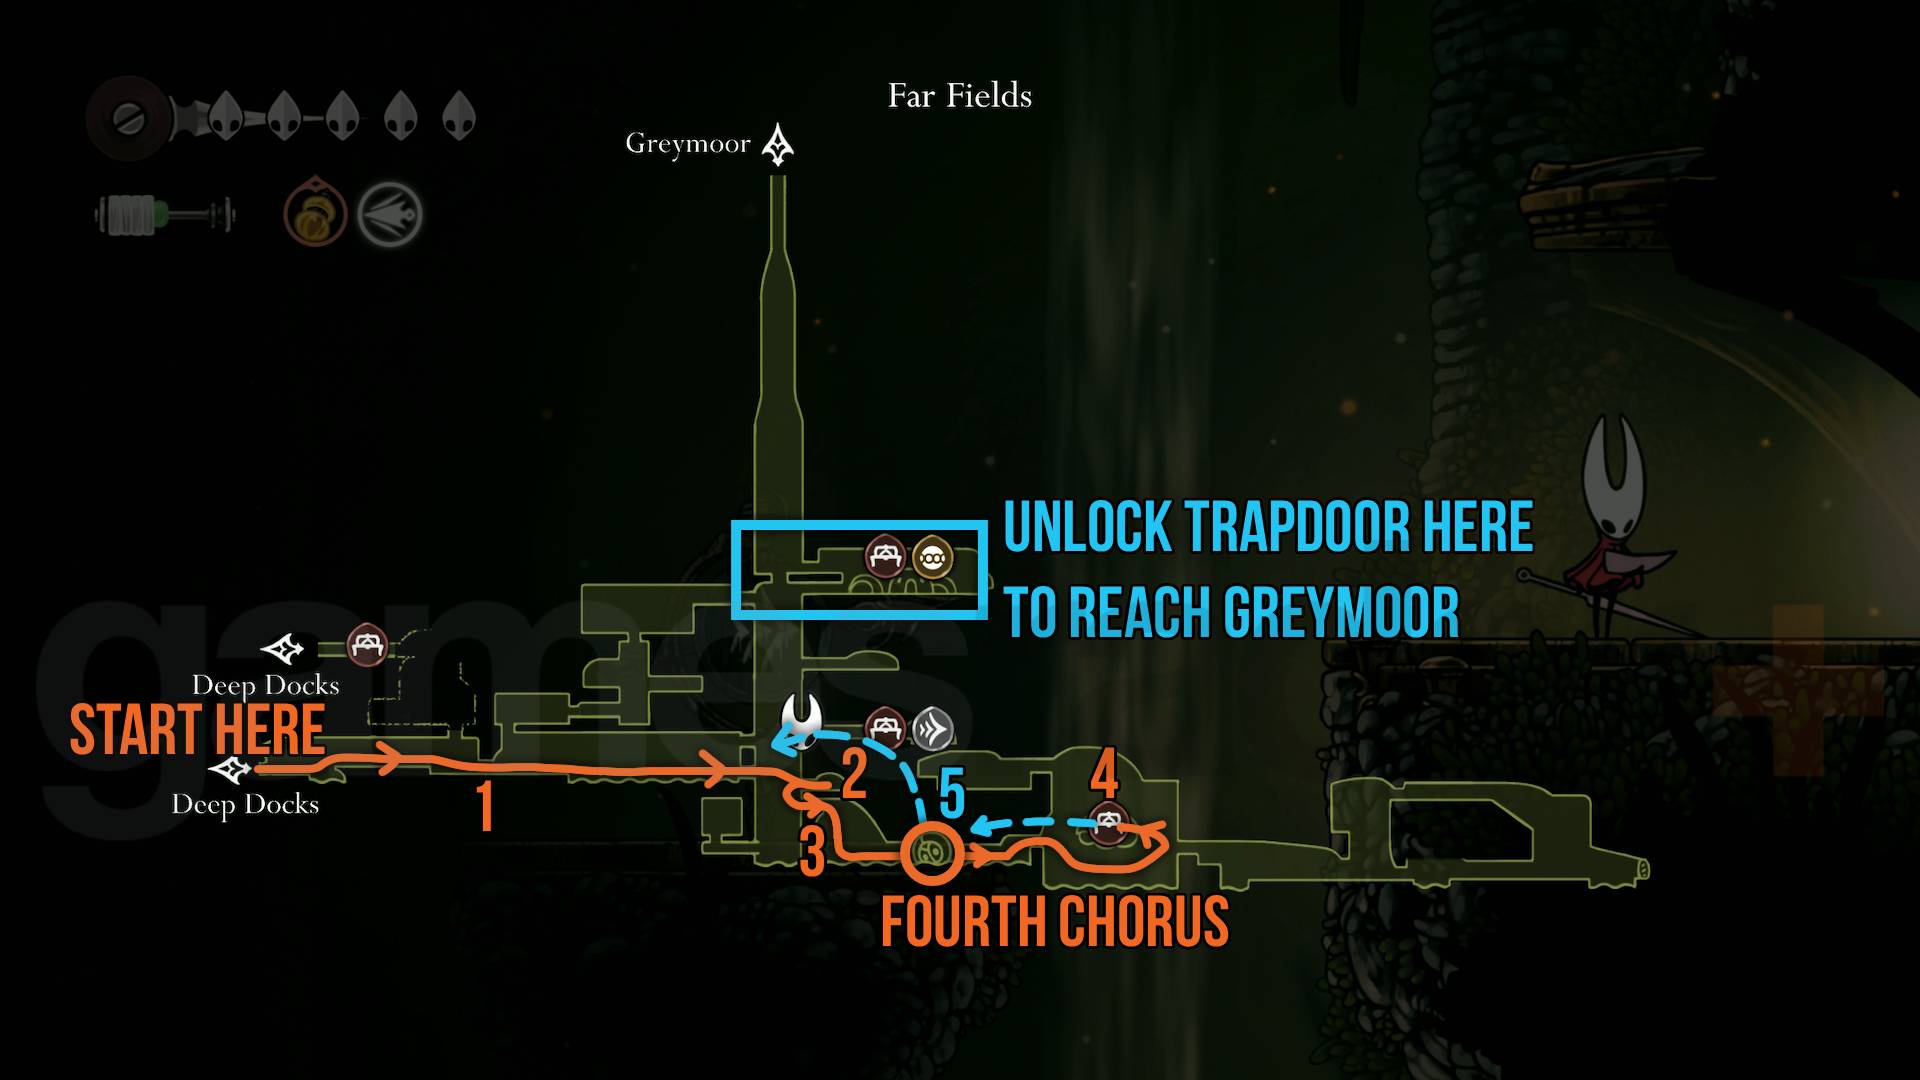
The maps and instructions below will help you reach important NPCs and items along the critical path as efficiently as possible, helping you get off to a great start on your Silksong journey. As a quick note on the maps, you should follow the orange paths from the clear "START HERE" point and the numbers starting from 1. Blue paths and numbers do not show a direct path but are there to explain that you should backtrack or fast travel to a previously visited location.
So, starting from Bone Bottom, here's where you should go first for the best start:
1. Finding a map
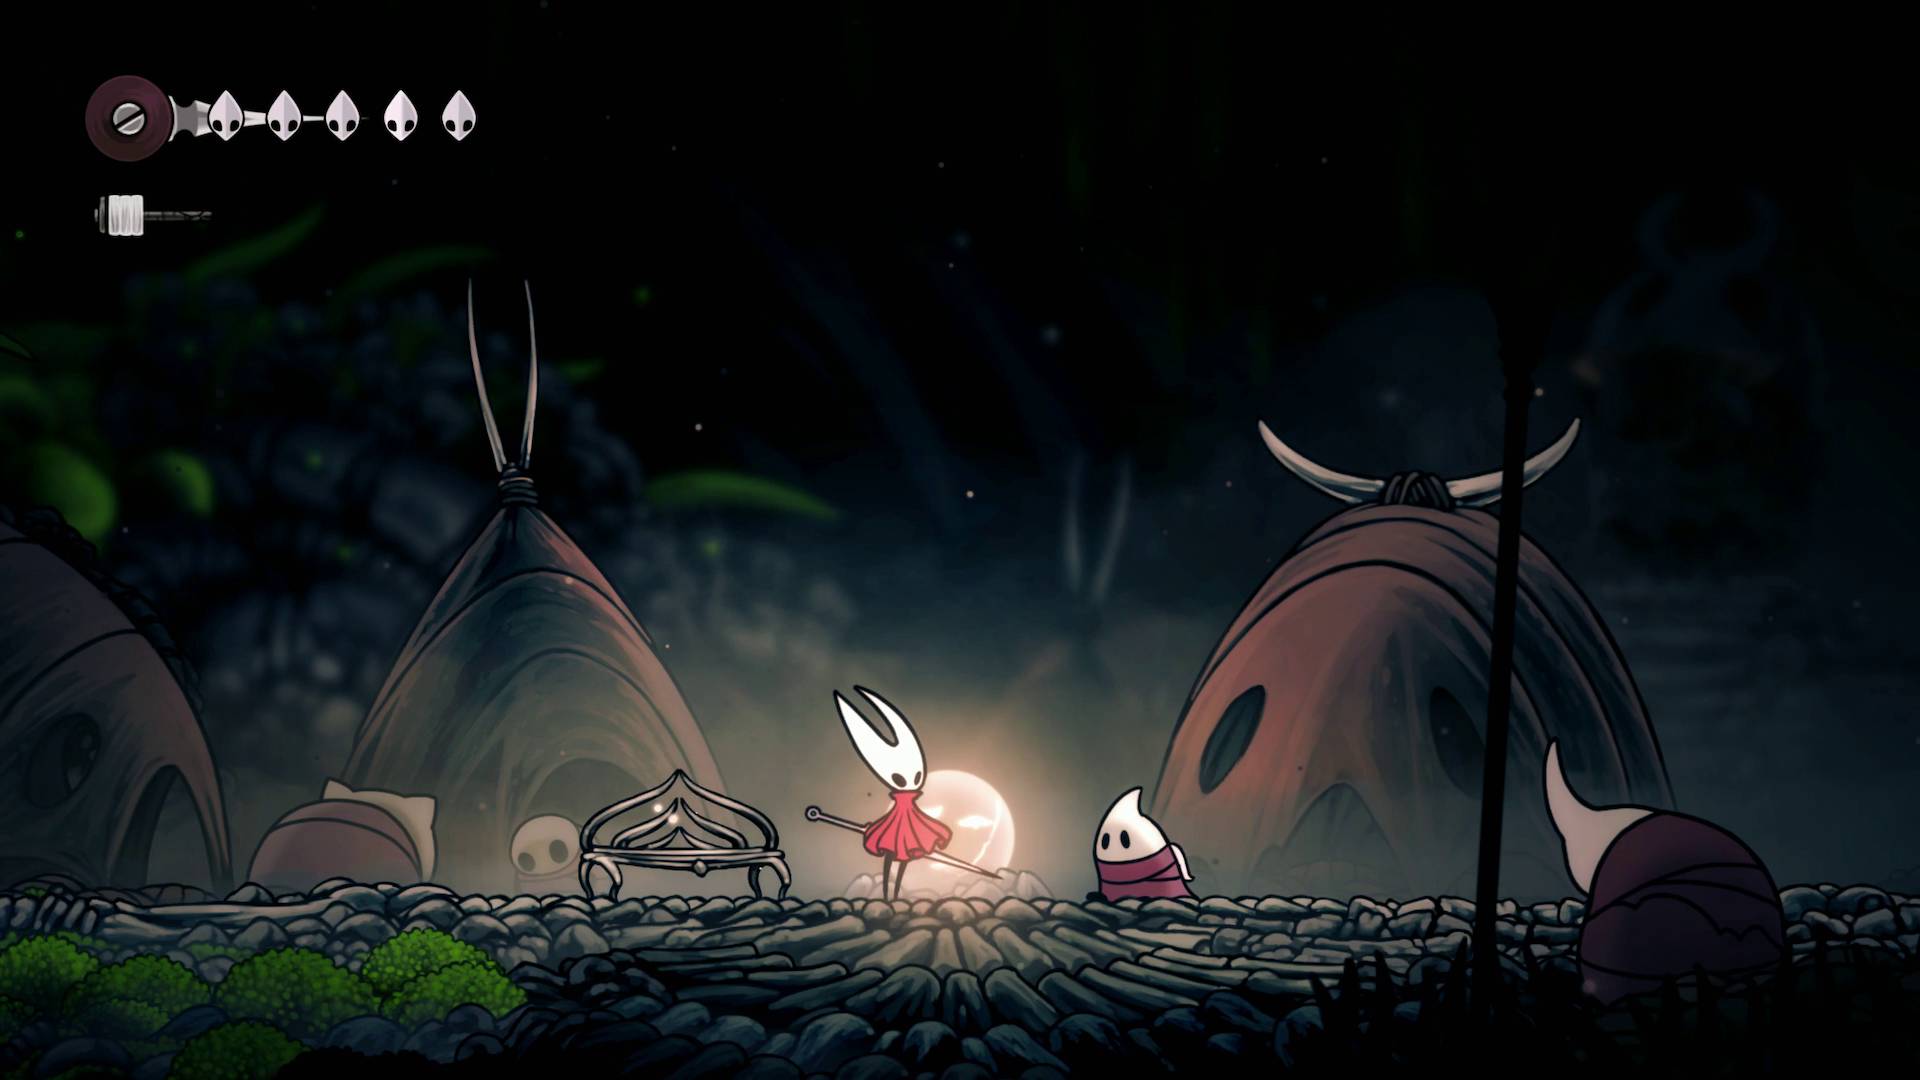
- Firstly, if you haven't already, make sure you've got the two Silksong Mossberries found in the Moss Grotto as these will come in handy later. One of them can only be reached using Silksong pogo jumps, so this is a good opportunity to get some practice in with this core mechanic.
- From Bone Bottom, go right and head into The Marrow. If you carry on along the ground-level path, you'll come across Sherma who is trying to unlock a gate with enthusiastic but ineffective singing.
- Use the upper ledge to access a new path that goes up, right, then down to get around the locked gate. You'll have to go through a gauntlet featuring several enemies to reach the other side of the gate. Just before this arena, there's also a secret path behind a breakable wall on the right that leads to a large stash of Rosaries. You may want to come back and collect these later, but gathering Rosaries is important for later. Once you've completed the gauntlet, drop down and go left to find the locked gate and lever. Jump and attack the lever to open the gate.
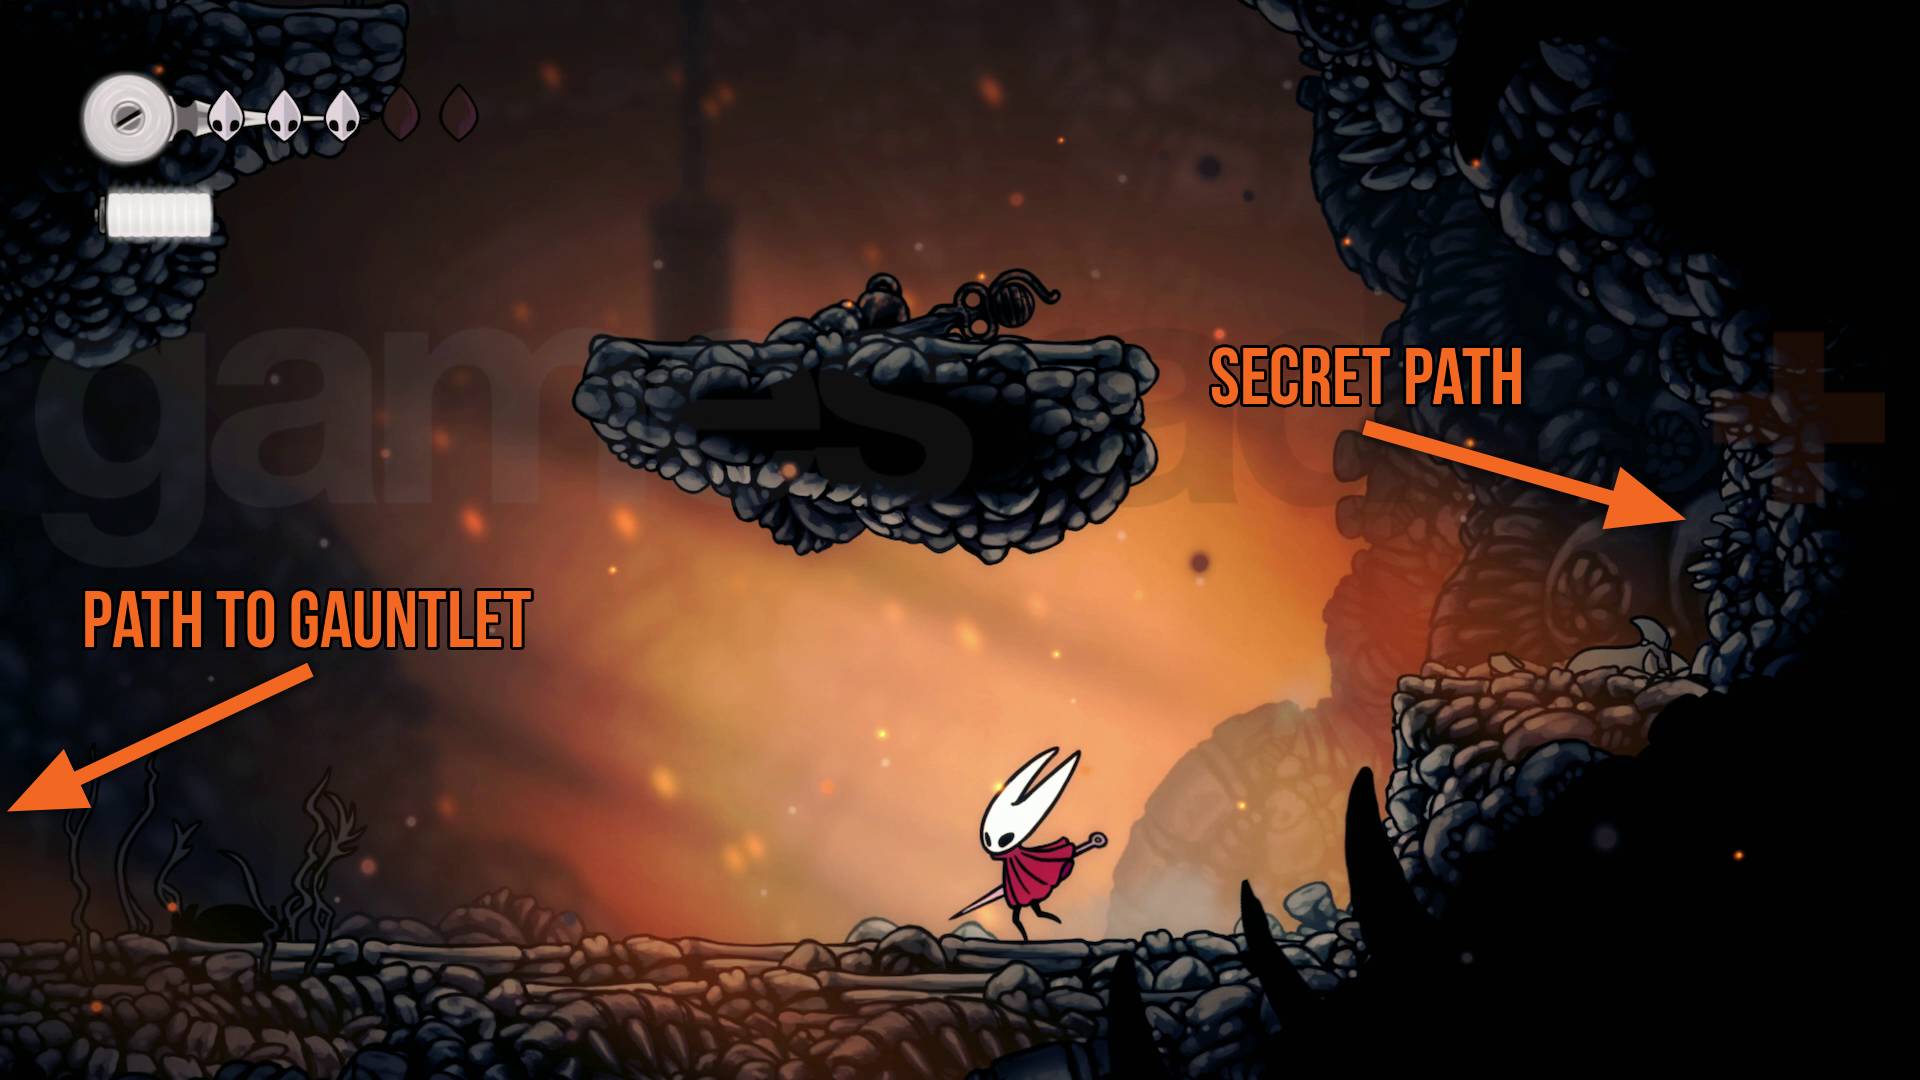
- Continue right to reach your first resting bench. You will have to pay 30 Rosaries to unlock this. Rest, then continue heading right into The Marrow proper.
- Keep heading right until you reach a small island in the lava with two floating platforms above. Use these to climb up, bearing right, to reach a tunnel with a strange, wheeled device with a light on top and a white painted symbol. Go to the end of the tunnel, jump into the next area, then follow the path to the left and up to reach a small camp.
- Speak to Fleamaster Mooshka and accept The Lost Fleas Wish. We've got a guide covering where you can find the first five Silksong fleas, which you'll encounter on your travels through the first few regions of the game.
- Follow the platforms and path up and left. When you get to a new area with a spine bridge, use the floating platforms to go up and left again.
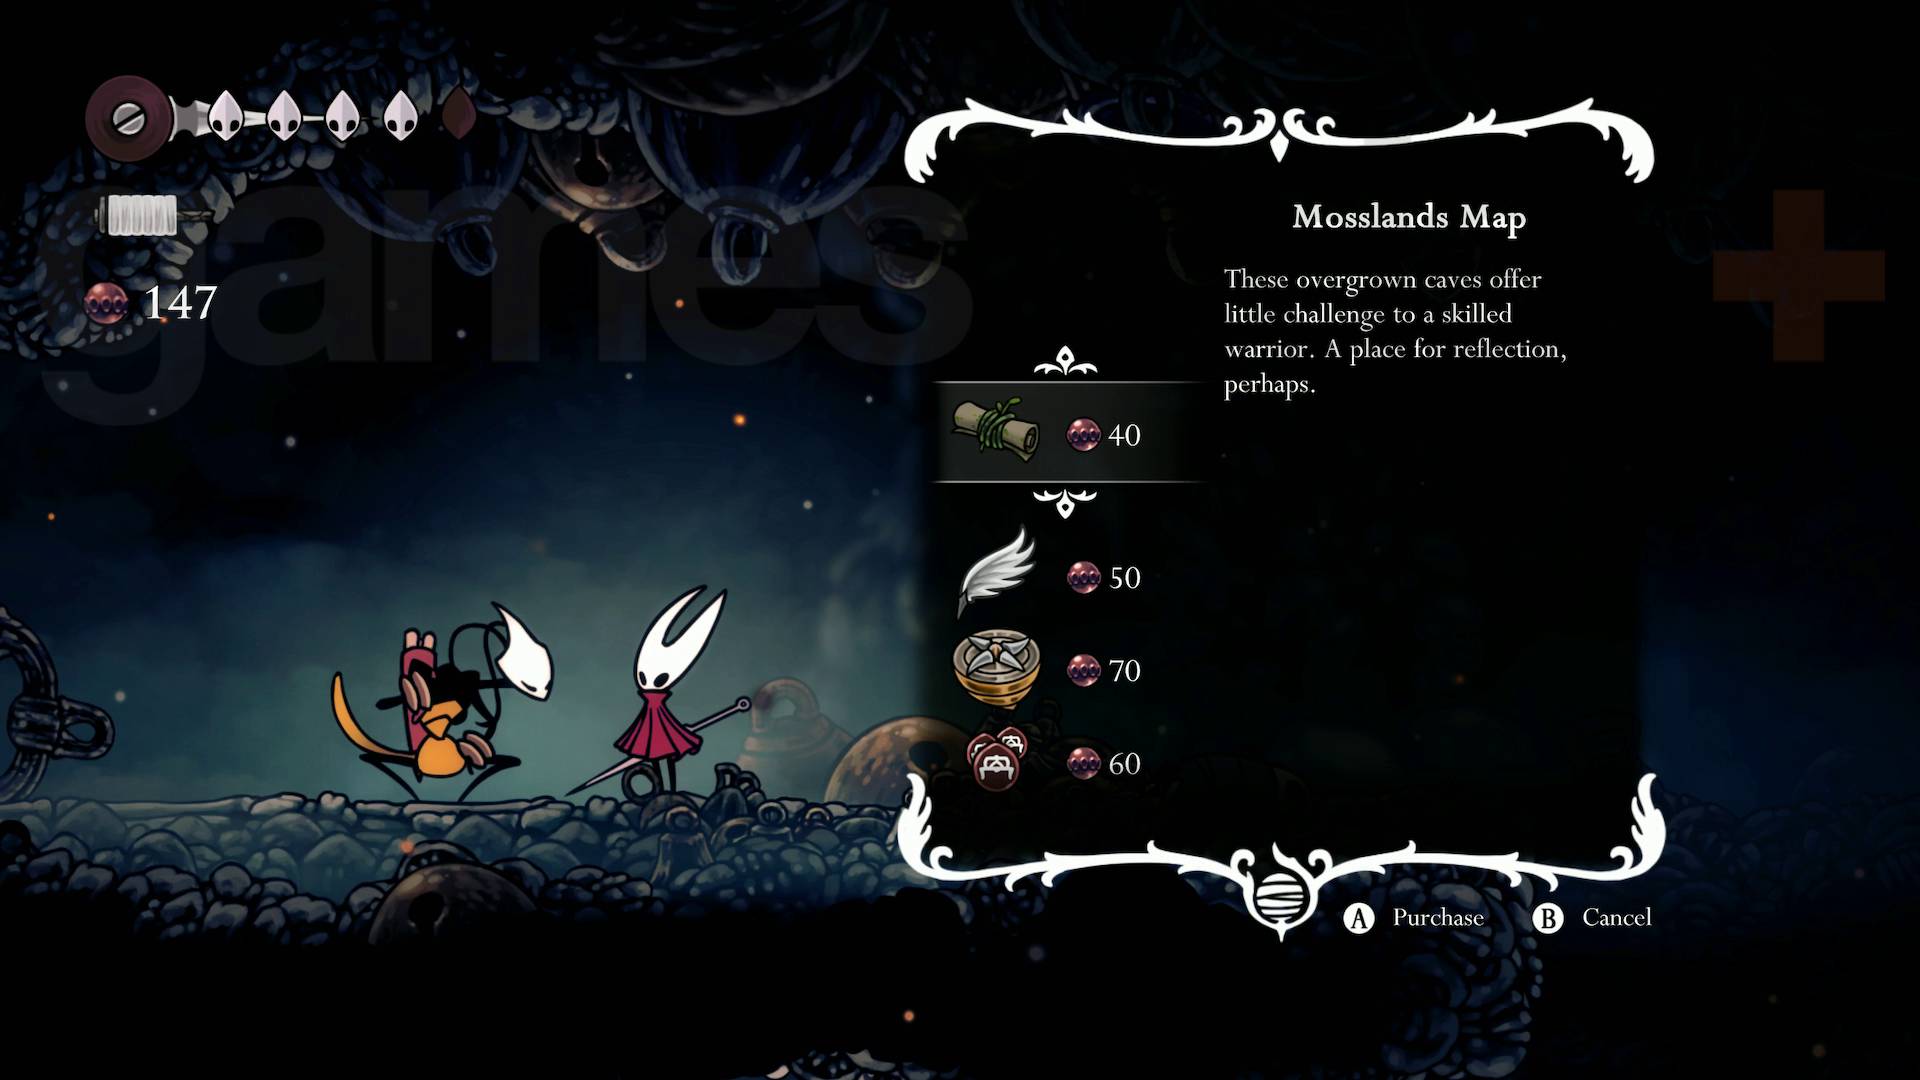
- In the next cave, keep going left and follow the singing to meet Shakra. They sell all sorts of useful navigation-related items, including Silksong maps. I highly recommend spending your Rosaries on the Mosslands and Marrow maps as well as the Compass and Quill.
2. Mosshome and The Marrow
- Beyond Shakra, you can drop down and head left to reach an area that introduces Pilgrim enemies. Run left until you reach some platforms that you can climb up, then start heading right along the upper path to eventually reach a resting bench in the next area.
- From the bench, you can go up to the next junction area, then I advise going left to reach Mosshome – a small region full of various Pilgrim enemies. Importantly, they all drop Rosaries when killed, so this region is a great place for farming Rosaries so that you can buy more stuff from Shakra.
- Progress through Mosshome to unlock the Silk Spear, then use it to uncover the Druid's cave. Speak to the Druid and you can promise to give them three Mossberries, and you should already have two. Use the previously linked guide to find the third, then return to the Druid to get the Druid's Eye amulet.
- Go back to the junction area and go right to face off against the Silksong Bell Beast. Beat this boss and you'll be able to unlock and use Bellway stations for fast travel between regions.
- Fast travel back to Bone Bottom and check out the Wishwall. You can take on the Bone Bottom Repairs and Garb of the Pilgrims Wishes, the latter also being a good excuse to revisit Mosshome and farm for more Rosaries. You may also want to buy the Magnetite Brooch from Pebb to increase your Rosary gains. Explore the deeper parts of Mosshome and you can also find a Spool Fragment.
- Fast travel back to The Marrow and then carry on exploring beyond the Bell Beast arena. You'll encounter new foes as well as red flowers which you'll need to pogo jump off to reach new heights. There's also tucked away cave that has an glowing orange substance at the end of it. Hit it (and make sure you run away to avoid the explosion) to reveal a metal ore that you can break to get a piece of Craftmetal, which will come in handy later.
- Keep descending through The Marrow and you can stumble into the Silksong skull ant boss who guards the way into Hunter's March (I recommend coming back here later) and, eventually, an entrance to the Deep Docks, which is where you should go.
3. Deep Docks
- Upon entering the Deep Docks, keep heading right until you reach a lift. Ride this up and the next one to reach a resting bunch (you will need 30 Rosaries to unlock this).
- Go back down and carry on the path you were on to find Shakra and buy more map gear from them, then go through the doorway to the left and pay 50 Rosaries to unlock the fast travel station.
- Next, you need to head upwards and to the right through the Deep Docks. Eventually you'll reach a point where you can unlock another bench, which you should do, and then go back and follow the path that goes up and left. You'll have to beat a gauntlet of red ant enemies but after that, you can unlock the Swift Step Ancestral Art, letting you sprint and dash around.
- Carry on going left until you reach a locked gate which you can open by hitting the lever. This links to the first resting bench you found in the Deep Docks.
- Head back down to Shakra, then go through the door to the right. This leads into a narrow, industrial corridor with a trapdoor that you can activate by hitting a lever. Use it to descend into the next room.
- Go left and take the lift down, then keep going right until you reach a gauntlet. Defeat all the enemies and some steps will appear, letting you use a couple of trapdoors to go up.
- Head right and you'll run into the Forge Daughter vendor. I recommend using your Rosaries and that Craftmetal chunk you got earlier to unlock the Sting Shard, a mine-like tool that you can chuck out for enemies to run into and take damage.
- Go back the way you came and keep going left to eventually find a bench to rest at and a lever that unlocks a gate, linking this path up with the trapdoor from step 5. Keep running left and use the lift from step 6 again, except this time you should go left into the next area.
- Drop down the platforms in this room and head through the first open door on the right to get into another room with a floor and hanging platforms made of hot coals. Use the platforms to jump up and to the left to reach a ledge that holds the second Spool Fragment.
- Go back the way you came all the way up to the industrial corridor in step 5. Keep running to the right down this corridor and you'll eventually reach a boss called Lace. Defeat them to unlock path ahead which leads to a bench and the Far Fields.
4. Far Fields
- Continue heading right to enter the Far Fields. You'll need to use Swift Step to leap across large gaps and you'll also come across some tough red ant enemies, so be careful.
- Follow the metal rings wedged in the ground, (Shakra's weapon of choice) to eventually find Shakra hidden in a cave. Buy the Far Fields map off them.
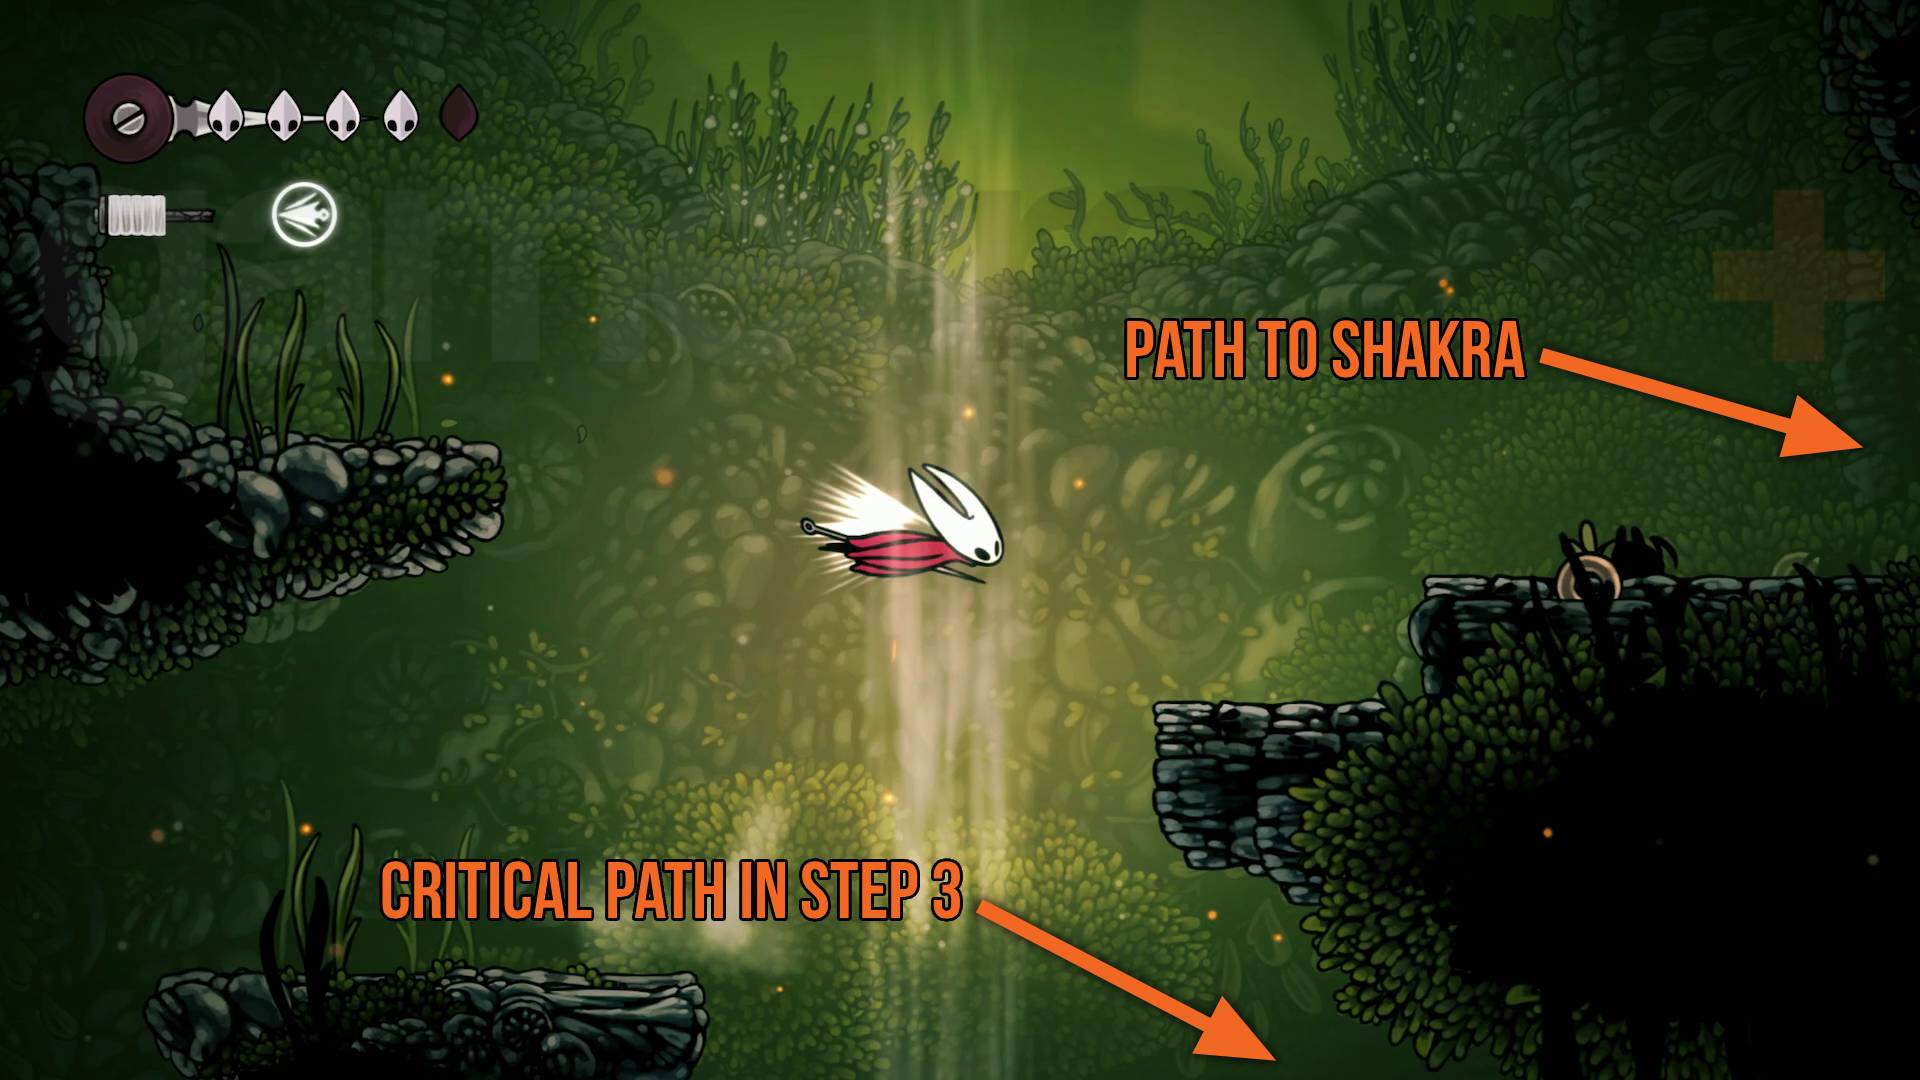
- Go back to the previous area and drop to the next ledge on the right, then head through the doorway. This leads into a massive floor-is-lava cave with a spine bridge which you just need to keep running through.
- In the next area, you'll see a floating balloon house which you can climb up to using the suspended platforms and nearby cliffs. Head inside and talk to the Seamstress and take on her Flexible Spines Wish. We've got a separate guide detailing how to collect the necessary Hoker Spine Cores in Silksong, so check that out then come back here and hand over the spines to the Seamstress to unlock the Drifter's Cloak upgrade.
- Now you can go back the way you came through the Far Fields but be aware that you'll have to fight the Fourth Chorus boss in the floor-is-lava cave mentioned in step 3. Beat this boss and continue going left until you reach the next main room, which is full of vertical air jets – you will have passed through here during steps 2 and 3.
Now that you've got several major Hollow Knight Silksong abilities and useful items, this is also the point where you can explore more freely. I recommend using your new Drifter's Cloak to ride the air jets and explore Far Fields a bit more as there are more benches and a station to unlock. It's also a good idea to go back to the Wishwall to see if any new side quests have popped up.
However, Greymoor is going to be your next target, but there are a couple of ways to get there. The simplest and probably best route is to ride the air jets and open all the doors, using the very top of the Far Fields chasm to reach Greymoor.
Alternatively, you could venture back to The Marrow and head into the Hunter's March Silksong region to make sure you get all five fleas. Go back to the Fleamaster and you can hitch a ride with the caravan up to a different part of Greymoor. It's not an especially good part but it does have convenient access to both Bellhart and Shellwood – the next areas to hit after Greymoor.
Weekly digests, tales from the communities you love, and more
The Silksong double jump and Silksong wall jump abilities are unlocked a fair bit after this, so persevere and you'll be able to enhance Hornet's movement!
© GamesRadar+. Not to be reproduced without permission.

Will Sawyer is a Guides Editor at GamesRadar+ with over five years of experience in writing online guides, news, and features, and has a BA (Hons) in Journalism. Starting as a freelancer, Will contributed to startmenu and Game Rant before joining the GamesRadar+ team in August 2021. Since then, he has written hundreds of guides about a huge range of games, with shooters and action games being his areas of expertise. Outside of writing about games, Will hops between multiplayer shooters with friends, such as Darktide and Helldivers 2, and delves into whatever has been on his backlog for far too long. He also tries to get through his never-ending Warhammer pile of shame of grey Tyranids, Aeldari, and Chaos Space Marines.
You must confirm your public display name before commenting
Please logout and then login again, you will then be prompted to enter your display name.
