How to nail all 50 Stunt Jumps in Grand Theft Auto 4
Videos and maps for every single jump in Liberty City
Weekly digests, tales from the communities you love, and more
You are now subscribed
Your newsletter sign-up was successful
Want to add more newsletters?
Join the club
Get full access to premium articles, exclusive features and a growing list of member rewards.
Stunt Jumps 26-30
The reason we're tackling jump 26 now and not earlier is because although you can see it from the first island, you'll get a 6-star wanted level if you attempt it before opening up Algonquin. Now, the best thing to do is line up your bike perfectly before you tackle the jump - then just back up without touching the steering at all. Now, assuming nobody gets in your way, you'll be able to take the jump knowing you're going to land in the centre of the bridge - the only place it'll register as successful.
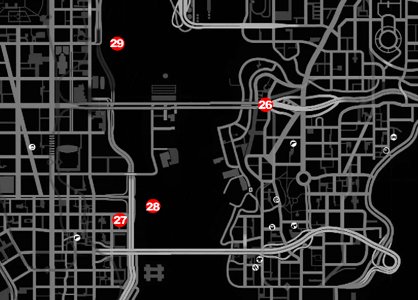
Nothing tricky for the next few, although there are loads of ramps in the water, so you might have to try a few before you find exactly which ones trigger the stunts. Check the video if you get stuck.
We couldn't figure out exactly where we were supposed to land jump 30 (which is up at the north of the island near jumps 17 and 18), as every time we landed up on the road it said 'not good enough'. So our advice is to follow the run-up in our video and just go as far as you can. It triggered for us in the water, so that's good enough.
Article continues below 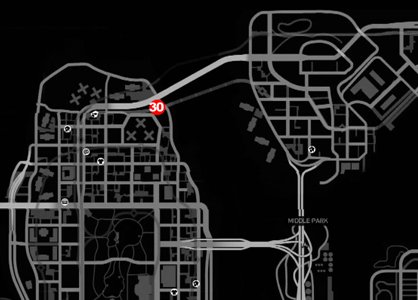
Check out the video for all the run-ups.
Jumps 31-35
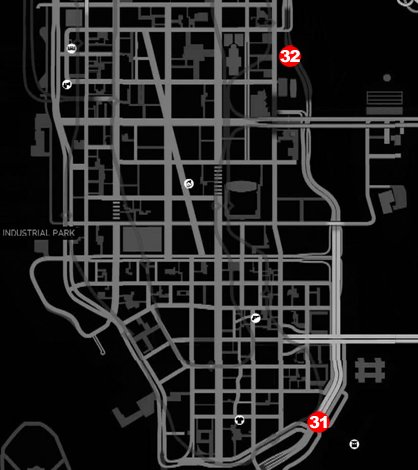
Jump 31 is simple enough, but 32 takes some finding. You'll actually pick up a 4-star wanted level for even attempting it as you enter the restricted area. By the time the cops realise you're inside, you should have made it to the staircase. Yes, on your motorbike.
Just head forward and left from the entrance to find the stairs, then follow the video. But be very careful not to go too fast over the ramp across to the first roof - it's very easy to overshoot. Once you've nailed the jump, there's a ramp in the garden to get you over the wall and on your way to freedom.
For the next jumps we say goodbye to Algonquin and hello to the fourth and final main island, Alderney. The jumps are pretty straightforward here, but that didn't stop us from falling off at every opportunity. It still registers, though.
Weekly digests, tales from the communities you love, and more
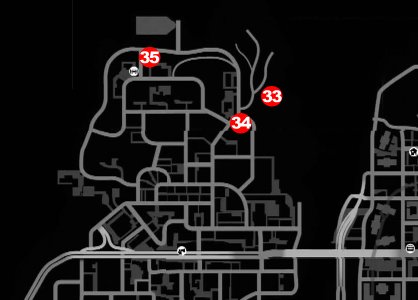
This is the north of the island - the map can get confusing this close in.
Jumps 36-40
You can probably clear the building in jump 36, but it doesn't seem to matter if you don't. The rest are pretty simple, with the only difficulty being controlling your bike over the bumps.
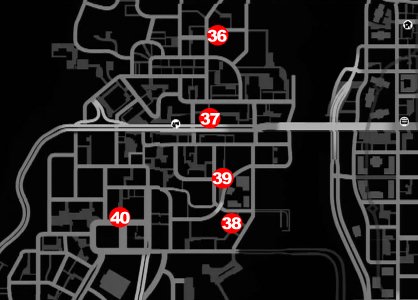
Remember, you can change your bike's position in the air with the left stick. Holding up will dip the front down, while pulling backwards will bring the front up from a nosedive. You can also turn the bike left and right, but remember that it will take a while to perform these actions in the slow-motion of the jump, so choose quickly what you want to do, then stick to it.
Jumps 41-45
Another set of easy jumps, although jump 45 has no obvious landing destination, so just launch yourself off the edge and hope you're going fast enough. As you can see from our video, it worked just fine - good job Niko was wearing his crash helmet.
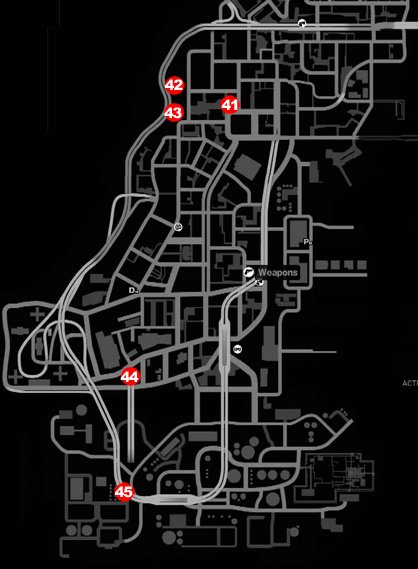
Here's the video... almost there now.
Jumps 46-50
Phew! Almost got them all, and we've saved the best for last. Jump 50 sees you soaring across the open water - of course you'll need some serious speed up for this one. Here's the map.
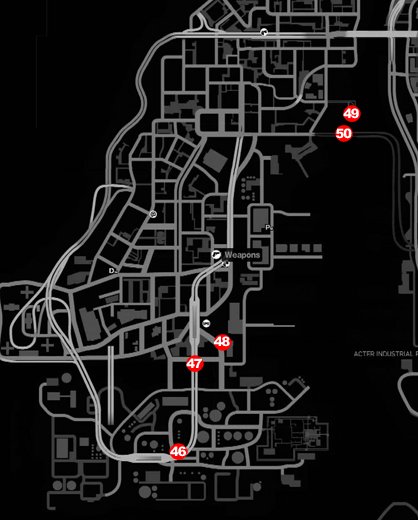
Check out the final video to see that skyscraper-bothering jump.
At this point you should unlock the Dare Devil trophy/achievement for completing all 50 unique stunt jumps. Congratulations!
Looking for more help? We also have a Grand Theft Auto 4 complete Pigeon location guide.

Justin was a GamesRadar+ staffer for 10 years but is now a freelance writer, musician and videographer. He's big on retro, Sega and racing games (especially retro Sega racing games) and currently also writes for Play Magazine, Traxion.gg, PC Gamer and TopTenReviews, as well as running his own YouTube channel. Having learned to love all platforms equally after Sega left the hardware industry (sniff), his favourite games include Christmas NiGHTS into Dreams, Zelda BotW, Sea of Thieves, Sega Rally Championship and Treasure Island Dizzy.
 Join The Community


