


This Sinking City 2 hospital walkthrough deals with the second area - Akeley Memorial Hospital - and the objective to Find Faye's body. This contains all the puzzles and solutions, as well as the best route to get through it all. This follows on from the Sinking City 2 walkthrough Part 1 that takes you through the opening city area of the game.
When you first arrive in this new area, head up the path, checking the left fork for a view and some dialogue before carrying on to Akeley Memorial Hospital. Before you go in, look for an item box in a tent by a green bus. Now head into the Hospital and use the Safe Room where you'll also find an item box. Directly opposite when you come out of the Safe Room there will be an ERC crate to note for later.
Ignore the door with a floating head on it for now and take the other door, picking up the Eye Technology note from the notice board as you pass it. Inside you'll find a door with a medical symbol on the handle that you can't open yet, so take the stairs up instead.


You'll find a door with a strange glowing face on a screen as soon as you enter the hospital. These are basically locks that need a face to open them. It breaks the building into three sections, and if you follow the story you'll eventually find all the faces you need.
Once a cutscene has played to reveal Faye's body, investigate the room to find an item box on a table and another floating head door, so take the corridor out and climb through the window outside instead.
When you go through the door outside to get back in you'll be attacked, so deal with that and then grab the item box around the corner, immediately as you came in, and one more near another floating head door.
There are some stairs down, but check the balcony through the door for an item box (and an ambush) before you go down. At the bottom you'll find an item box and map next to a door you can unlock for a shortcut back to the Safe Room area.

There's also a small locker room with an item in a locker and a Letter From Intern Dexter note. When you have everything, head through the double doors marked Anatomical Theater/Treatment room.
Go down the corridor until the door slams and then take the door you can use. Pick up the Station Manual + Occult Symbol note on the desk to get your first blue Symbol. You can't use the device here yet, so check the map on the wall nearby to get the Prism System Schematic note that mentions the Treatment Room, Chapel, and Basement.
Now duck under the partially opened shutter to find Faye's body and get a new objective.
Charge the Prism at Three Stations

You can't reach the Prism through the shield yet, so head through the open door by the body in the chair and read the Prism Station Reset Protocol note then connect it to the Prism System Schematic note in Investigations to complete the group and earn an upgrade point, then pull the lever in the room to disengage the shield around the Prism.
Grab the Prism and then run out of the open door to escape the ambush. A cutscene will play and you'll fall into the Lower Yard. Grab the item box by the truck and then go in through the white door.
Pick up the On Mirror Doors note and then turn away from the Mirror Door and head down the corridor to get a tease for a new monster, then head through the gate. You'll find a Rusted Lock here to come back to later and see a Prism station through a window.
Squeeze through the gap and follow the corridor around. You'll be attacked, including another version of the Lorelei boss with pustules and back eggs, so shoot them in the legs and stomp the eggs when they're down to save your ammo. Get past them and you'll reach the Morgue.

In the Morgue, pull out all the body trays for some items and then check the Morgue Worker's Memo note on the desk. There's also an ERC crate just around the corner, an item in the blue lockers, and some more body trays to pull out for more items and a face for the Mirror Doors. Pick it up and then rotate it around, finding various interaction points that will eventually open its case. Once it's open a cutscene will play.
After the cutscene you'll be attacked, so grab the face. You can run out of the door smashed open by one of the enemies, but it's probably better to deal with them now as you'll come back later. Whatever you choose, leave via the smashed open door to find a basement map, a Safe Room, and an item in the locker next to the Mirror Door you can't open.
Next to the Safe Room is a locked door, which you can open for a shortcut back to the Lower Yard you fell in before. Head through the white door there to find a Mirror Door matching the face you have, so open it and head upstairs.

In the first door you reach at the top of the stairs, you'll find a yellow item crate and an ERC crate pen in the toilet. Grab that and head back through the Lower Yard to open the crate in the Morgue quickly while it's so close, for an Inventory Upgrade and an item.
Go back up the stairs and towards the poster to interact with the shimmering light, to reveal a blue Symbol.
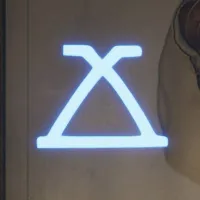
Now go up the stairs again, where you'll find an item in a chest of drawers near the windows. Go through the door surrounded by mannequins, then grab the items in the two yellow boxes and the Anti-Rust Acid.
Now go back down the stairs and head out of the door to the left of the poster where you saw the symbol. On the left outside you'll find items in a blue drawer and a yellow box on a wheelchair, grab them and then go right into a large yard called the Therapeutic Garden. You'll have to deal with enemies here before you do anything - lure them into the bear traps if you can.
At the far end of the yard you'll find a yellow item box and a glowing bear trap you can examine to find another blue Symbol. There's also an item in the blue drawers near the door. You can now connect all the blue Symbols in your Investigation tab for an upgrade point.
Find the white door up the stairs with the sign for the 'Central Staircase' and the rusted handle, and use the acid on it to open it. Save the acid for the other rusted handle you found earlier, but you'll need a combination for what's inside so don't go there yet.
Head straight ahead towards the Anatomical Theater with Faye's body inside. You can't get in through these doors, but to the left is the purple/blue Prism Charging Station.
How to use the Blue Prism Charging station

To charge the prism you need to rotate the three rings to display one of the three blue symbols you've found, so that they align between the blue arrow at the top of the machine and the one on the Prism, as shown in the images above. There doesn't seem to be any clear information as to which symbol goes where, but you'll only find one of each correct symbol per layer.
Once you have all the symbols lined up, you'll also need to hit 'validate' it to then charge it and receive a partially charged Prism.
When you head out of the room you'll see the Doctor walk past and be attacked. Deal with the enemies and then follow the Doctor into Reception, where a cutscene will reveal a new enemy you can't fight so run to the nearby Mirror Door and use the face to escape. At this point the black creature will patrol, appear, and pursue you at random points, so be prepared run away and lose it from time to time.
Through the smashed open double doors to the right you'll find another Mirror Door you can't open, an item box near a wheelchair, and an open door you can go through to find a Memo: Repairing the Key note and half a new Face. You'll have to rotate its case around again to find interaction points to open it and take it. Once you have it you'll be attacked again, so fight or dodge through them and head upstairs where you'll find a new map.

Visit the Outpatient Room, where you'll find an item box and a Digit '3' note. Back out in the hall you'll find a Hasty Note note in the corner on the trolley that the 'Caduceus Key is in the West Wing'. This is the medical symbol you found on a door earlier and is also on the Isolation Wards door right by the note. Head out the open door that's hanging off its hinges to reach a small outside balcony.
Go though the open window to find a pink Symbol and an item box, before unbolting the door to get back to the hallway you were just in. You can either go through that door and back around to the little balcony area, or back through the window, and unbolt the door there for a shortcut back onto the Upper Hall.
At this point I was attacked by the black creature and had to run away, although I'm not sure if it was scripted or a random encounter. Whatever happens to you, head to the Prosthetics Workshop where you found the Anti-Rust Acid (the door with mannequins outside) and place the half face in the machine there.
Now go to the Staff Room on the 2F and get the Staff Memo Incursions note on a noticeboard, an item box on a chair, and a Folded Note note on a table. Pick them all up and head through the door onto the balcony to find the Caduceus Key, the medical symbol you've seen on a few doors. Predictably, you will be attacked, so run or fight as you see fit to get away.

Head to the Pharmacy on 1F and use the Caduceus Key to get in. Listen to the Radio and pick up an item, then look at the glowing book to get a new pink Symbol for the Prism.
Head out, take the stairs immediately on your left and make your way through the Founder's Hall, into the Upper Hall, and go through the Caduceus Key door you found earlier.
In the first room on the left you'll find a Lost Letters - the Coming Reign note on the wall and a yellow item box. In the door on the right you'll find a yellow item box and an item on a table. Further down the corridor is an open door to the left where you'll find a yellow item box and a glowing body you can interact with for a yellow Symbol.
At the end of the corridor you have a choice - you can either drop down a hole or go through the door and take a ladder down. Both more or less take you to the same place, just via slightly different routes. Take the hole for completion, take the ladder for a shortcut that misses a few important things. You can come back to either at any time, however.

If you drop through the hole you'll end up in the Observation Ward and have a pretty horrible fight against multiple enemies, but it's worth doing it while you're here just to get it done, and will save some time for a few things. When it's over you'll find an ERC crate, an item in a cupboard, a Torn Page From a Diary note, and an item in a yellow box. When you have everything, leave and turn right to find a Letter with Digit 1 note on a table, then go left to find two item boxes before a bandstand.
Check the bandstand to find a Radio, an item box, and an Inventory Expansion. You can also unlock a gate by the bandstand to open a shortcut back to the Therapeutic Gardens. For now, however, go back the way you came in to the bandstand and turn right, where you can unlock another gate past the benches to reach the Asylum Gate. Here you'll find a couple of item boxes, see a monster in the distance, and the ladder you could have taken instead of jumping into the hole.
Go through the open gate and grab the Lost Letters - Goodbye Maria note immediately on the left by a body in the wall, then carry on to trigger a boss fight.

To defeat this boss you'll need to avoid the yellow liquid it throws around, while shooting what look like red exposed lungs. The best time to land a hit is just as it's about to throw a ball of liquid, as even though you can't see the weak spot you'll still hit it. There are three regenerating item boxes that constantly refill around the area, so keep looping around to collect what's in them as you fight.
When it's dead, you'll get one last go on any unopened item boxes that will now no longer respawn. Then go through the Prosthetics Craft and Repair door to find an item box and the other side of the Face you already have. Interact with the case to get the face out, then unbolt the door and you'll be right at the bottom of the stairs you need to get back to where you left the other half of the face. Take the stairs up to the Prosthetic Workshop and fix the Face, and then use it on the Mirror Door nearby to leave, as the door you used to get in will lock.
Carry on into the next room and you'll find the Note with Digit 0 note and the Black Reef Longshot marksman rifle, as well as a yellow item box. Unbolt the door and leave, where you'll be attacked. Head down the stairs and out of the door straight ahead of you, dealing with or dodging enemies as you go. Turn right outside and then head through the Therapeutic Gardens so you can get back to Reception. You'll hear an announcement that will add the Wireless Room as an objective which, handily, is behind an Old Man Face lock.

Head to the Upper Hall and use the old man face on the Mirror Door to get into Medical Records. Grab the For Akeley's Widows, Questions Linger note and head through the hole. There will be an enemy in there to fight, and it's a tight space so be ready. When they're done, interact with the glowing spot for a new yellow Symbol.
Head out of the door, where you'll be right by a shortcut you can unlock back out into the balcony near the Upper Hall.
At this point you can skip the Wireless Room and go straight to the Chapel as it's an optional side objective. But you'll miss an ERC pen, and some Dream Essence upgrade points if you skip it.
Assuming you're heading to the Wireless Room, ignore the bolted shortcut door for now and instead go down around the corridor to it.
Inside there's an item in the drawers and an ERC pen on the desk and, obviously, three talking brains in a jar. Speak to all three brains in turn to get a clue and a note, then join up the notes you got from the brains to the Note about Wireless Room in Investigations to get an upgrade point.
Now it's for the wireless room brain puzzle.
How to solve the wireless room brain puzzle

Each of the brains have a confusing clue, and some info on if the others are telling the truth. However, to solve the Wireless brain puzzle you just need these three pieces of information:
- Start with Pence who says the primary frequency is bad luck on Fridays, so 13.
- Now use Dunwich's clue to 'round the primary to the nearest ten and half it', giving you 5.
- Finally Ambrose says the tertiary is double the sum of the first two, giving us 36
That gives you the code: 13, 5, 36. Set the dials to each number in turn and press the central button to enter it and move on to the next. You'll see a green light each time you get it right, and when all three numbers are entered the brains will explode.
As a reward you'll get some Dream Essence.
Now unlock the shortcut or go back through Medical Records depending on which is safer, and go to Reception to open the ERC crate now you have the pen. Inside you'll find Cutter's Tomahawk, a melee upgrade for the shotgun.
Head towards the Waiting Area with the old man face Mirror door, and access the Chapel Courtyard. There are two item boxes on a bench to grab before you enter the Chapel.
Inside the Chapel you'll find a Lost Letters - Deja Vu note on the right next to some bodies and two item crates around to the left. There's another item box on the pulpit, as well as a glowing spot you can interact with to get another yellow Symbol. You can now join all the yellow Symbols in Investigations for an upgrade point.
Left of the pulpit is an item box on a bench to the right by the door. Go through the door and you'll find an Unsent Letter note, and another Prism charging station that you now have three yellow symbols for.
How to use the yellow Prism Charging station

For the yellow Prism Charging station solution, insert the Prism and rotate the dials so the symbols you've found appear between the two yellow triangles, as show in the image above. Then validate the answer to complete it.
This is the same process as for the previous station so, while there's no obvious clues, there's only one correct symbol per layer.
When you leave the room you'll see the Doctor go past and open up a new door. Head in to find a lot of brains and a Local Residents note on a shelf. Keep going, through the gap in the shelves, and you'll find the final Face and trigger a cutscene.
Once the cutscene has played out there's an Exceptional Specimens note, and two items to grab before you head out. When you get back to the Chapel you'll be ambushed by several enemies, including the black phantom creature. Don't try and fight anything, just smash any obstacles blocking the exit and run.

For now go to the Head Surgeon's Office on 2F, which you can now access with the final Face. Inside you'll find an item box just as you go in, a Diary of Thedus Lowe note, and the Vertebrae Key on the desk. Grab them and then look for a cupboard you can push away to access the next room.
Inside you'll find the Memo with Digit 8 note, which you can now connect to all the other number notes in Investigations to get an upgrade point and work out the combination for the lock in Storage. There's also the final ERC pen and an item in a cupboard.
Head to the ERC crate in the General Ward now you have the pen (the area where you dropped down the hole just before the boss fight) and you'll get some items and Dream Essence.
Now for the lock in Storage.
The storage lock code

The locked Hospital Storage code is 1308. The Letter With Digits notes you've been finding list numbers and most of them have positions, with the exception of 0, which just goes in the slot not listed explicitly:
- 'One comes first'
- '3 is the second digit'
- 0
- 'Eight comes last'
Inside you'll find a bunch of items and the Doyle's Cold Blood attachment for the Submachine gun that lets you continuous fire slow enemies.
Now it's time to get the final Symbols, so head back to the Locker Room near Reception and go down the stairs. Pick up the Access Restricted note near the door with the Vertebrae Lock that you now have the key for and go in. Just inside you'll see a glowing point on a pile of bodies that will now give you the final pink Symbol. Link them all up in Investigations for an upgrade point.
Head through the hole in the wall, where you'll have another mini-boss fight with the lung monster. Once he's dead make sure you check the room thoroughly for items, and then push the trolley out of the way to get into the next room. Grab what's in the item box and listen to the Radio, then use the pink Prism charger to charge your prism one last time:
How to use the pink Prism Charging station solution

As with the previous two charging stations, the solution to the pink Prism charging station is to line up the three symbols you've found inbetween the two pink triangles by rotating each ring. As before, there's only one symbol per layer so it's just a case of finding them. When they're lined up, press validate to complete the puzzle and fully charge the Prism.
Now it's time to use the fully charged Prism, so head to the final surgeon's Mirror Door on 1F that opens the way back to the Anatomical Theater where Faye's body is. When you place the prism a monster will take Faye's body, so chase it.
There will be some item boxes in the area you reach with cars and trucks, and some blue drawers to search - but don't take too long as there will also be lots of monsters. Otherwise head down the path, keeping an eye out for some more item boxes as the path turns, then head through the hole in the fence and drop down.
Eventually the slither will rise up and block the way ahead, and you'll have to survive attack waves while Faye tries to open a door. At this point keep moving, fighting, and dipping into the refilling item boxes. There are three waves, ending in the lung monster boss you've fought twice already. The final stage is the worst, as it keeps spawning the little jumpy Stygians monsters while you're trying to deal with the boss. Just keep looping the area and taking what you can from the respawning item boxes. They'll usually spit out health when you're in real trouble, so just try to stay alive.
When the fight is over, push on to trigger a cutscene and when that's done you can make your way back to the boat and complete the hospital area.
This guide is a work in progress and will continue.

