You are now subscribed
Your newsletter sign-up was successful
Want to add more newsletters?

Every Friday
GamesRadar+
Your weekly update on everything you could ever want to know about the games you already love, games we know you're going to love in the near future, and tales from the communities that surround them.

Every Thursday
GTA 6 O'clock
Our special GTA 6 newsletter, with breaking news, insider info, and rumor analysis from the award-winning GTA 6 O'clock experts.

Every Friday
Knowledge
From the creators of Edge: A weekly videogame industry newsletter with analysis from expert writers, guidance from professionals, and insight into what's on the horizon.

Every Thursday
The Setup
Hardware nerds unite, sign up to our free tech newsletter for a weekly digest of the hottest new tech, the latest gadgets on the test bench, and much more.

Every Wednesday
Switch 2 Spotlight
Sign up to our new Switch 2 newsletter, where we bring you the latest talking points on Nintendo's new console each week, bring you up to date on the news, and recommend what games to play.

Every Saturday
The Watchlist
Subscribe for a weekly digest of the movie and TV news that matters, direct to your inbox. From first-look trailers, interviews, reviews and explainers, we've got you covered.

Once a month
SFX
Get sneak previews, exclusive competitions and details of special events each month!
They say patience is a virtue, but I sure fell folly to frustration waiting for the Analogue 3D. Rather than just accepting that the remake would likely become the best retro console for N64 games, I decided to HDMI mod my N64 in a bid to make my own. The result? Well, it's actually nowhere near as atrocious as you'd think, even if it's nowhere near as fancy as the FPGA system.
I can already hear many of you shouting at your screens, asking why I've only just got around to trying an N64 HDMI mod. I'm never one to shy away from a retro console project, especially one that can make all the difference to visuals and gameplay. But, when it comes to the Nintendo 64, the custom parts used to be way pricer than they are now, and options like the Ultra HDMI will set you back way over $100.
Harnessing N64 HDMI superpowers

Okay, this is where I potentially shatter your N64 HDMI dreams, as this mod isn’t remotely beginner-friendly. The process involves some pretty scary surface-mount soldering straight onto the console’s CPU legs, not to mention you’ll have to chop its shell a little. That said, I wouldn’t say this upgrade is completely unapproachable, and with the right tools, a little patience, and a lot of concentration, you will pull the project off.
Yes, you’ll need a soldering iron if you don’t already have one, and I personally used a Hakko coreless model. Some experts are going to point and laugh when I say it takes AA batteries, but hey, it’s by a reliable Japanese tool brand and gets hot enough, and I’m personally a fan of not wrestling with a cable. There are countless other options at Amazon, ranging from rechargeable to proper power stations with temperature control, and while I wouldn’t skimp on tools, I get the need to keep project costs low.

While it’s not mandatory for every soldiering exercise, I’d strongly recommend picking up some liquid flux too. The technique I use for the HDMI specifically relies on flowing solder across several pads while ensuring nothing is bridged, and good paste will help you achieve that. Some copper wick will come in handy if you need to soak up any accidental solder blobs or reverse any steps in the mod.
You’ll obviously need to pick up the N64 HDMI mod too. The kit includes a main PCB, a ribbon cable, and a mini HDMI adapter, so you won’t need extra components, wires, or additional parts. It might be worth considering taking a peek at replacement shells if you’d rather not mod your original, but if you are keeping everything authentic, the only other thing you’ll need is a screwdriver set that includes a security Gamebit to deal with Nintendo’s pesky proprietary screws.
How to install an N64 HDMI mod

Getting inside your N64 is naturally the first step. Before you even go hunting for screws, make sure to remove your Expansion Pack from the top if you have one (that red thing you use to play Majora’s Mask). That’ll stop anything from catching upon separating both halves of the shell and prevent damage. Once it’s out, flip your ‘90s baby over and remove the six Gamebit screws (three at the top, two for the “feet”, and one right next to the model sticker). I’d highly recommend keeping track of everything you take out and placing them in a separate tray or, at the very least, in specific piles.

Once you’re in, you’ll have even more screws to deal with (yayyyyyy). This time, they’re holding the metal shielding to the main board, so you’ll want to remove them all to lift that off. You should now effectively have an N64 board sitting bare within the bottom shell with all the chips and guts showing, ready to be yonked out.
Okay, here’s the thing - I sometimes like to get carried away. Therefore, I made a couple of questionable decisions during this mod that I would avoid. The first was not taking my time with cutting the shell itself to accommodate the new PCB and port, as rather than snipping into the back to suit a mini HDMI, I grabbed a full-size cable next to me and accidentally based my cuttings on that. Uh-oh.
The result? Uh, yeah, let’s just say I ended up masking off the butchered hole with some electrical tape, and it looks very rough. I’m lucky since I have a couple of N64 consoles and replacement shells, but we’re sticking with my mistake for now. To avoid the same fate, you’ll want to carefully trim a mini HDMI-sized square right under the word “multi-out” at the back of the shell. The mod’s PCB is designed to sit right between the screw pegs, which helps it naturally integrate alongside the original hardware with enough clearance.

My second blunder applies to pre-mod prep, as for whatever reason, I sat the main board back into the bottom shell before soldering. That then resulted in me having to gently lift it back up to place the HDMI PCB back under. You don’t want to be doing this after you’ve just secured a rather delicate ribbon cable, so I’d place the part where it’s meant to go, operate on the main board, then re-attach the ribbon upon sandwiching things back together.

Look, it’s easy to make daft mistakes when modding, even if you’re constantly tinkering with retro consoles. So long as you take your time and do things in the right order, you’ll get on much better than I did. To give myself credit, I largely avoided issues while actually soldering the ribbon cable to the N64’s PPU, and that really is the biggie with this mod.
Soldering the ribbon cable to the board is going to require counting some really small legs on the side of the PPU. Specifically, you’ll want to locate the chip directly in front of the arrow pointing to the cartridge slot, then rotate things so that you’re facing the side with a small “40” label at bottom right corner. Each of the little pads is going to attach in front of a leg, and to find your starting point, you’ll want to line up the first contact with the sixth leg.

I feel ya, things are getting complicated, but here’s what you’re going to do to help ease the pain. First, you’ll want to line things up and triple-check that the first pad is exactly six legs in. Then, use a piece of Kapton tape to hold the cable in place, as this will help prevent it from moving around while you’re trying to work. I’d then apply some liquid flux across the pads before finally getting yourself into a soldering situation.

At this point, feel free to get your iron toasty and tin the tip using some solder. The idea here is that you’ll want to gently run your iron across the pads so that solder flows onto the pads. Your first pass will likely result in some of the connections joining together, but rather than panicking, simply add some more flux and run your iron across it again. You should start to see each connection individually, separating. It’s worth having a peek at your work with your phone camera to check that there’s spacing between each connection, but some of you might have better eyesight than me.
I’d take a moment to appreciate your work before moving on to the next step, as you’ve just pulled off what is a pretty fine pitch soldering job. You’ll be pleased to know that the only other point you’ll need to solder is the individual ribbon strand, as it connects to the left leg of that transistor on the right. I actually struggled to get a good joint on the flimsy pad and opted to solder a thin wire from the optional pad instead, so you can do this if things are feeling iffy.
Everything should be secured now, and your last job before buttoning the N64 up is to connect the ribbon to the bottom shell PCB. The flex cable slots into a dedicated connector with a clamp, so you’ll want to gently push it all the way in then lower the black hinged lever to lock it in place.

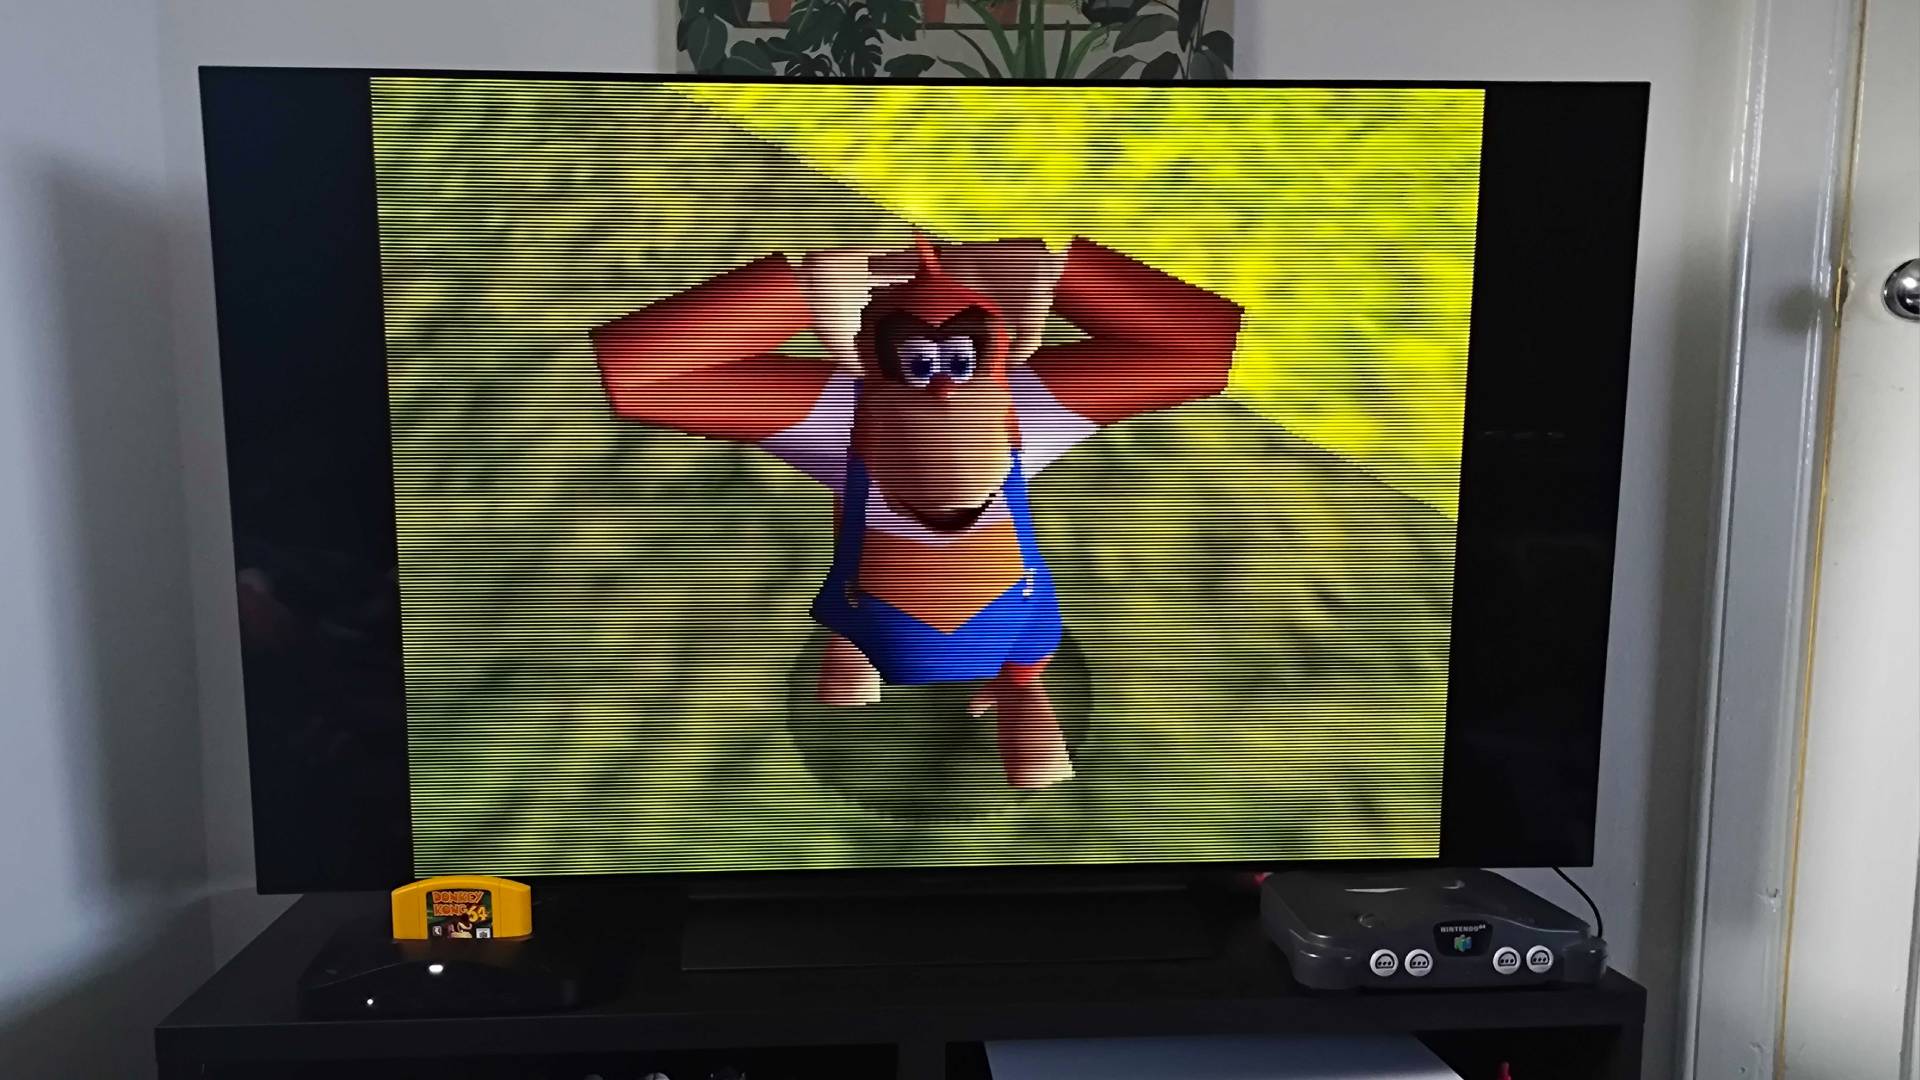
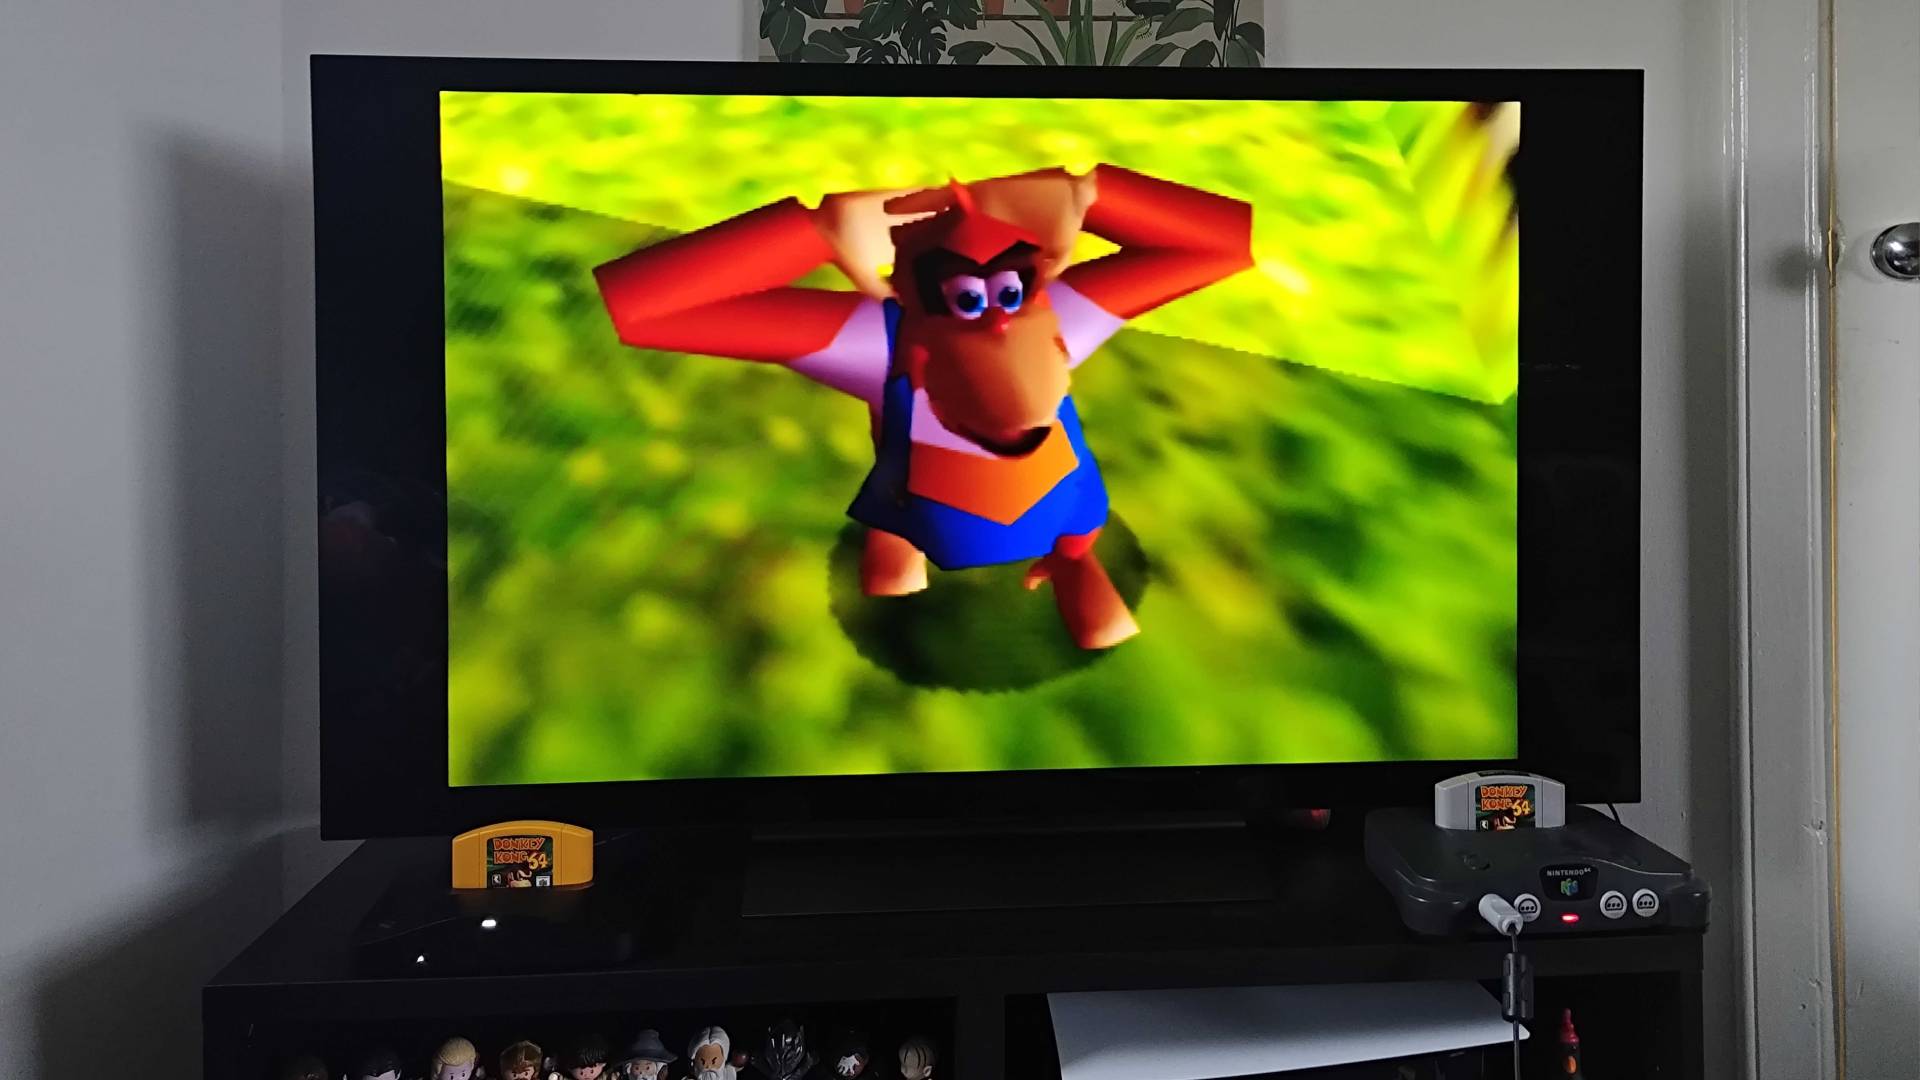
I always prefer to test things before reassembly, which translates to me temporarily plugging back in the power supply, Expansion Pack, a copy of Donkey Kong 64, a controller, and a cable into the shiny new HDMI port. If you’re planning on doing the same, you should immediately see an image spring on your screen, and it’ll hopefully be far crispier than before. I’d also double-check your audio is coming through nice and crystal too, and make sure to press A, B, and START to make sure you can access the PCB’s options menu.
All working? Your reward is putting the shielding and all those screws back in place before finally getting to enjoy an HDMI-modded N64. I’m proud of you, and while I have some nerdy gripes to share about the visual results, it will provide you with far nicer visuals and an easy way to jump straight into original games on a contempoary screen.
Original vs remake

I've already spoiled the fact that the Analogue 3D looks nicer than the original N64 with an HDMI mod, and some of that is Nintendo's fault. The big issue with Ninty's OG hardware is that it has some visual effects baked into its hardware, and they look rather unslightly on modern screens. While pulling a clean signal straight from the PPU helps remove some blur effects and dodges that "Vaseline" look of composite video, the FPGA remake really goes the extra mile in providing a proper 4K glow-up.
Let's start with the obvious advantage of the Analogue 3D's 4K output. Serving up a UDH image to your TV will save it from handling upscaling yourself, whereas your screen will have to do that with the N64 HDMI mods' 720p visuals. I wouldn't say it's a massive biggie, as that resolution does map evenly to 4K (3x pixels), but it is still work for the panel that can potentially add lag or latency.
On that note, it is worth stressing that even the Analogue 3D isn't going to change the native resolution of games. Each N64 cartridge still possesses 240p graphics, textures, and visuals, so you're not getting a revamp a la the Nintendo Switch Online library. That's very deliberate since ports and emulated results tend to look a bit weird, with overly sharp character models that stick out compared to the original textures.
Rather than taking that approach, the 3D provides "original display modes" that add authentic CRT filters to N64 games. Unlike basic scanlines, these options mimic elements like shadow masks and the phosphor glow of various tube displays, ranging from commercial models to professional PVM and BVM units. All of that is fancy talk for the fact that everything will look just like the original developers intended it to when designing graphics for '90s TVs.
This is something you'll absolutely miss out on with an HDMI-modded N64, as the console's original signal will be at the mercy of modern TVs. Basically, that means you'll be looking at blocky pixels that lack the right separation, which in turn contributes to a muddier look that's further hindered by the lower native resolution. Don't get me wrong, you'll be getting far sharper visuals compared to a stock Nintendo 64 using composite or S-Video, but there will ultimately be a clarity jump.
So, why even bother HDMI-modding your N64? It's a logical question to ask, and I'd say it all comes down to ease of use. Adding that port to the back cuts out the need for additional upscalers, and while the results are only marginally better than S-Video, they're pretty great compared to bog-standard composite on a new screen.

Upon firing up Ocarina of Time on my freshly modded N64, I could immediately spot improved text sharpness over HDMI compared to composite. That's largely because the former analogue output type suffers from muddy pixels caused by artifacting and poorer color accuracy overall, which does hinder sharpness. While Hyrule still looks a bit scrappy in scaled-up 240p, the signal was also noticably cleaner than even S-Video, hitting color accuracy and sharpness that's at the very least on par with historic RGB mods.
That makes sense given that Highspeedio's HDMI board is pulling a signal straight from the N64's graphics chip, just like some of the more advanced RGB mods out there. Sadly, this isn't a silver bullet for Nintendo 64 games with mess filters baked in, and the only way around that is to use flash carts to strip it out of a ROM or even an Action Replay to remove it using codes (I've had zero success with the latter)
Going the extra mod mile

I'd say an N64 HDMI mod is technically enough to make your own DIY Analogue 3D, but you can go a step further if you want wireless controllers, effects like scanlines, and USB power. The gamepad side of things is fairly straightforward since it merely involves picking up some wireless adapters, which in turn will let you use a range of pads, including the 8BitDo N64 Wireless controller. I specifically use a Retroscaler four-way wireless receiver, but there are also individual dongles for single ports.
I've already touched on the scanline generator, and it makes far more of a difference than you'd think to an HDMI-modded N64's visuals. The effect is very subtle, adding horizontal separation is more or less like thin black lines. If you stick your nose up to the screen, you're not going to see any nice emulated pixel shapes or a specific aperture grille effect, but everything will look that bit sharper when kicking back. It even has some dials for RGB color adjustment, just in case things need to be tweaked a little after adding the overlay.
If you're really itching to make your N64 more like an Analogue 3D, you can also grab replacement USB-C power supplies that replace the back modular unit. I haven't tested any of these yet, and I'm not so sure the benefits are worthwhile since you'll still need to use a 45W brick. That said, it will reduce the bulk at the back of the console, and using less chonky wire will aid cable management since wrangling the thick original is a pain.
Imitation of imitation is the highest form of flattery

The question that's currently haunting my waking dreams is whether I was silly to try and make my own Analogue 3D? I could get away with saying I was merely getting around to an N64 HDMI I'd been putting off for years, but it was the new FPGA system that inspired me to try it out.
I've ultimately decided that making my own Analogue 3D alternative, as flawed as it is, was worthwhile. Most of you will still want to stick with simple HDMI upscalers and adapters, and that's just fine; don't let the gatekeepers tell you how to play Donkey Kong 64. But, if you are brave enough to pick up a soldering iron and want far cleaner visuals from your OG console for under $40, I'd absolutely give this mod a try.
The main reason you'd even want to carry out this mod in the first place is the price of FPGA remakes. The Analogue 3D will set you back $270, and even if you do shout at the company to take your money, you'll need to wait for the stock to drop in the new year. Is it worth waiting for if you're big into Nintendo 64 games, but if you consider yourself more of a casual player, I'd start off with enhancing the OG system.
Looking to play classics on the go? Swing by the best retro handhelds for portable emulators and more.

You must confirm your public display name before commenting
Please logout and then login again, you will then be prompted to enter your display name.