Eldin Tower
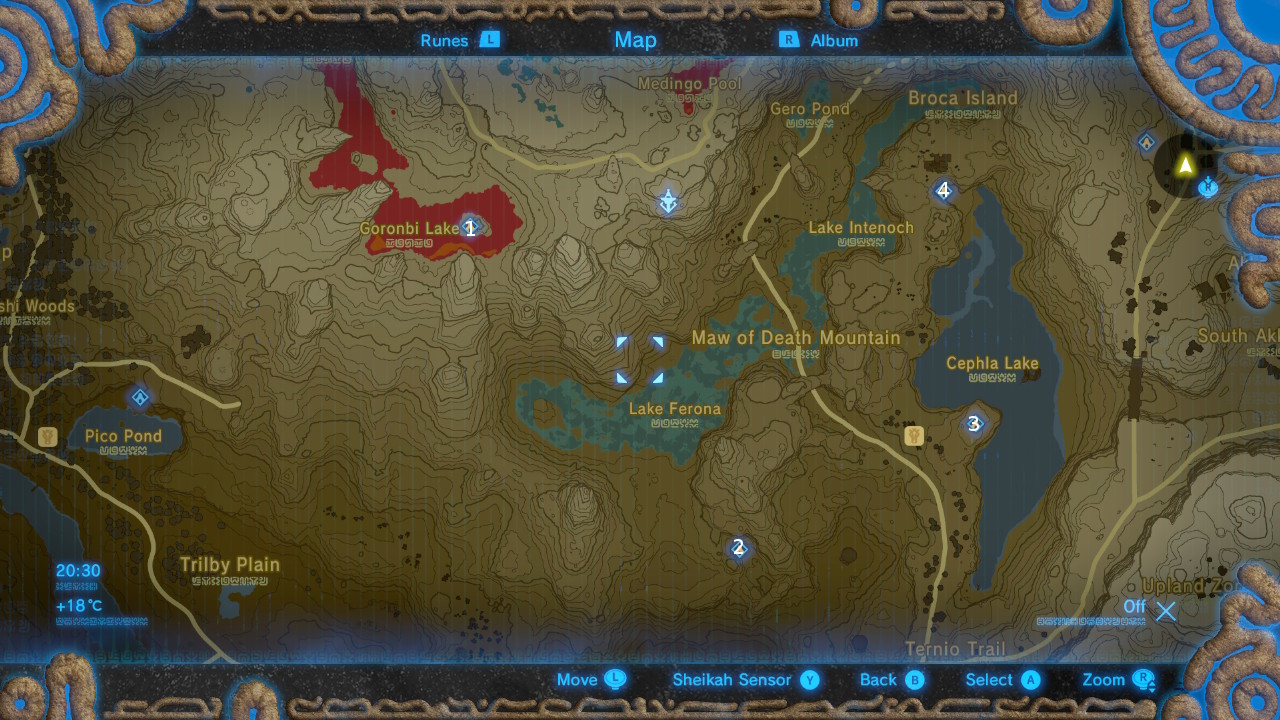
#1 - Qua Raym Shrine

This shrine is located on the island in Goronbi Lake. Use Magnesis to move the metal cubes, forming a path over the lava.
Enter the shrine and destroy the wooden crate on the scale in front of you to lower the chest containing the small key.
Open the locked door and grab a metal cube with Magnesis. Take it back to the shrine entrance with you.
With the entrance behind you, look up to the left to see a chest on the platform above. Place a metal cube onto the pan next to the platform to lower it. Pop a second metal cube at the foot of the steps, giving you a boost to hop aboard.
Now move the metal cube on the pan along to the pan in front of it, also on the left side of the room. This will lift you up to the chest platform.
Return to the main area and hop onto the pan on the right under the spikes, where the first chest was. Throw a bomb towards the destructible rocks and detonate it to clear them.
Place one metal cube onto the pan you're standing on, and another on the pan on the left.
Standing on the right-hand pan, place a second metal cube onto the adjacent one. You'll be lifted up to the altar.
#2 - Tah Muhl Shrine

Talk to Mayro at Foothill Stable, southeast of Eldin Tower to begin A Landscape of a Stable shrine quest.

Leave the stable and follow the road south until you reach the fork where it meets Ternio Trail.

Hop onto the rocks on the edge of the road and you'll see the stable to the right and the shrine to the left.
Once inside, set fire to the ivy in front of you, burning the wooden crates behind it to reveal the entrance to the next room.
In the next room, set fire to the ivy on the left next to the locked door. The flames will spread to the wooden chest and platform on the other side of the fence. The chest will burn away, dropping a small key.
Use Magnesis to lift the key over the fence and open the locked door to reach the second chest.
Turn around to face the altar and blow up the wooden crates on the right, burning the ivy on the wall to reveal an alcove with a third chest.
The fourth chest is on the left, close to the fence, in top of a stack of wooden crates. If you're using a bomb to destroy them, be careful that the crate doesn't get stuck on the ledge.
Once you've pilfered all of the chests, head to the altar.
#3 - Mo'A Keet Shrine
This shrine is on a small plateau overlooking Foothill Stable, southeast of Eldin Tower.
Once you're inside use Stasis on a boulder as it rolls past, before it goes over the edge, and run up the slope sharpish.
On the next platform, head to the right and use Magnesis on the metal sphere and place it to one side so that you can nip up the ramp and open the chest.
Use Magnesis on the metal sphere again and hold it in front of you as head up the slope on the left, allowing you to reach the altar.
#4 - Sah Dahaj Shrine

From Eldin Tower, glide east towards the northern end of Cephla Lake and you'll spot an enemy outpost. The shrine is on the ground below it.
Get inside and burn the ivy with your preferred method of choice and go through the opening to the next room where a Guardian Scout awaits.
Take care of it and scooch up the ladder where you'll find more ivy to get rid of.
In the next area you need to destroy the wooden crates holding up the stone slab in the enclosure to activate the floor switch. You can set fire to the ivy to do so.
Don't forget to grab the metal chest from the wooden platform with Magnesis.
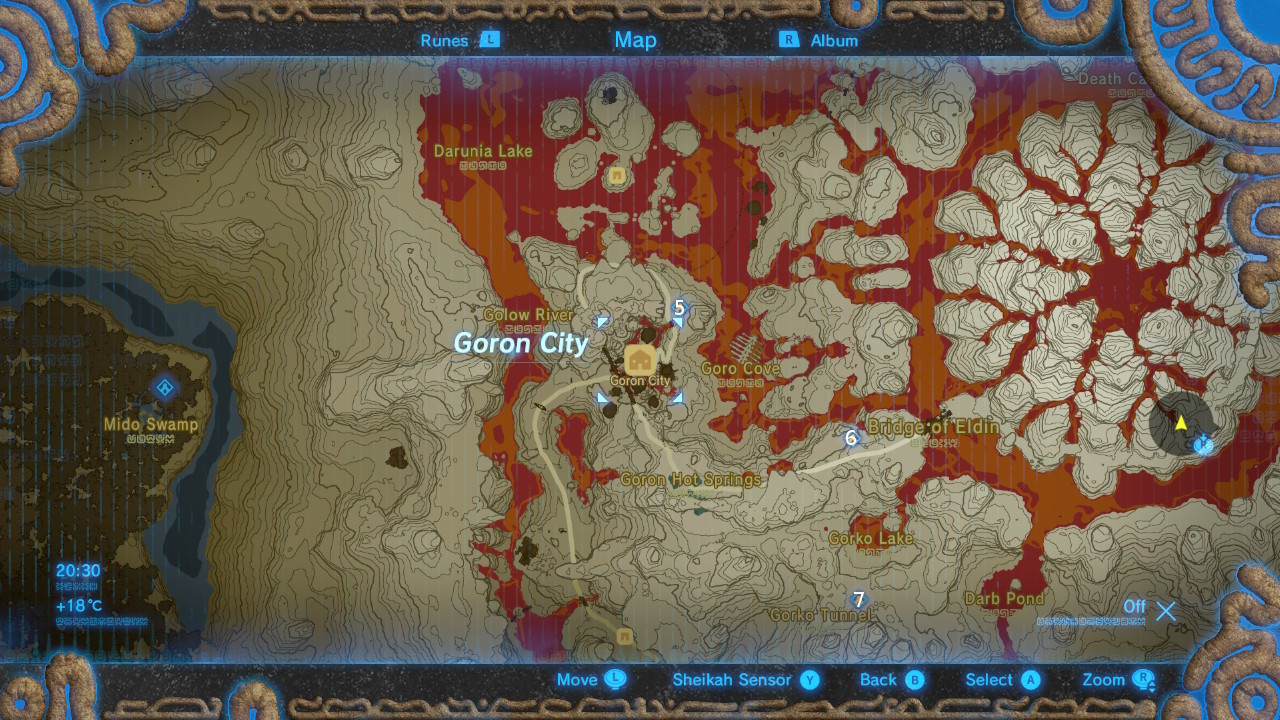
#5 - Shae Mo'Sah Shrine
This shrine is just outside of Goron City, along the path that leads to the Abandoned North Mine.
Step on the floor switch to open the gate, cast Stasis on it and run through. This save wasting fire arrows and time on burning the ivy to get the barrel down.
Set fire to the ivy t the left of the gate to destroy the wooden platform and drop the barrel. Pop it on the floor switch to open the gate.
Open the chest to the left and proceed into the main room where three Guardian Scouts are waiting. Take them out and open the chest next to the ramp.
Head up the ramp and go through the arches to the right of the stairs. Turn left to find third chest.
Step on the floor switch at the top of the steps to drop a lantern and use Magnesis to push it onto the ivy, releasing the metal orb. The orb will roll down and be blocked by a gate.
Go down the ramp to the opposite side of the room and turn left to find another floor switch. Step on it to clear the orbs path and open the nearby gate.
Run through before it closes. You'll find a chest to the right containing a key. Grab it, head up the ramp, and drop down into the main room. Return to the entrance and open the locked door to the left of the stairs (with the entrance behind you).
Ignore the stairs and stand on the floor switch to the left of the gate. Cast Stasis on the switch and run through the gate to the altar.
#6 - Daqa Koh Shrine

Exit Goron City via the road to the north and follow it around to the springs. Keep going, towards the Bride of Eldin, and shortly before reaching the bridge, the path will fork. You'll see the shrine down the path to the left.
Drop down from the entrance and you'll be launched into the air. Glide to the top of the large cube and turn around to face the entrance. You'll see a chest to the left.
When you're propelled into the air again, glide over to the chest, and return to the top of the cube once you've pilfered the contents.
You'll be launched upwards again, and when the crystal on the cube touches the ceiling, cast Stasis on the cube to keep the gate open, glide over, and run through to the exit.
#7 - Kayra Mah Shrine

Talk to Bladon in Goron City. You'll find him in a hut on the northwest side of the area.
Leave the city via the road to the north and carry on until you reach Goron Hot Springs.
From here, follow the path straight ahead, guided by the torches, to reach Gorko Tunnel.

Inside you'll find Gonguron and your next objective is to head down the hill and bring back a rock roast. The trip back will include both melee and ranged enemies, as well as boulders hurtling down towards you. Try not to drop the rock roast as it's itching to slide all the back down to the bottom of the hill.

Gonguron will reveal the shrine once he's got a rock roast in his belly.
Inside the shine you have to make your way up a slope, avoiding the boulders rolling toward you. Use your powers to help, or simply avoid them. They'll leave rupees in their wake which increase in value as you progress up the slope.
There are two chests that you can grab on your way to the top. The first is in an alcove to the right, along the ramp.
To reach the second one, get to the top and turn around to see a chest on a ledge on the right. You can glide down to reach it.
Interact with the altar after you've opened the chests to clear the shrine.
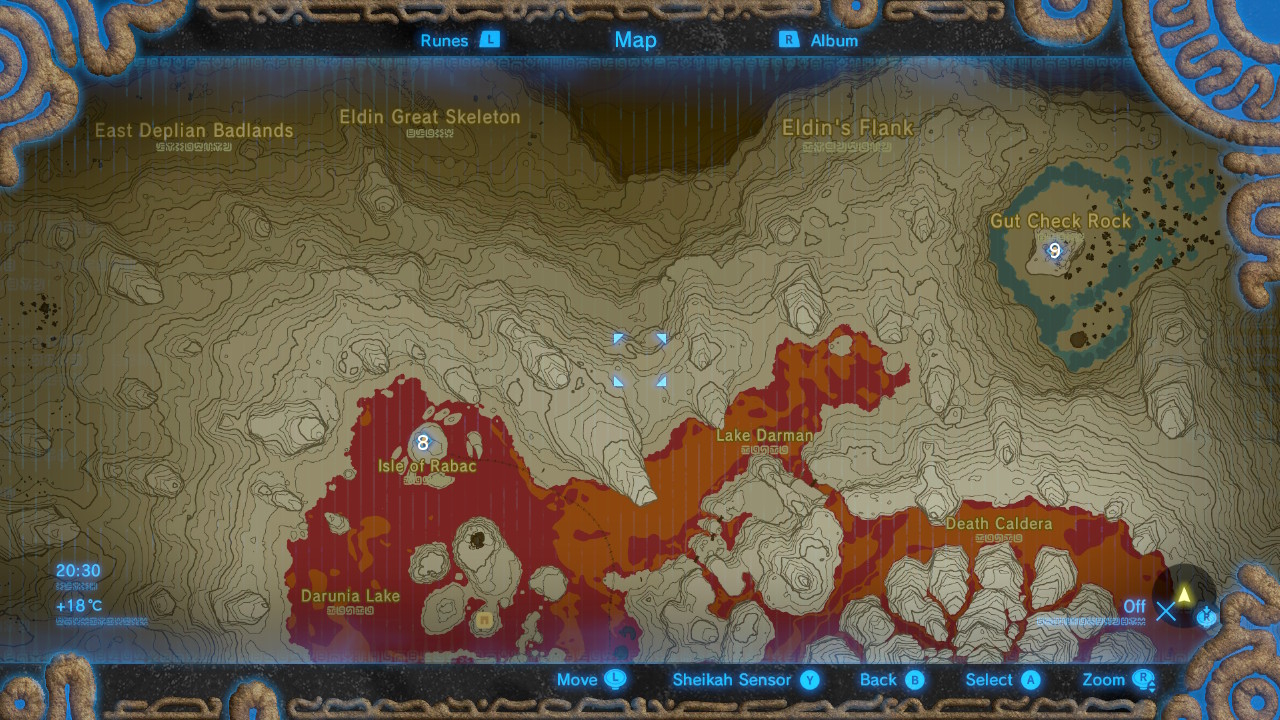
#8 - Shora Hah Shrine

Leave Goron City via the northern road and look behind the Shae Mo'sah shrine to see rails over the lava.

Hop into the mine cart on the shore of the lava lake and drop a round bomb into the cage at the back end.
Detonate the bomb to move the cart along the rails and repeat the process until you reach the shrine.
Enter the shrine and use Magnesis to lift the spiked block and pass underneath.
Turn left at the junction and use Magnesis to arrange the metal blocks so that you can reach the chest.
Rearrange them again to reach the lantern with the blue flame and light the nearby torch. Carry it back to the junction and light the lantern here to open the gate to the right.
You need to carry the flame through the corridor with the fountains, which is easy enough. The last one is the trickiest, so press Y to hold the torch out to the left. Light the torch at the end activate the moving platform.
Light the lantern on the platform using an arrow that you've touched to the lantern next to you. This will raise some steps back at the central junction.
At the top of the steps is a floor switch that will lower the platform in front of you. Ready Magnesis before using the switch to stop the spiked boulder from running you down. Dump it into the lava and head up the slope.
On the next platform, take out the four Guardian Scouts, open the chests, and light the torch using the lantern on the lift. Now light the lantern next to the gate to open it.
To open the second gate, first light the lantern in the middle of the platform. You need to light the two on either side of the gate at the same time, so light up an arrow and position yourself so that the arrow will pass over both of them when you fire it.
Go through the gate and light the lantern in the next area. Once again, light an arrow and fire it when the platforms are aligned to light up both lanterns simultaneously, activating the updrafts.
Glide to the second moving platform and light an arrow on the lantern. Shoot the lantern on the right on the platform opposite. Glide over and light the second lantern.
Use Stasis to stem the flow of the fountain, then use Magnesis to move the lantern on the metal platform to the opposite end of the rails.
Use the updraft to reach the chest hidden behind the pillar on the right. Glide to the platform ahead and use Magnesis to grab the second chest.
There are Guardian Scouts down the ramp behind the fence, so to take them out, light an arrow and shoot it at the leaves. Now light your torch and proceed to the last area.
Light the lantern to open the chest nearby. Once you've got the goods, stand in the centre of the horizontal lanterns with your flaming torch and perform a charge attack to light them all simultaneously.
This will open the gate to the altar.
#9 - Gorae Torr Shrine

To the north of Death Mountain is an island with a column of rock sprouting from the middle. At the top of this rock is a shrine.

Glide over and speak to Bayge, who is blocking the shrine entrance, to begin The Gut Check Challenge shrine quest.
The objective it to climb the tower of rock, collecting rupees on the way. You need to make it to the top within the time limit and grabbed a minimum of 100 rupees along the way.
Pop any Climber's armour pieces you have - the temperature is normal here so you won't be incinerated - and a couple of haste and stamina related elixirs wouldn't go amiss either.
An extended stamina wheel is also hugely helpful, letting you make jumps up the side of the rock to the platforms. Don't focus on green rupees unless they happen to be in your path. Keep an eye out for the higher value ones.
Once you've completed the challenge, you can enter the shrine and go straight to the altar.
Jump to Section: