Traverse Town: Riku
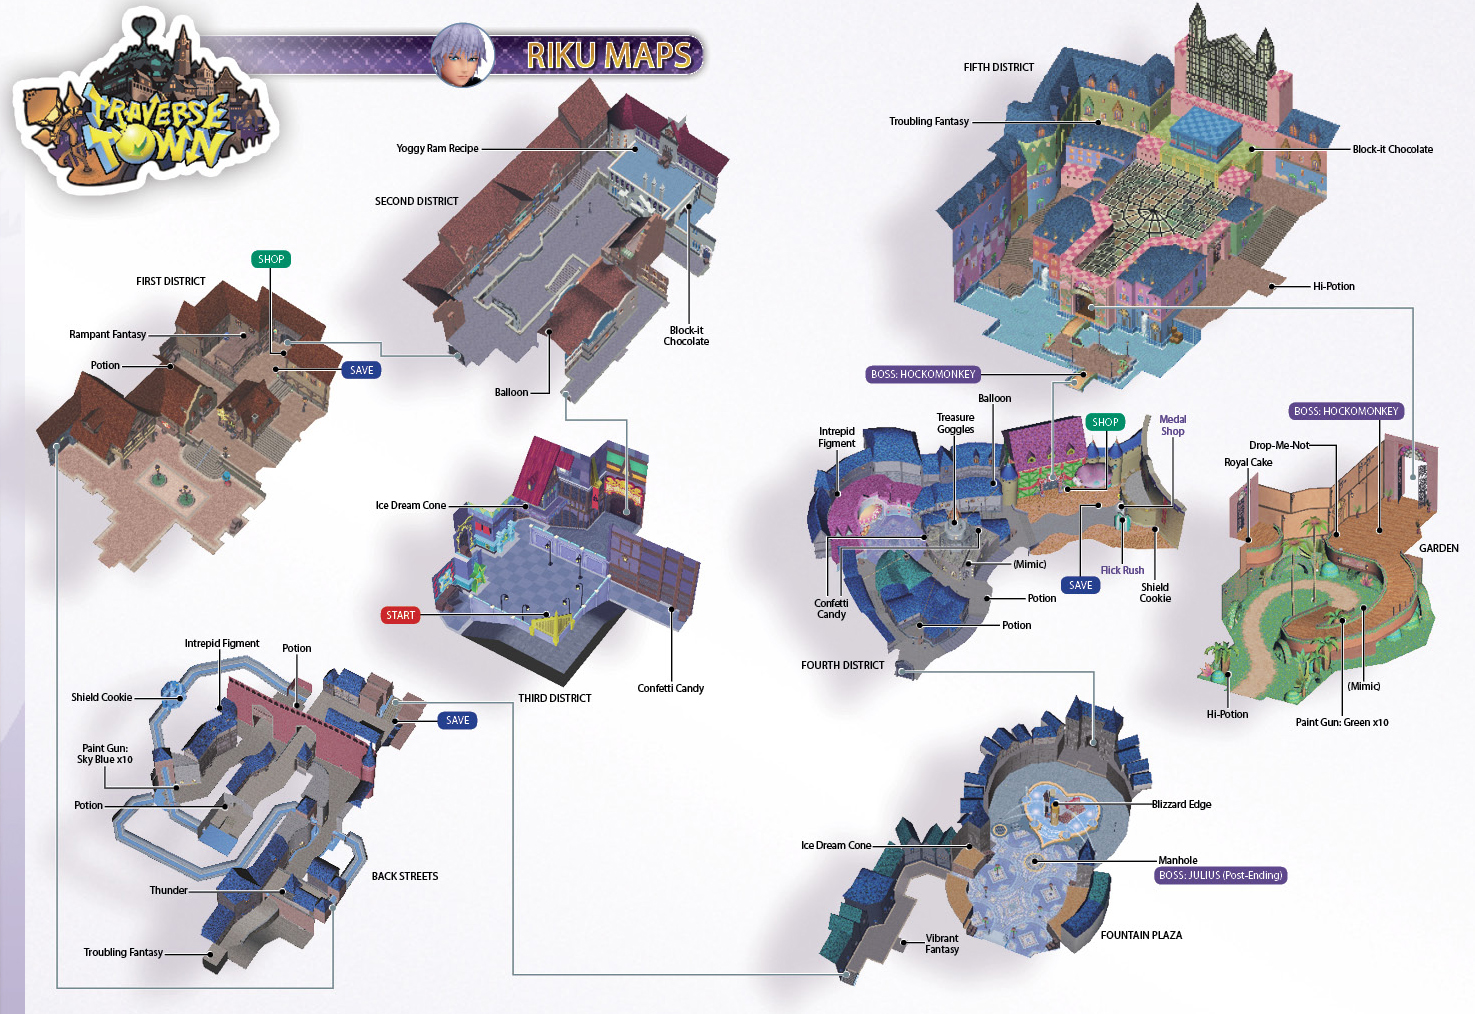
Above: Click the image for a bigger map.
Dive Mode: Riku
Because Riku is dealing with many more enemies than Sora had to during his dive into Traverse Town, just taking all the foes down accumulates enough points to open the goal ring. After a few seconds, the adversaries subside, allowing you to pay better attention to the obstacles as well as the magic prize in the narrow center of a four-way corridor blocking most of the space. For a higher score, break the green cards floating in formations at various intervals throughout the dive.
Riku Gets Some Answers
Riku arrives in Traverse Town. He meets a mysterious boy named Joshua, who explains that the worlds have been split in half, and some people who should be together have been sent to different places. Joshua tasks Riku with finding a girl named Rhyme in exchange for his help in locating Sora.
Link Portals
Link Portals appear in various locations throughout Traverse Town, displayed as pink dots on the Touch Screen map. Moving near a Link Portal, while zoomed in on the map, causes a display card to appear on the Touch Screen. Press the display card on the Touch Screen to activate the Link Portal. Activating Link Portals either replaces your current Spirits with a new set for a limited time (or until you leave the current area), or allows you to take on Nightmares in a quick challenge battle for extra prizes. The stars displayed on the card indicate the difficulty of the challenge involved or the strength of the friendly Spirits you’ll summon.

Vaan’s Friendship Portal is now available at the top of the stairs. Access it and use the Spirits provided to take out enemies as you search the area for treasure chests. Open the chest in the alley to find Confetti Candy. Remember to use Flowmotion to reach a chest containing an Ice Dream Cone on a raised ledge above the exit.
Time for Riku to Make Spirits
Riku catches up with Joshua in Second District and begins to learn about Dream Eaters, much the same way Sora did previously. The Komory Bat Recipe is obtained, allowing you to make a Spirit for Riku. The main menu opens automatically and you must create a Komory Bat Spirit. Use the same procedure as before, and don’t forget to increase your materials to improve stats and tickle your pet aplenty before proceeding.
Linking with Spirits Tutorial
After Beat appears and trash talks Joshua, a brief tutorial on Linking with Spirits follows. When a Spirit is in the party, the Link Gauge fills as a Spirit attacks an adversary. When the Link Gauge is full, touch the Spirit icons on the Touch Screen, or hold L + R and press either X, B, or A, depending on which Spirits you wish to link with. Fill up the Link Gauges of both Spirits in your party to perform a powerful Dual Link.

For tutorial purposes, Komory Bat’s Link Gauge will fill to maximum automatically. Defeat the enemies now surrounding Riku by pressing the Link button on the Touch Screen (featuring Komory Bat’s face) to link up and perform dark powered attacks with greater damage than Riku is capable of alone.
Clear Vaan’s Battle Portal!
After clearing the courtyard area of enemies, you’ll be able to open the Link Portal located between the two lampposts. Use the lampposts to activate Flowmotion and wipe out the appearing foes with ease. Clearing this easy Link Portal awards 10 DP and a Rampant Figment. Perform at least three Flowmotion attacks before taking out the last assailant to obtain a Royal Cake.
Riku’s Time to Snooze
Clearing the area of enemies allows Joshua and Beat to end their confrontation. But like Sora experienced earlier (head to the Livin' Life by the Clock section to continue Sora's adventure), Riku suddenly feels the urge to take a nap.
Tutorial: Earn Bonuses with Drop Points
When you drop, a screen appears where you can spend Drop Points (DP) to give the next character a bonus. There are three ways to earn DP: collect Droplets, snag Lucky Items left by enemies, or clear battle Link Portals. After using DP to increase Sora’s Attack or Magic, convert the rest to munny.
Resuming Riku
Riku wakes up to find he is alone, but he spots a girl being chased on the upper level. Follow her through the large exit to the south into First District, defeating enemies along the way and collecting items from chests on the upper levels.

Riku jumps between the girl and some Nightmares; eliminate them all to proceed. Use Flowmotion around the lampposts to gain the advantage. After the skirmish, the girl introduces herself as Shiki. Riku tells the girl to go home, even though she thinks he’s her knight in shining armor. After the scene, you’ll be facing a gate; proceed through it into the Back Streets area.
The Back Streets and the Aqueducts
Follow the twisting Back Streets to the upper level, and then follow the street north, then west. After taking out a large group of Nightmares, continue toward the southwest doorway. Open the chest on the right to obtain Paint Gun: Sky Blue x10 and proceed into the corridor. Riku enters Flowmotion here; ride the aqueduct to the top.
Riku flies over a large gap; Air Slide Y before falling through the gap to sail across and land in the aqueduct on the other side (otherwise, have fun starting over). Crossing the gap successfully allows Riku to reach a raised level above the entrance, where there’s also a chest containing the Thunder spell around the corner to the left. Take a moment to equip this in Riku’s Command Deck.
Drop over the side of the platform to land on the ground near the Back Streets’ entrance, and head to the west side again. This time, go to the northwest corner, where you’ll find a chest containing a Potion. Enter the waterway at the back and ride it via Flowmotion up into a sewer room full of Nightmares. Riku will automatically perform a Flowmotion jump upon entering the room. Before your Flowmotion glow fades, attack (A while in the air) and you may possibly destroy all the Nightmares at once! Open a chest on the top ledge to the left to obtain a Shield Cookie.

Continue into the next aqueduct and let Flowmotion carry Riku to the topmost chamber. Defeat a large group of Nightmares appearing on the stairs, then open the chest on the left to obtain a Potion. Proceed through the large doorway and notice on the Touch Screen that Riku is now crossing the central bridge above the area. Fight your way to the far end, and use the save point. Continue upstairs.
Riku’s Trip through the Fountain Area
Riku enters the Fountain Area from the southwest alleyway (the southeast area is permanently blocked off to Riku). Move to the barrel on the left and use Reality Shift to slingshot it into the crates piled high in the space across the alley. Destroying the crates reveals a chest containing a Vibrant Fantasy.
Proceed into the large courtyard south of the fountain and defeat all of the Nightmares that materialize in Riku’s path. More attack as he jumps up stacked boxes to collect items or reach Zidane’s Battle Portal on the far side. Take some extra time to clear this Link Portal, and perform three Flowmotion attacks while doing so to obtain a bonus Ice Dream Cone.
Jump into the fountain and clear out the Nightmares that appear there. By moving him to the back wall of the structure within the fountain, you can roll Riku into the wall, enter Flowmotion, and jump all the way onto the top of the edifice. Jump onto the cylindrical tower to reach the chest containing the Blizzard Edge command, which you should equip immediately. Then, proceed through the north doors.
Fourth District Navigation
Take a moment to notice the strings of lights running between all the rooftops here. Jump onto any of these and ride them to the central tower via Flowmotion. Open the chest within the tower to obtain Treasure Goggles, a useful Spirit toy that allows your little followers to collect extra items. From the central tower, you may ride the strings of lights to the outer rooftops and open more treasure chests. Cecil’s Battle Portal on the east side of the area provides a nice extra challenge, wherein you must defeat one rather elusive Spirit within 20 seconds to achieve the bonus: a Royal Cake. Simply ride the rail with Flowmotion and hit it with a Flowmotion attack to pull this off easily!
When finished clearing the southwest area, move northeast toward the hovering character balloons. Here you’ll find Moogles charged with various responsibilities, including buying and selling items, trading medals for commands and items, and offering Flick Rush. The latter is a fun card game in which you can battle Spirits you’ve created with other Spirits. By winning, you’ll earn medals to trade for commands, recipes, and more rarities at the Medal Shop. You must have three Spirits in your party to play. You’ll want much stronger Spirits to compete, so play further in the game and raise your Spirits higher before trying this. When done here, be sure to save your game before proceeding through the door in the northeast wall.
Hockomonkey
Base HP 295.6
Base Attack 14.0
Base Magic 15.0
Base Defense 6.6
EXP Multiplier 0
With this boss floating high over the Garden area, your main strategy is to have Riku jump onto the railing running along the front of the upper level to trigger Flowmotion, and then quickly press A to leap off and attack. Get back to the top of the area by riding the outside stair railing. Fire, Blizzard, and Thunder spells all prove useful, as does Strike Raid and the flying slash portion of Blizzard Edge. While hovering, Hockomonkey’s main form of attack is firing projectiles that are easily dodged or blocked, especially when lock-on is engaged.

At given intervals, Hockomonkey vanishes, and a squad of floating blue hands appears. Destroy all the hands to make Hockomonkey reappear. During this time, it is recommended to have Riku drop to the ground level, since the hands follow him down there, making them easier to knock out with simple Flowmotion attacks launched from the walls. Destroying all the hands causes Hockomonkey to reappear in a dazed state, during which time it is best to link with your Komory Bat and attack. Keep attacking Hockomonkey and its hands to win the battle and obtain the Skull Noise Keyblade.
Liked the Kingdom Heart's beginner's guide? Check out the full version from BradyGames...

Check out BradyGames on the web at www.bradygames.com, like them on Facebook, or drop by their Twitter feed @Brady_Games.


