All Final Fantasy 16 Hunt Board and Notorious Mark locations
Want to go hunting for Notorious Marks in FFXVI? Their locations are specifically unclear, but we can help you find them.
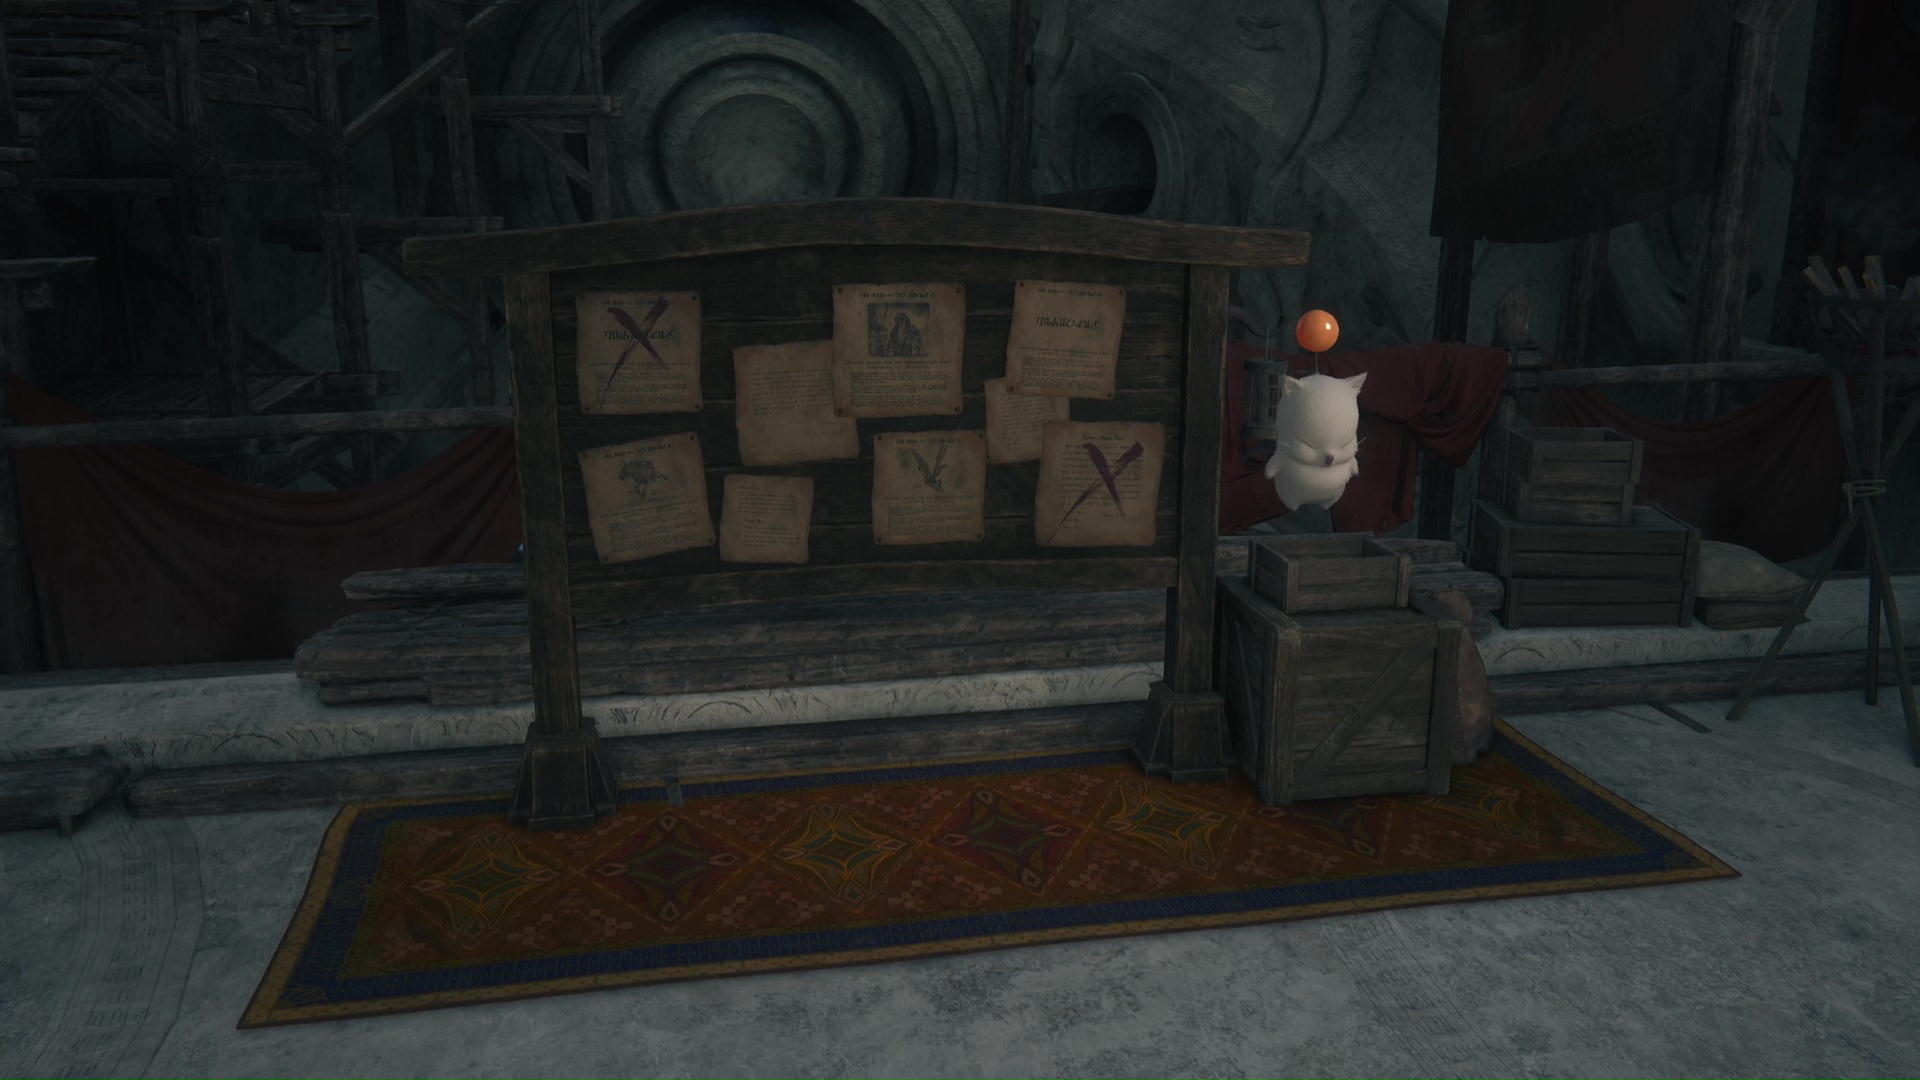
- All Hunt Board and Notorious Mark locations
- Ahriman
- Angel of Death
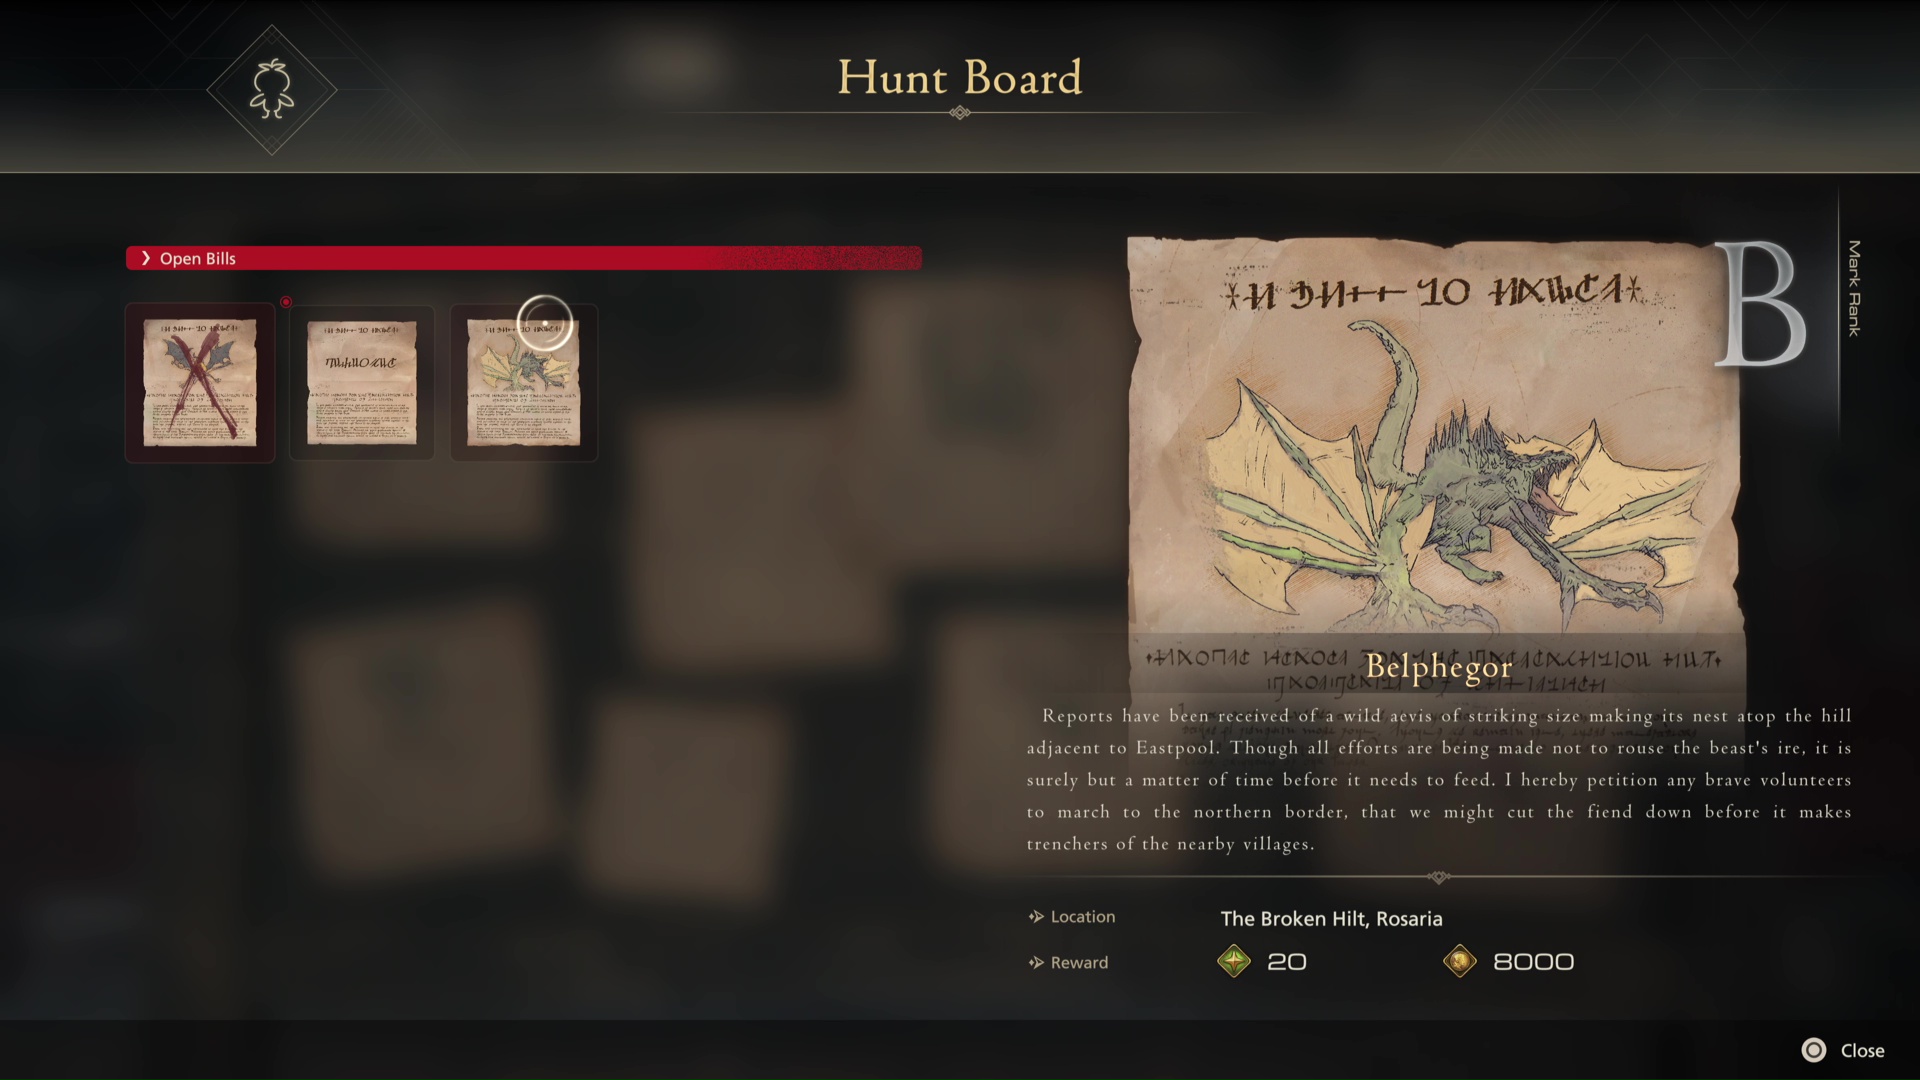
- Belphegor
- Dozmare
- Severian
- Sekhret
- Muddy Murder
- A Hill to Die On
- Soul Stingers
- Grimalkin
- The Nine of Knives
- Breaker of Worlds
- Bomb King
- Ten of Clubs
- The Mageth Brothers
- Ruin Reawakened
- The Pack
- Dread Comet
- Carrot the Morbol
- Tricephalic Terror
- Pandemonium
- Gobermouch
- Bygul
- Agni
- Usher to the Underworld
- Blood Moon
- Wailing Banshee
- The Grim Reaper
- Knight of the Splendent Heart
- How to unlock the Hunt Board
Finding locations for the Final Fantasy 16 Hunt Board's Notorious Marks is one of the biggest side quests in the game, with special rewards, experience and Gil for those who can track the locations of these deadly monsters down. Some of them get added to the board simply by playing through the game, others require specific conditions to be unlocked, and some of them, like the legendary Ruin Reawakened or Breaker of Worlds, will test Clive's abilities more than any other foe in the game.
Fortunately, we've found ALL of those Notorious Marks for you, and have laid out their locations below to make the FFXVI hunt board a little easier to manage, as well as what you need to do to unlock them if the conditions are any harder than simple campaign progress. If you're struggling to find Belphegor or the Angel of Death in Final Fantasy 16, we'll help you hunt your target down when working for Nektar the Moogle.
All Hunt Board and Notorious Mark locations in Final Fantasy 16
If you're looking for Hunt Board targets and Notorious Marks in Final Fantasy 16, we've listed their locations below, with more details about them further down.
Article continues below- Ahriman: Southwest of Martha's Rest, on the Route to Riddock's Jump.
- Angel of Death (Aruna): West Claireview plain, Southwest of Northreach.
- Belphegor: At the furthest point of the dead end path Southeast of The Broken Hilt, below Eastpool.
- Dozmare the Griffin: Castle wall just South of Caer Norvent River Gate, Southeast of Lostwing.
- Severian: Northern path of Sorrowise, to the West of Martha's Rest.
- Sekhret: Northwest Greensheaves, to the North of Martha's Rest.
- Muddy Murder (Flan Prince): Northern section of Hawk's Cry Cliff, at the bottom of the slope.
- A Hill to Die On (Fastitocalon): Top right corner of The Velkroy Desert in the Dhalmekian Republic, past The Bandit's Bed.
- Soul Stingers: East side of The Fields of Corova in Dhalmekia, in the open space North of the Empty Hovel.
- Grimalkin: In the Cattery, the dead-end path South of The Sickle, all to the West of the Jaw in Dhalmekia.
- Nine of Knives: Just on the road North of the Jaw fast travel point.
- Breaker of Worlds (Atlas): At the furthest Eastern point of Cressida, attached to the Greensheaves region between Martha's Rest and Eastpool in Rosaria.
- Bomb King: In the Crock, the little path South of the Dragon's Aery in Sanbreque, near Northreach.
- Ten of Clubs: In Vamare, the little outpost on the South side of Fields of Corova in Dhalmekia.
- The Mageth Brothers: On the beach at Quietsands, North of Port Isolde in Rosaria.
- Ruin Awakened (Svarog): In Mornebrume, the forest path East of the Caer Norvent Glorieuse Gate, South of Northreach.
- The Pack: South of Tabor in Dhalmekia, in the dead-end route going South from the Western road.
- Dread Comet: In the Sickle, connecting the Jaw and Fields of Corova in Dhalmekia.
- Carrot the Morbol: In the Whispering Waters, just North-West of the Three Reeds fast travel point.
- Tricephalic Terror (Gorgimera): On the West side of the main Velkroy Desert, south of the Fast Travel point.
- Pandemonium: On the South-West path leading to the Castle from the Skaithfarr village near the Shadow Coast in Waleod.
- Gobermouch: In Eistla village in Waloed, on the raised West side of town.
- Bygul: Just West of the central path going through Kritten Hollow in Waloed.
- Agni: On the Halfcombe path going South from Eistla towards the Edge of Infinity in Waloed.
- Usher to the Underworld (Thanatos): On the road West of Titan's Wake in Dhalmekia.
- The Blood Moon (Terminus): In the Crock in East Sanbreque, same location as the Bomb King before it.
- The Wailing Banshee (Gizamaluk): In the Garnick settlement in West Vidargraes in Waloed.
- The Grim Reaper (Prince of Death): At the Western tip of Cape Orsiere in Sanbreque, North and West of Northreach town.
- Knight of the Splendent Heart: At The Penitent's Gate in North Sanbreque, North of Moore and next to the Royal Meadows fast travel point.
When we've put a part of the name in brackets, it's because the Notorious Mark's name is different to its listing on the hunt board - for example, the "Angel of Death" is actually called Aruna, but you don't know that until you find it. There are further monsters on the board that we've yet to unlock, but that will comfortably cover the first few targets that Nektar the Moogle will send you after, and we'll update this page with new locations and targets as we get the details for them in the following days!
Finding Notorious Marks shouldn't be too hard once you're in the area - you can see monsters without entering combat and Marks tend to look very different from the local monsters (not to mention you'll know what they look like from their entry on the Hunt Board itself).
Ahriman location
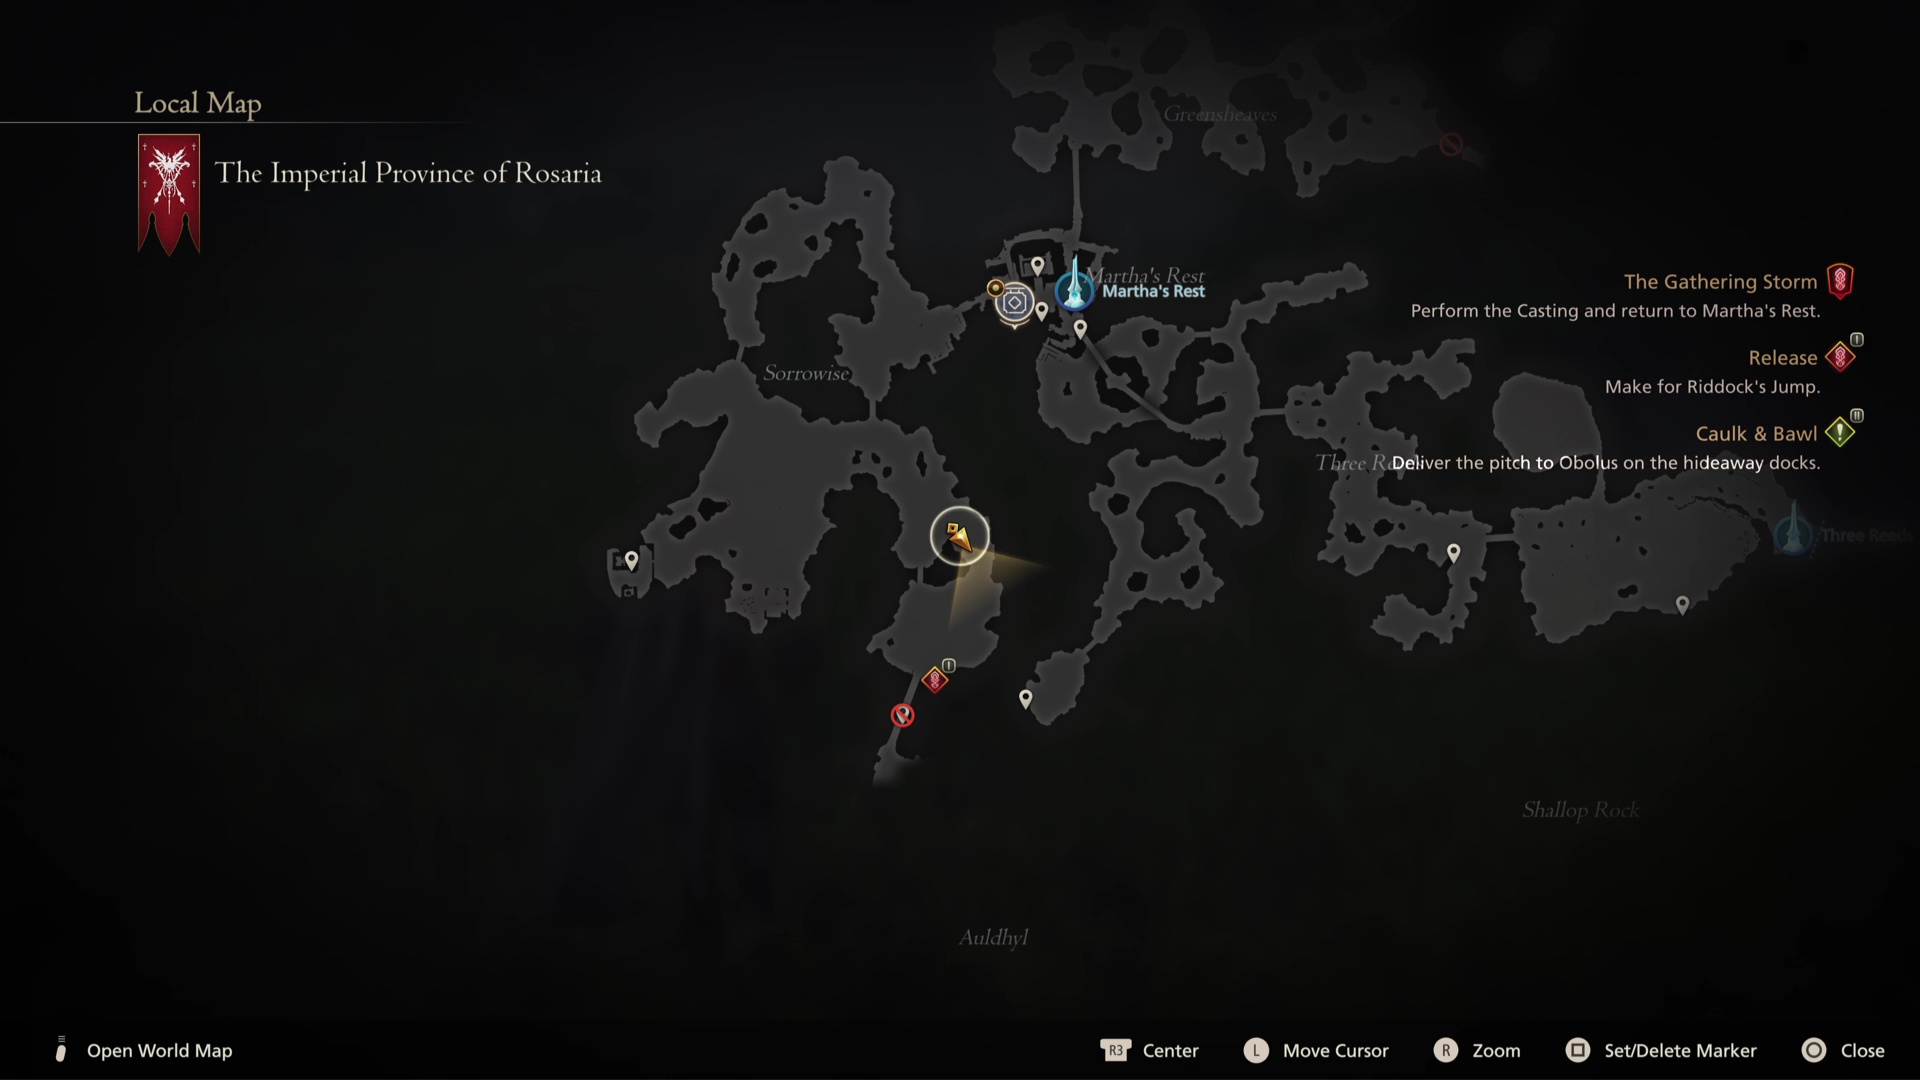
The weakest of the Notorious Marks, Ahriman is a little one-eyed winged monster that can be found Southwest of Martha's Rest, down from Sorrowise. It uses a lot of area-of-effect attacks, some of which do very high damage. You'll have to dodge more than you use the Final Fantasy 16 parry mechanic, leaping forward and back as required to avoid getting caught in these radiating deathzones.
Angel of Death location
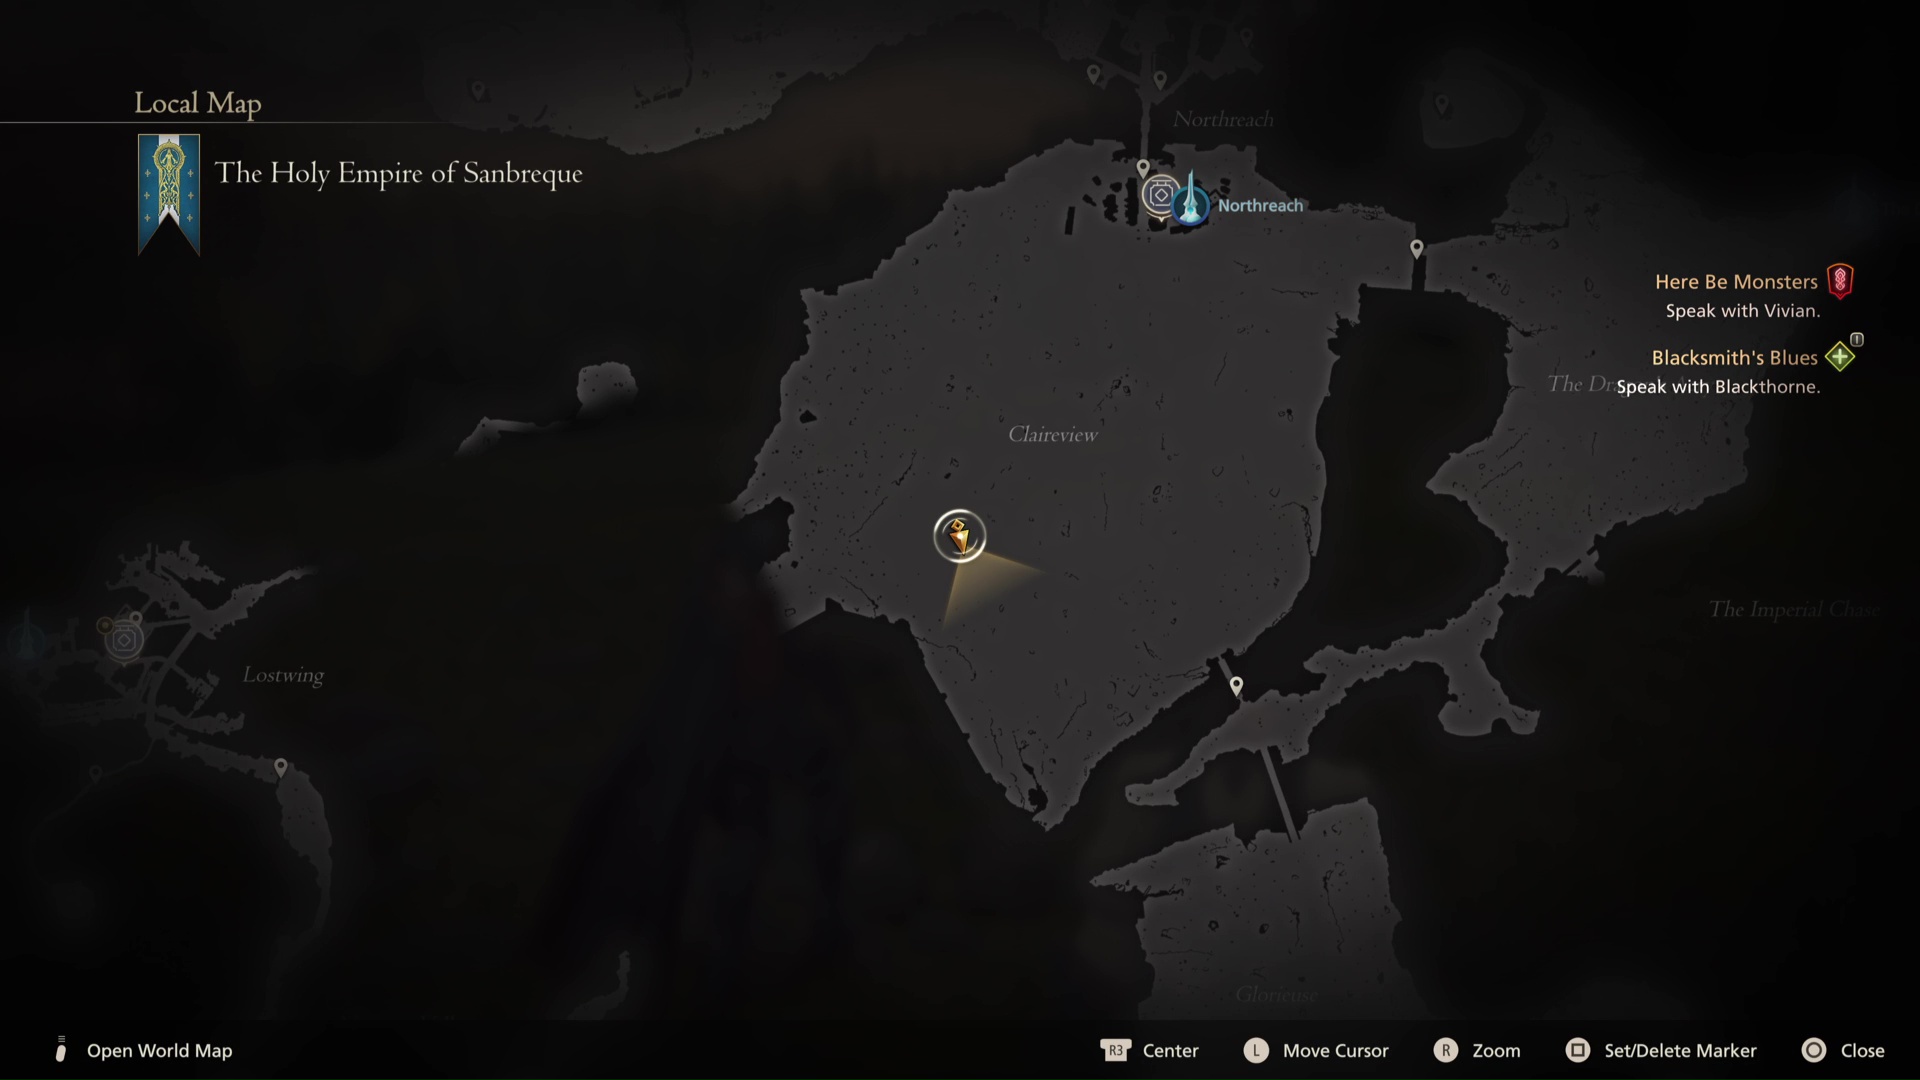
The spectral Aruna is found on the West side of the Claireview plain, the big open space just South of Northreach. It's a pretty obvious target among the more mundane foes in the area, and one that uses a lot of swift, sweeping charges and fast-arcing strikes.
Weekly digests, tales from the communities you love, and more
Belphegor location
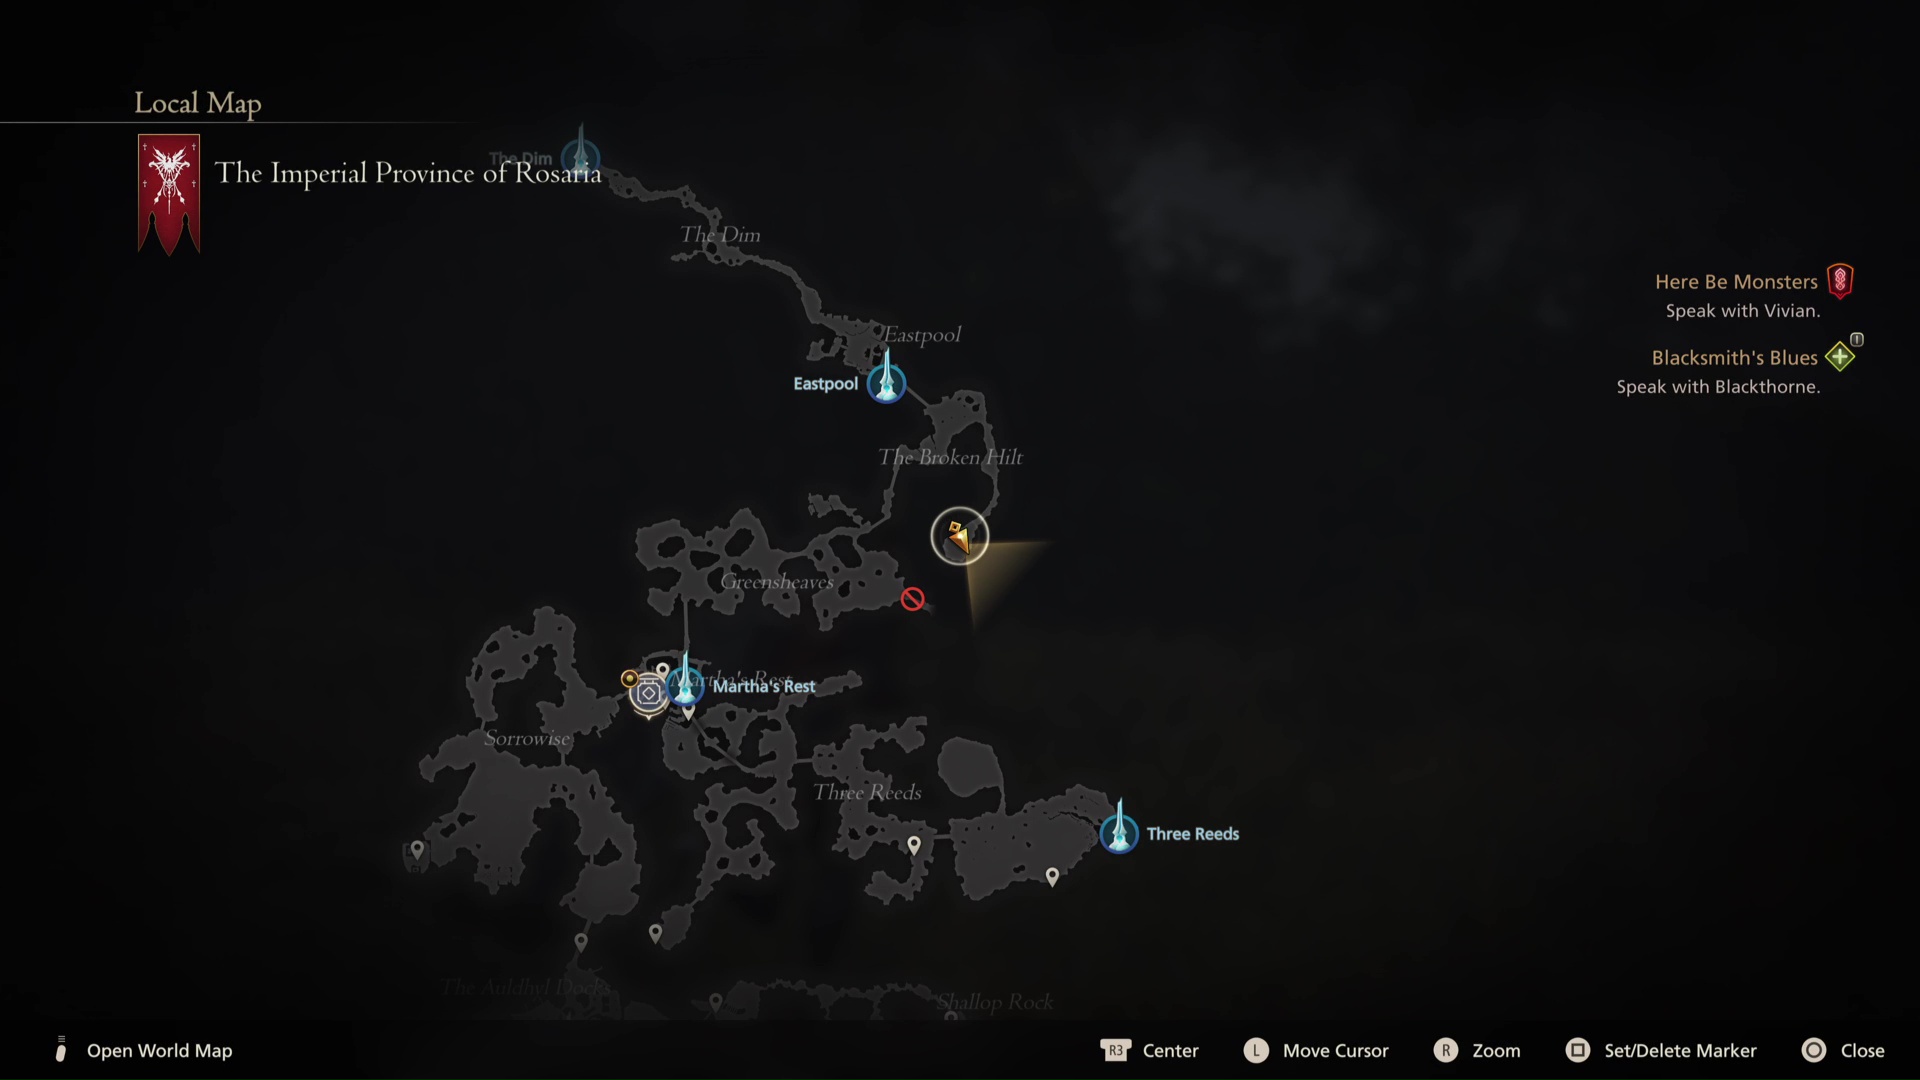
Belphegor is a dragon-like creature found near Eastpool. Head South out of Eastpool to the Broken Hilt and turn East down the long path that leads to a dead end with a cliff - Belphegor is waiting at the furthest point. It does a lot of hard-hitting attacks mixed in with a few breath projectiles to keep you on your toes, so don't get complacent.
Dozmare the Griffin location
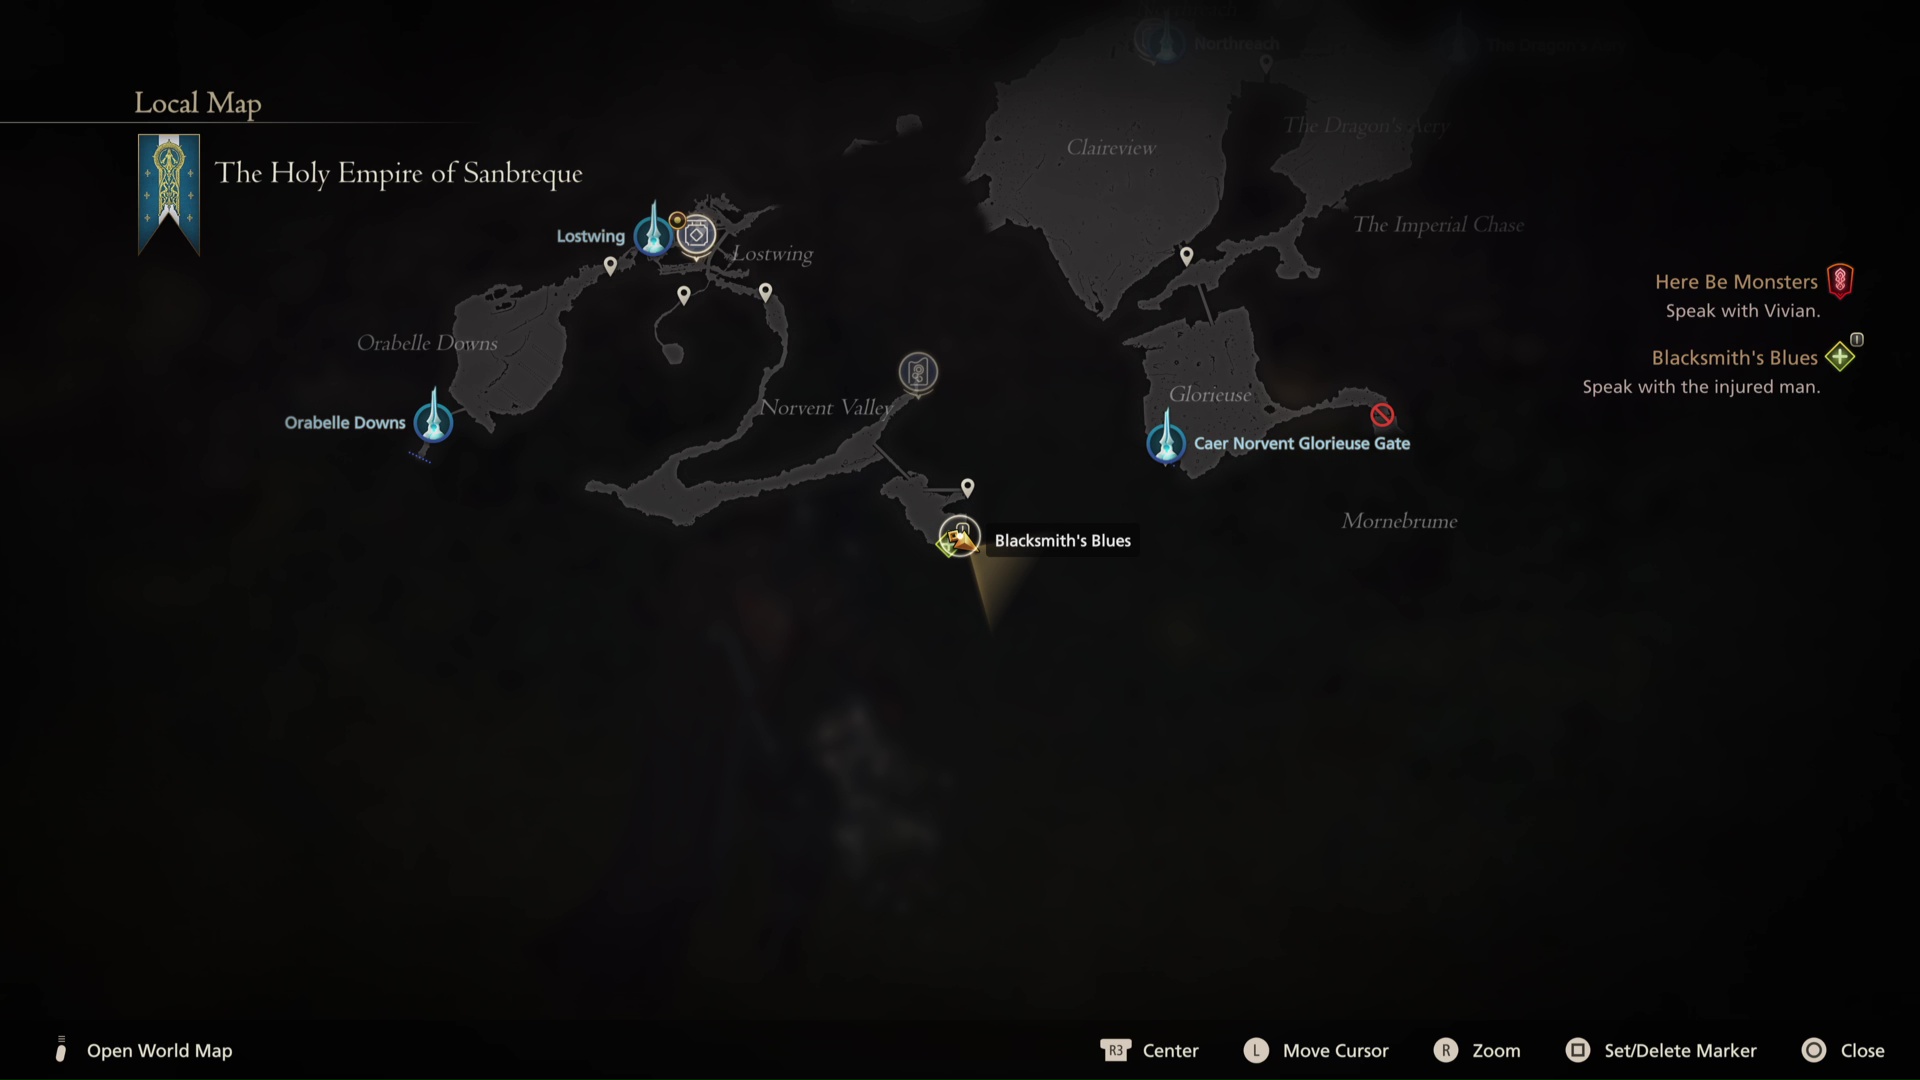
Dozmare is a target that only opens up as part of the Blackthorne Blues quest you get back at the Hideaway, and is very out of the way. Fast Travel to Lostwing and head down the zig-zagging road South, following it all the way to the end and the Caer Norvent River Gate. Just South of that is an open space in front of the fortress wall - approach the wall to prompt Dozmare to appear. The griffin is a brute who deals primarily in melee strikes, and is more of a tank than its appearance might suggest - though it's certainly capable of the occasional fast lunge or sweep to throw you off balance.
Severian location
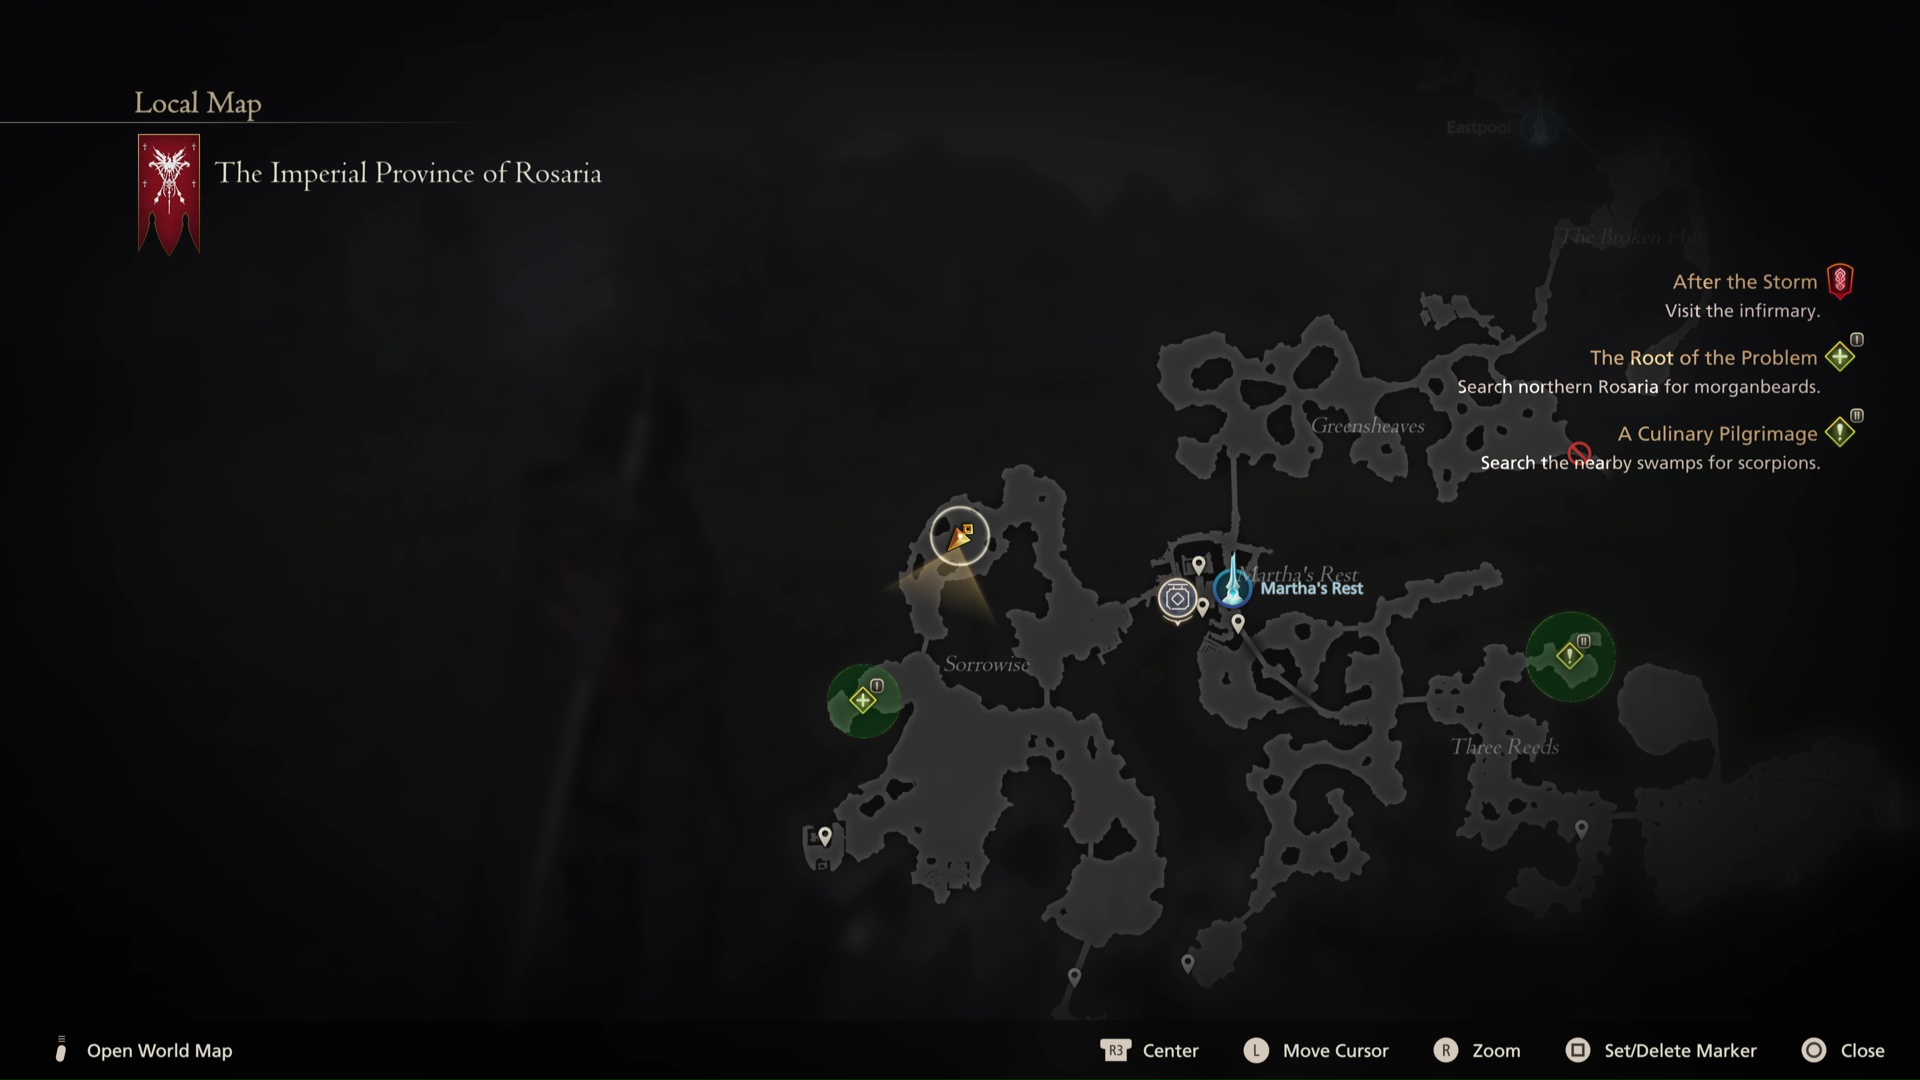
The Severian is a Fallen construct, similar to the bosses you fought back at the Phoenix gate. It's found at the Northernmost point of Sorrowise, to the West of Martha's Rest - leave the town by the West gate and hug the right hand path until you see it ahead, curled up into a huddle until you approach. It's a blade-focused and AOE fighter whose unpredictable attack patterns can make defense tricky, so stay mobile and don't always leap in for a counterattack when the opportunity presents itself, as it locks into combos that can still knock you away even if you avoid the first attack.
Sekhret location
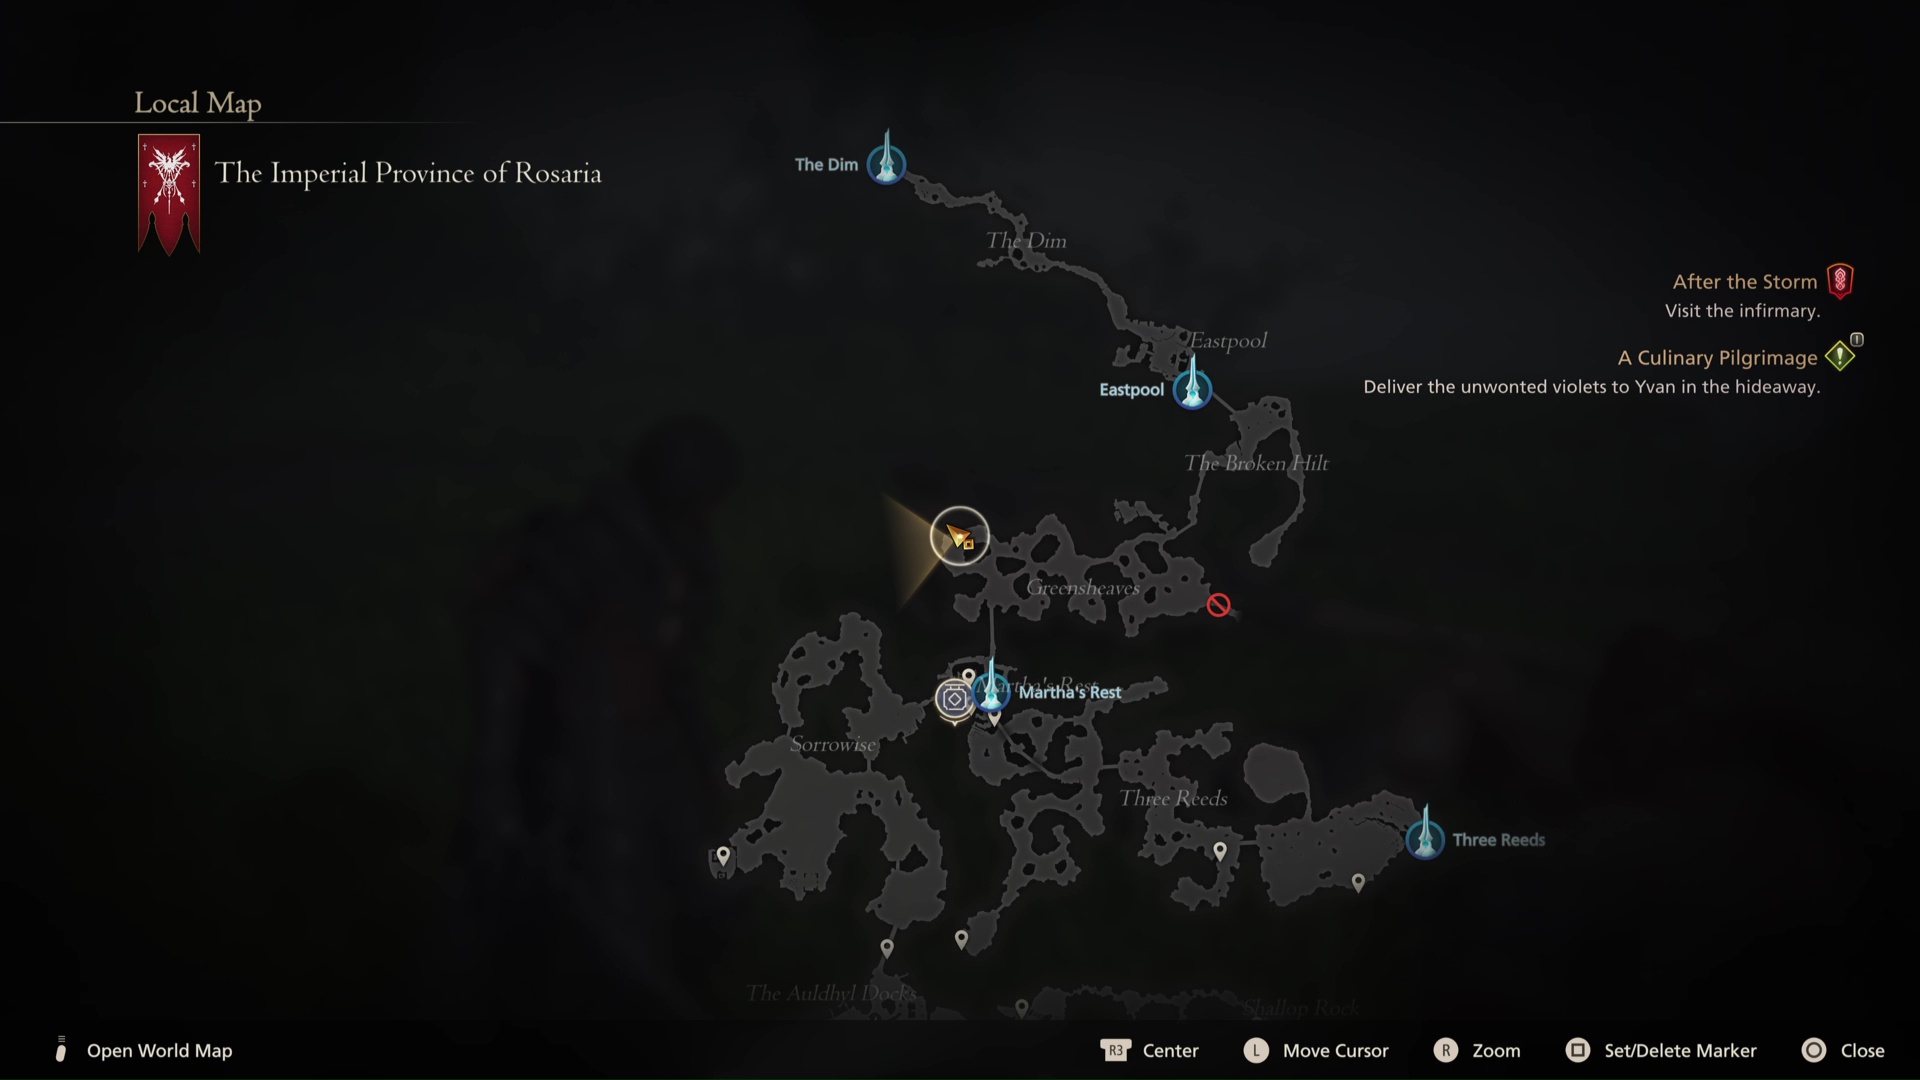
Sekhret is a big minotaur, and while you've fought several already, it's easily the toughest so far. Located on the Westernmost point of Greensheaves, to reach it leave Martha's Rest by the North gate and head to the back-left corner of the area to see the brute stomping about. Sekhret uses massive melee strikes, slow but heavy, capable of doing huge damage if they land. You should also watch out for the "Raging Bull" attack - getting caught in that rapid combo can be an instant kill.
Muddy Murder location
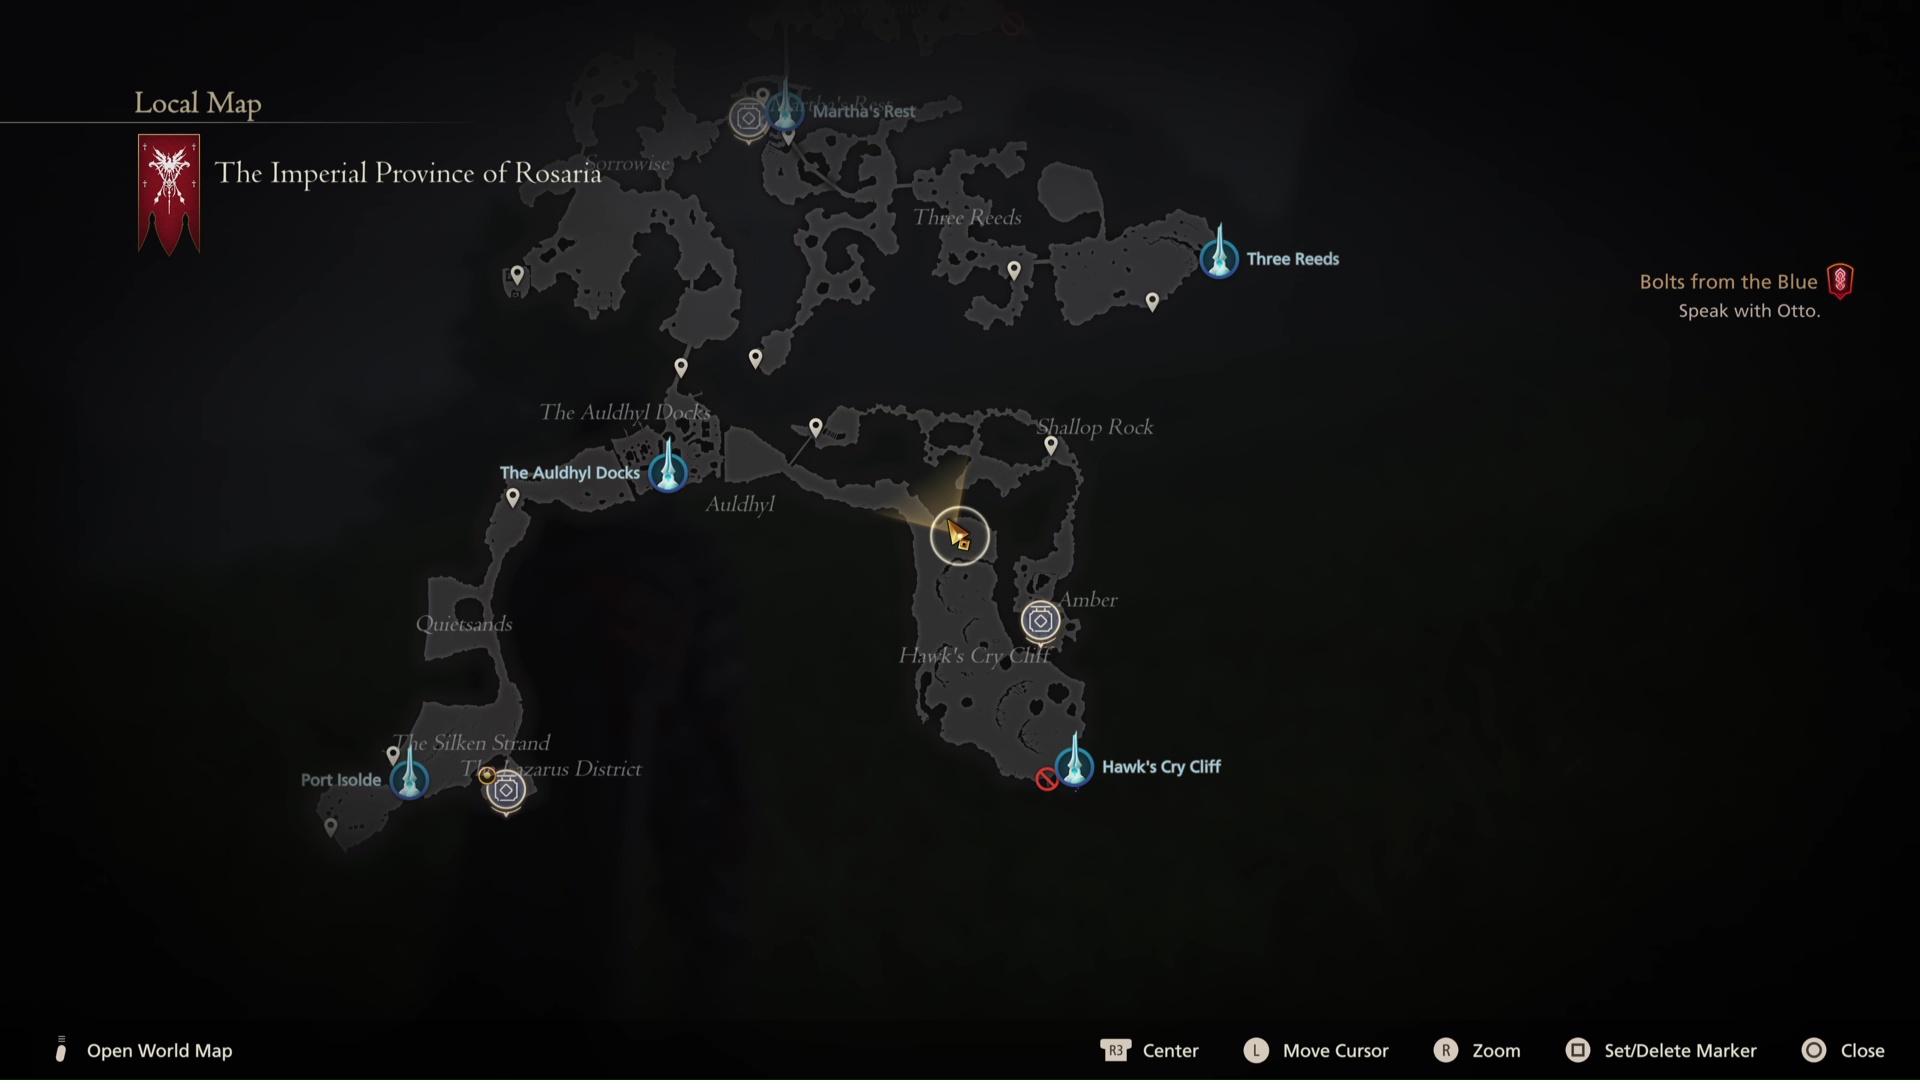
Though the board doesn't call it as such, this is to kill a gelatinous monster called the Flan Prince, found at the Northernmost point of Hawk's Cry Cliff. It's actually hidden until you get close, so head into the little dead end arena marked and go to the far east wall, and it'll appear out of the ground. The Flan Prince is a bit of nightmare - not very agile, but with a wide range of spells from all elements that make it very unpredictable, including the ability to dual-cast two at once. The focus on AOE attacks means you should be dodging and evading all the time.
A Hill to Die On location
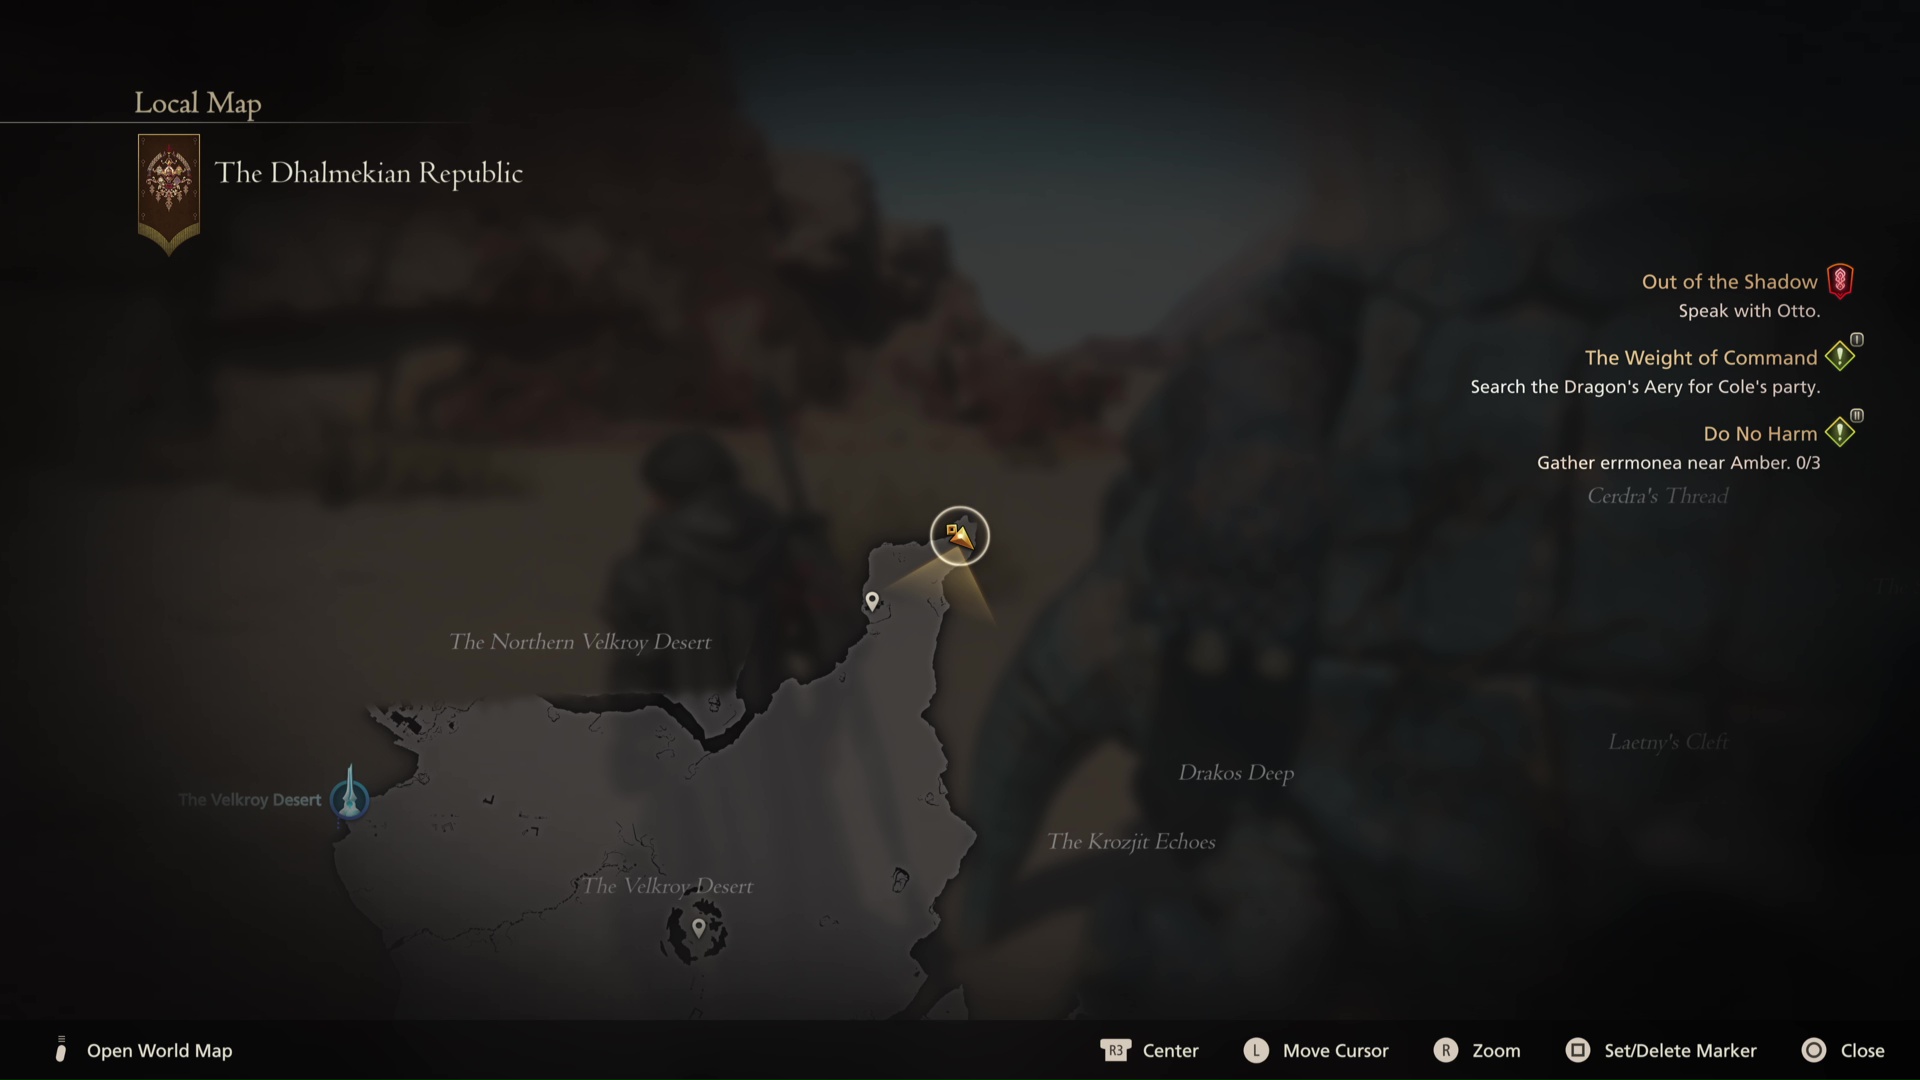
The hunt target of A Hill to Die On is in the very top-right corner of the Velkroy Desert in Dhalmekia, past the Bandit's Bed ruins - just fast travel to The Velkroy Desert and head East until you hit the border, then straight up. The target is a Fastitocalon, a powerful turtle whose limited motion hides a surprisingly diverse move set. Fastitocalon will take reduced damage unless you hit it in the head, and you want to be very careful not to be in the path of its spin move, which can do massive damage to those caught in it.
Soul Stingers location
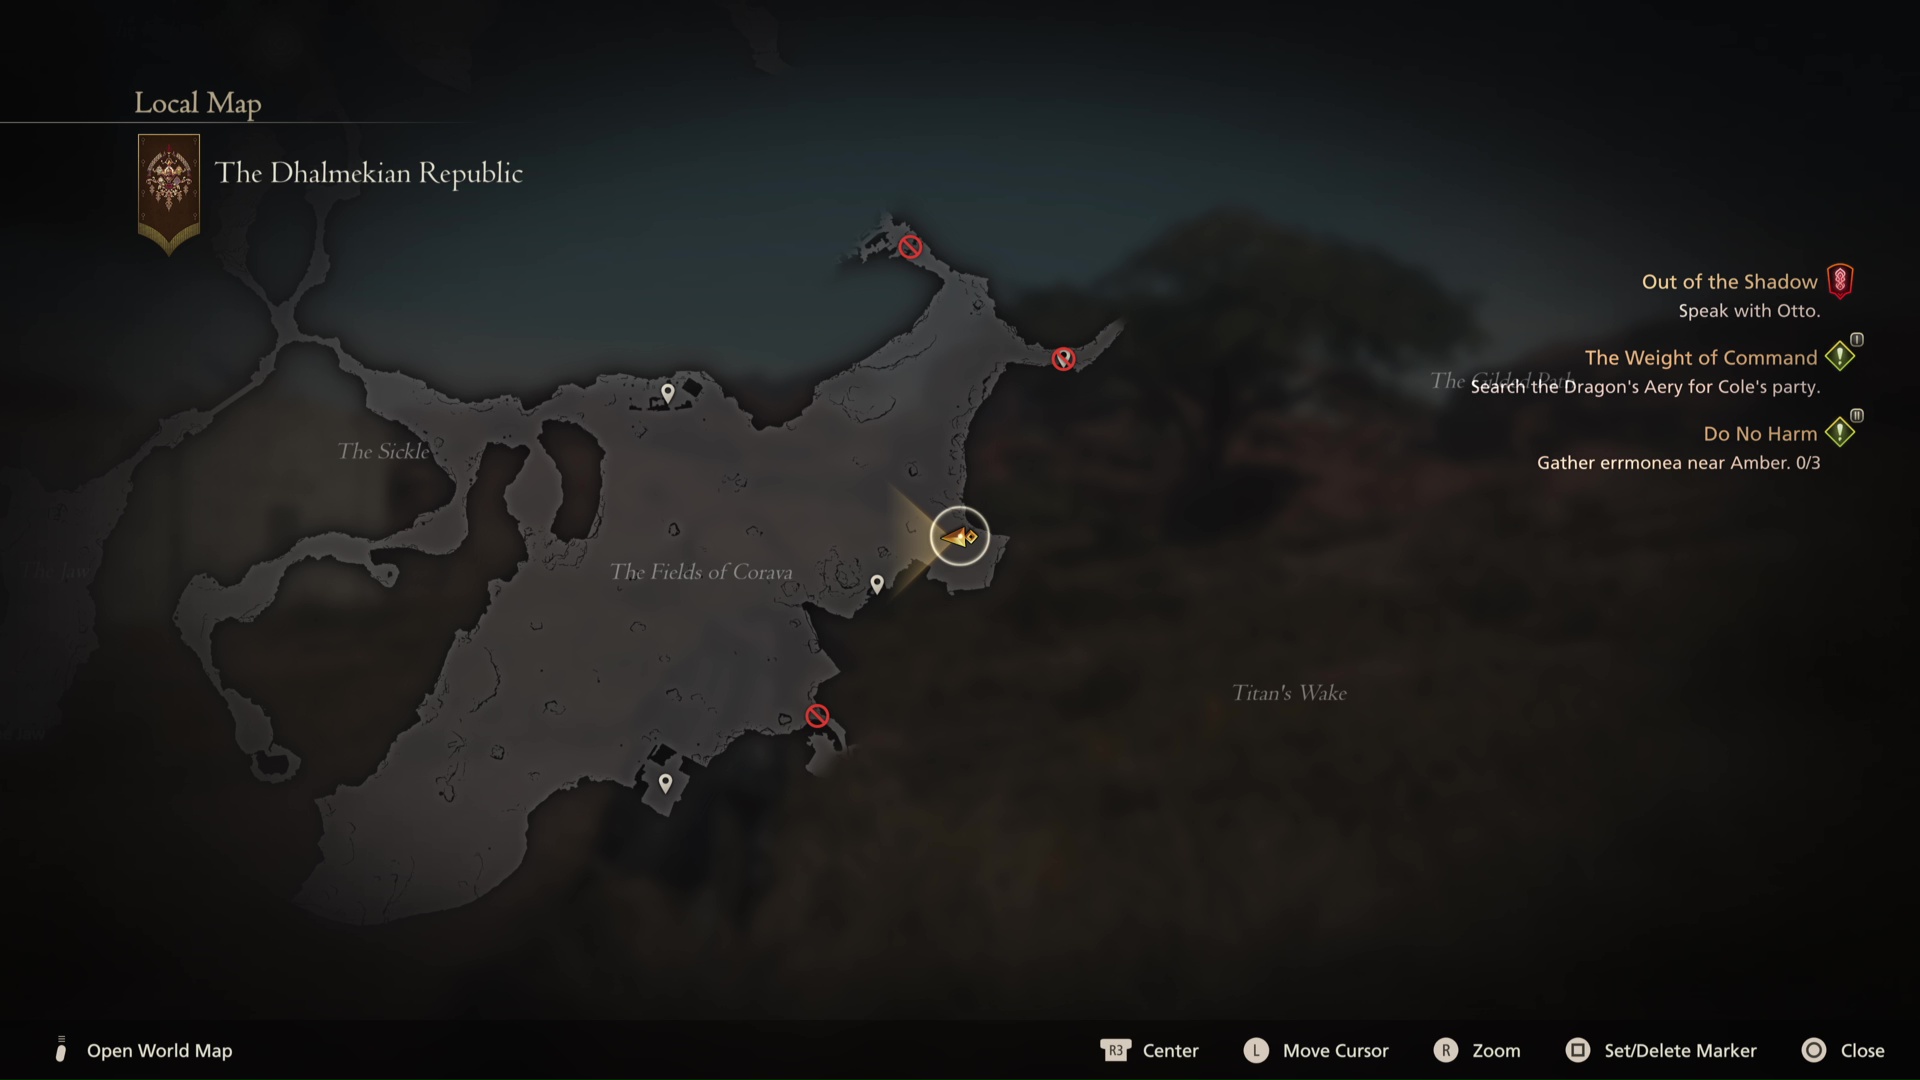
The first (but not last) hunt target that's actually a group of enemies, the Soul Stingers are found on the right side of the Fields of Corava in Dhalmekia, in the open space north of the Empty Hovel. The Soul Stingers are fast-moving insects that aren't too hard individually, but grouped together they can be enormously damaging, as it's difficult to see them all at once and defend from multiple angles. Use either AOE attacks like the Flames of Rebirth to burn them all, or focus on one at a time. The less there are, the easier it'll be.
Grimalkin location
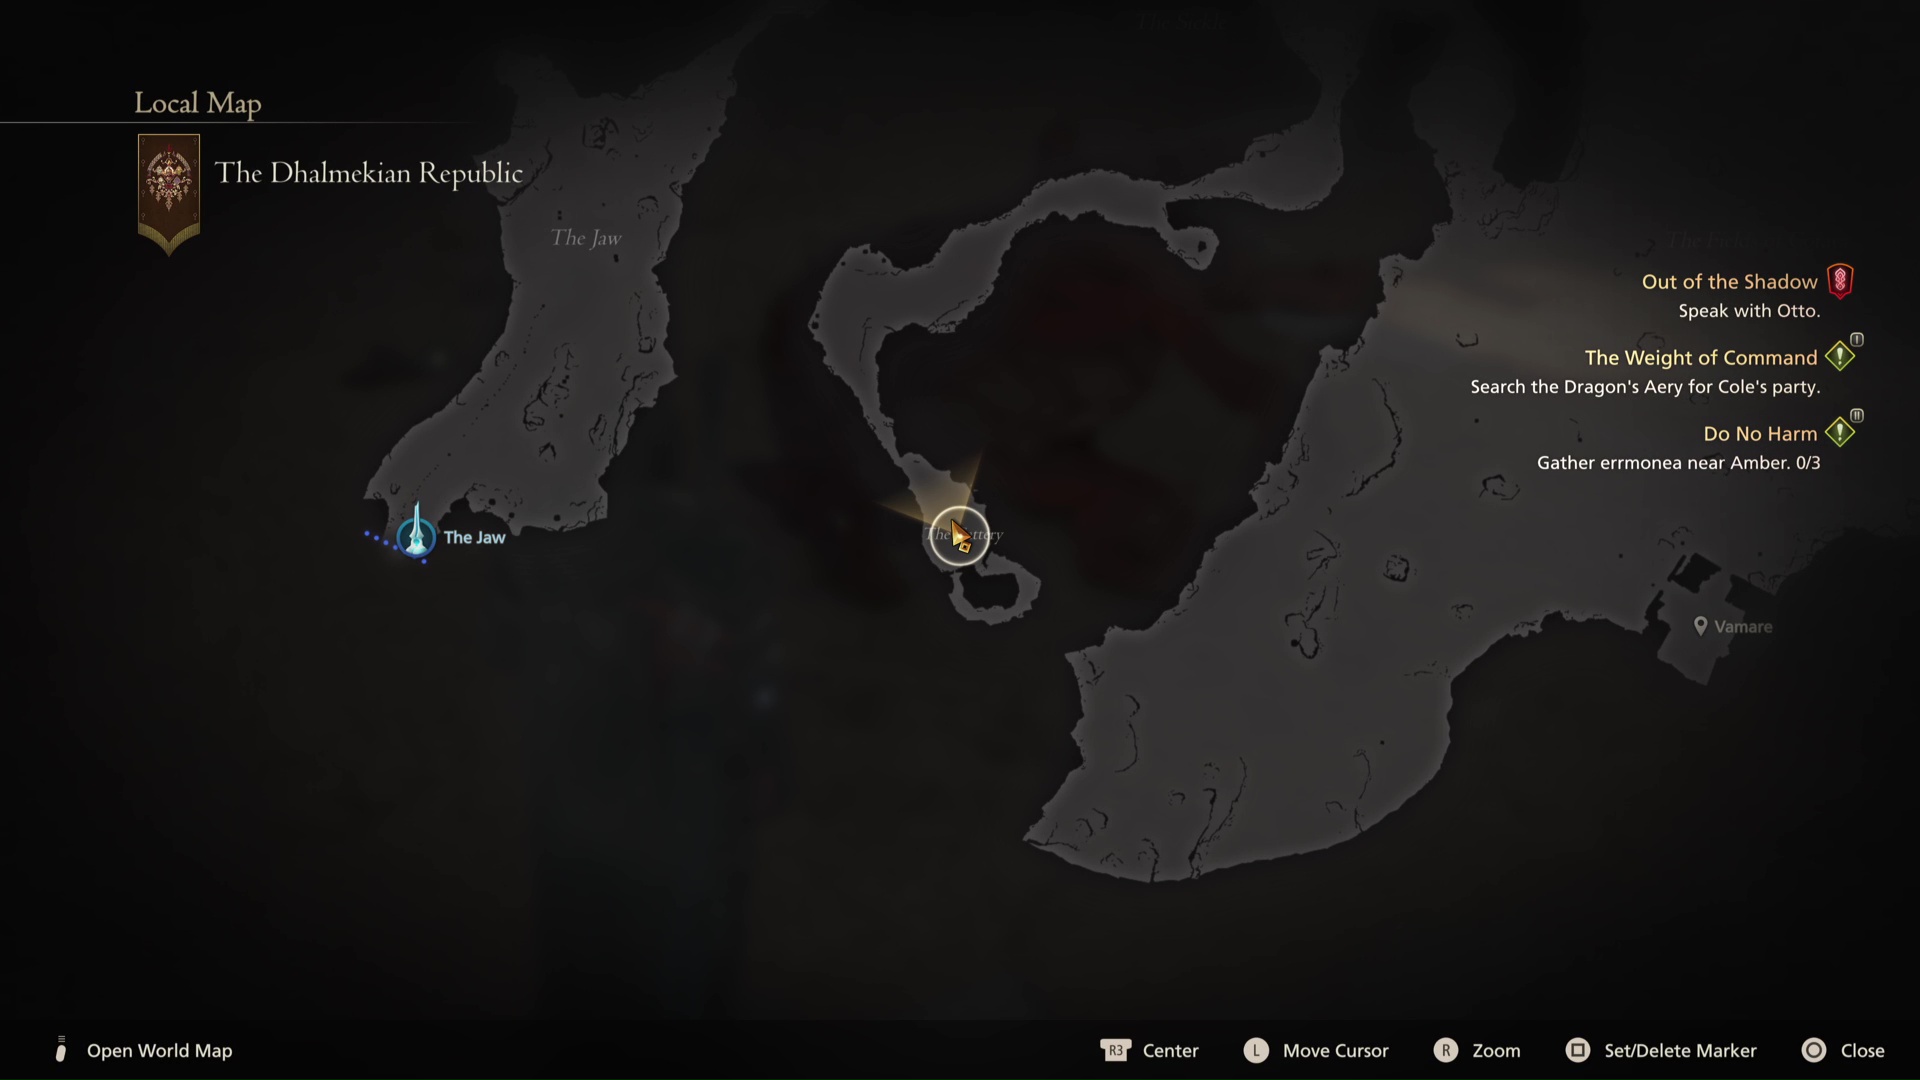
Another pack enemy, the Grimalkin is a large predatory monster leading other, lesser monsters. To find it, you'll need to reach the Cattery, a dead-end area in Dhalmekia South of the Sickle. On reaching it, the Grimalkin will make you fight several of its minions first, the Wild Nakk, but they're relatively easy, with no ranged attacks and only a basic moveset. The Grimalkin is harder, as it's bigger, with a wider moveset, and is something of a tank. Focus on ranged fighting if you can, and use its obvious telegraphing for some easy counter-attacks.
The Nine of Knives location
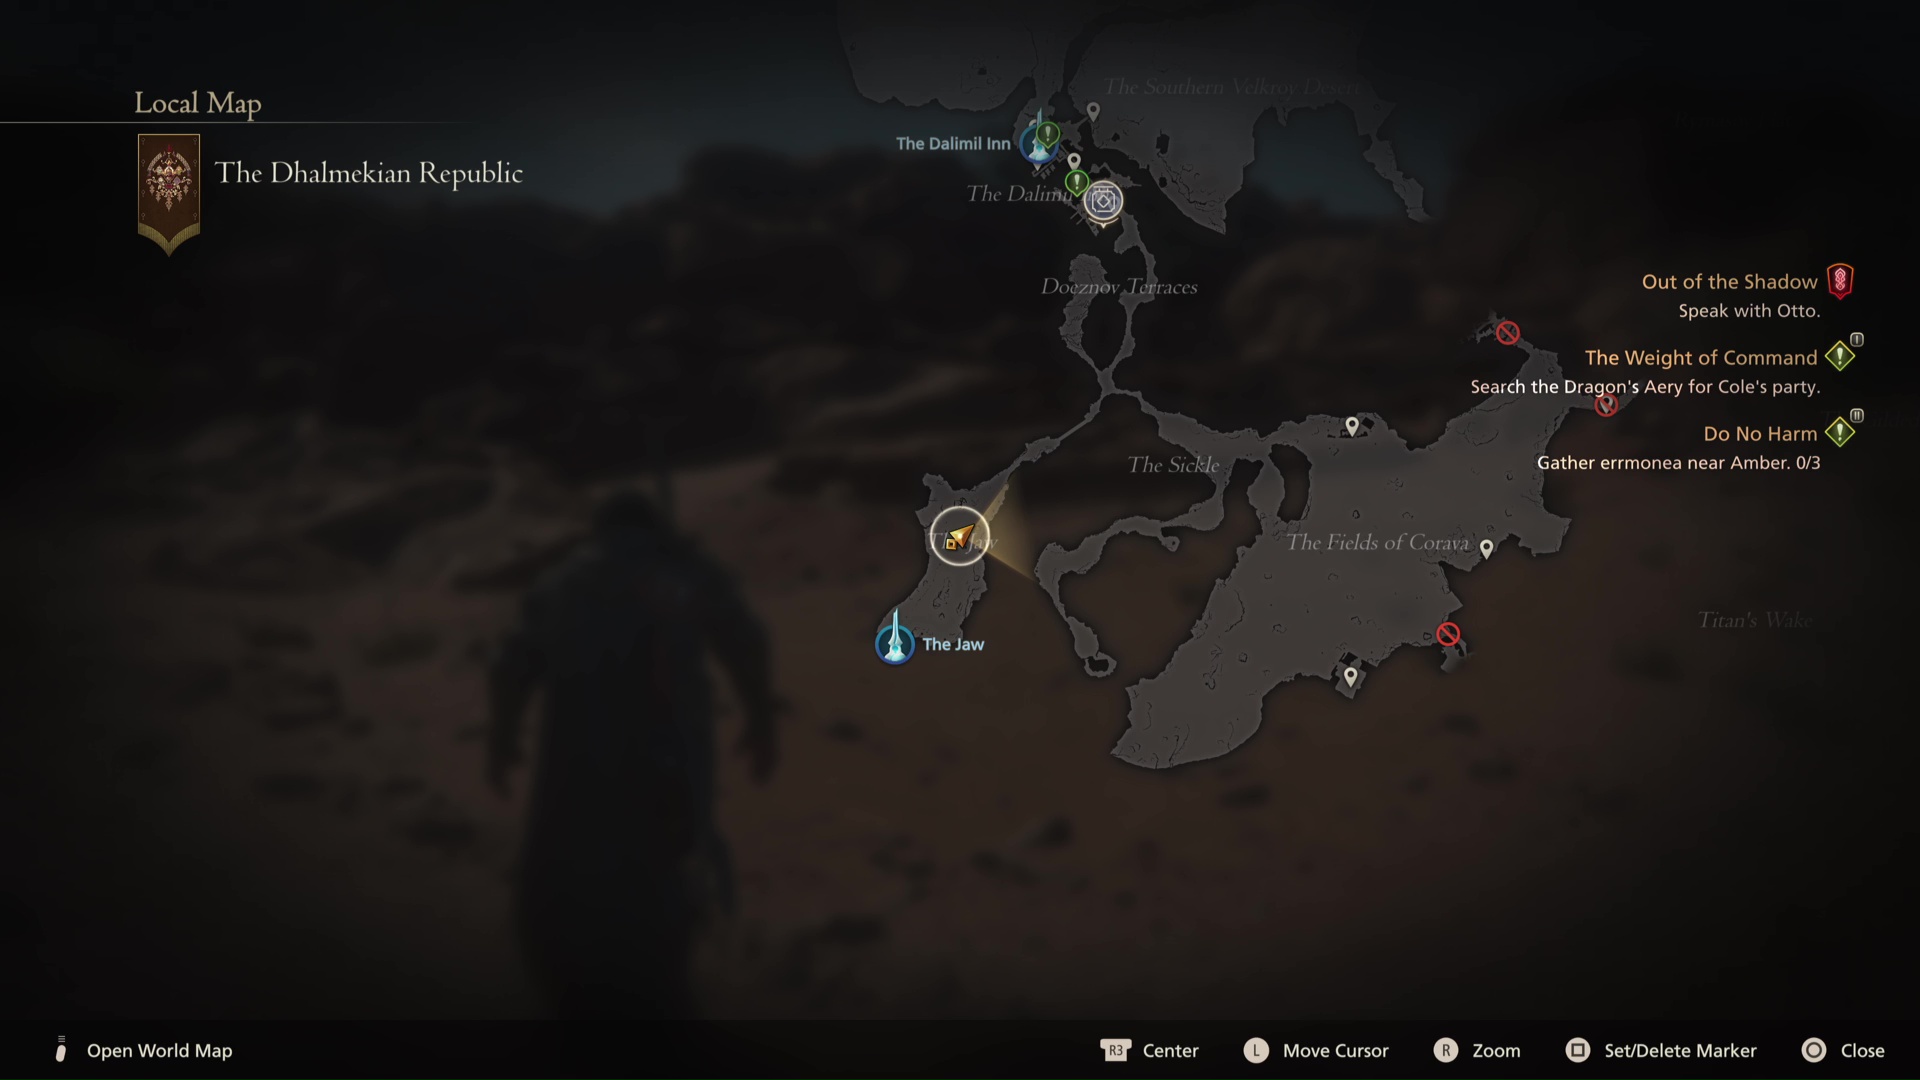
The first of the bandit hunts, the Nine of Knives is very easy to find - just fast travel to The Jaw in South Dhalmekia and walk North along the road to see them. The Nine of Clubs is an agile rogue who mixes fast strikes, mobility and ranged attacks, so you'll need to play defensively as much as possible. Watch them closely to anticipate their strikes, then follow up with a parry or precision dodge to lay the hurt on them.
Breaker of Worlds location
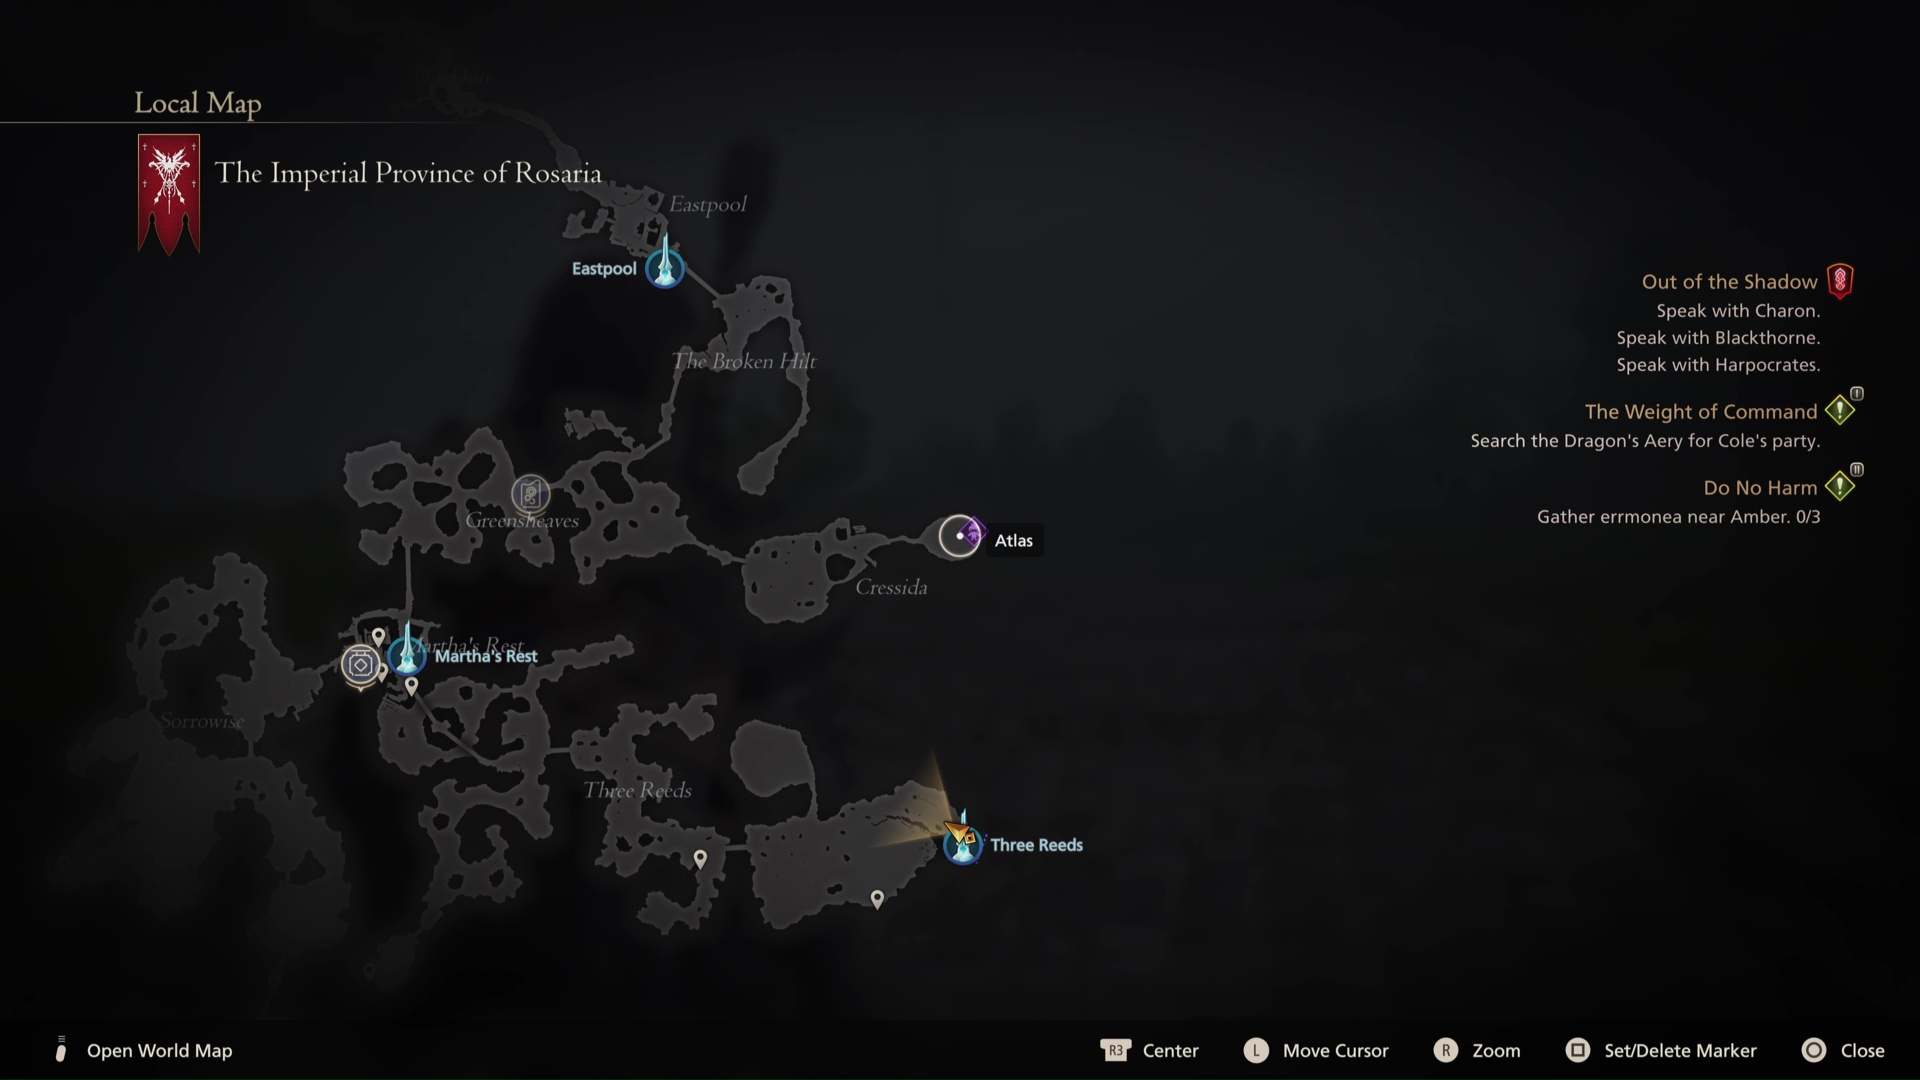
The Breaker of Worlds is the first target with no clear search zone given to find them, but don't worry - they're in Rosaria, in the Cressida area South of Eastpool. To reach them, fast travel to the Eastpool Obelisk and follow the path South through The Broken Hilt and under the arch at East Greensheaves, then track down through Cressida and head East until you hit the end. The Breaker of Worlds is actually a Fallen Construct called Atlas, and you are, frankly, probably not ready for it. It's level 45, despite you getting the option to hunt it a lot early than that, and its incredibly high HP, hugely damaging AOE attacks and habit of leaving fiery trails behind it means you'll probably want to level up a few times before trying this thing on.
Bomb King location
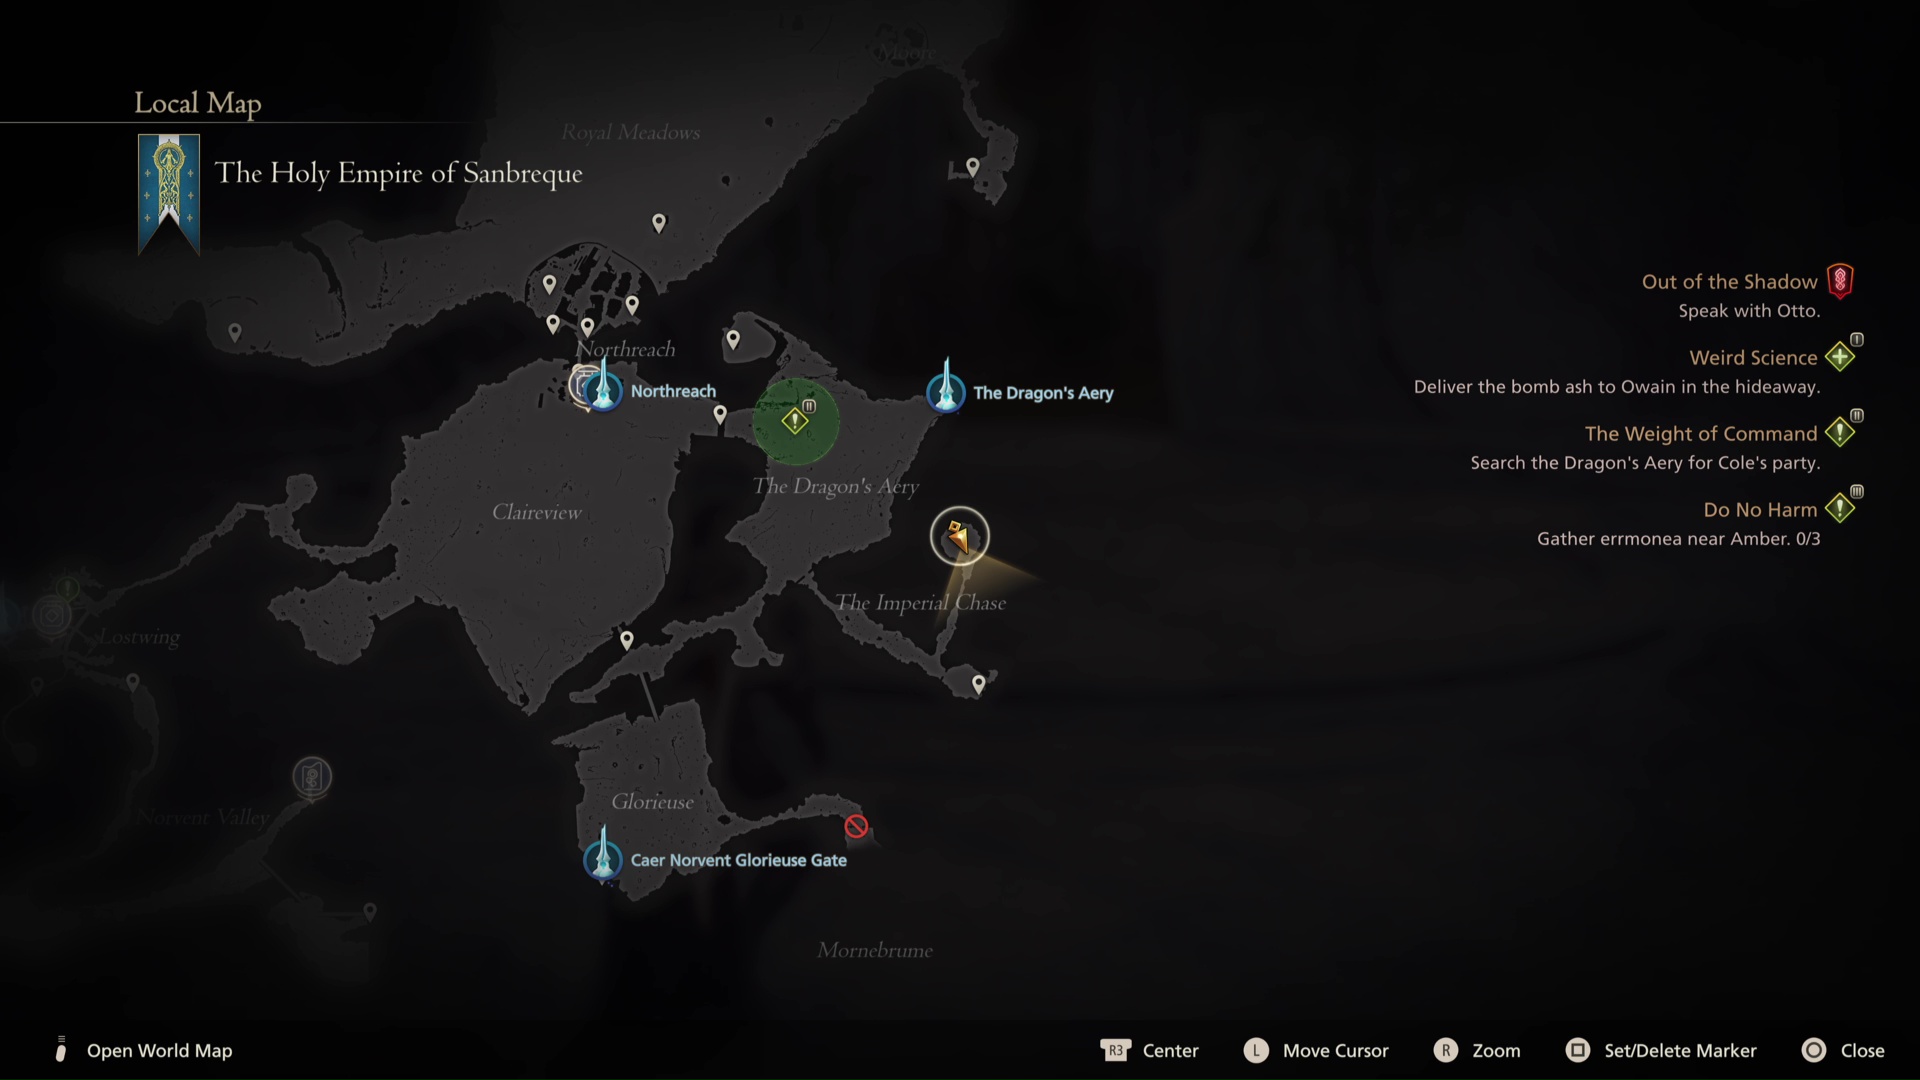
The Bomb King is a hunt target tied to a quest - specifically the "Weird Science" side quest you get back at Hideaway after working on Mid's engine. Once it's on the board and confirmed by Nektar, you can find the Bomb King in The Imperial Chase, the little path South of the Dragon's Aery near Northreach. The Bomb King is, to nobody's surprise, an upgraded version of the standard Bomb enemy, and one that focuses on explosions, AOEs and projectiles over melee attacks. You'll have to stay mobile to avoid getting caught in its lingering fire, and use single, high damage strikes before diving away for cover.
Ten of Clubs location
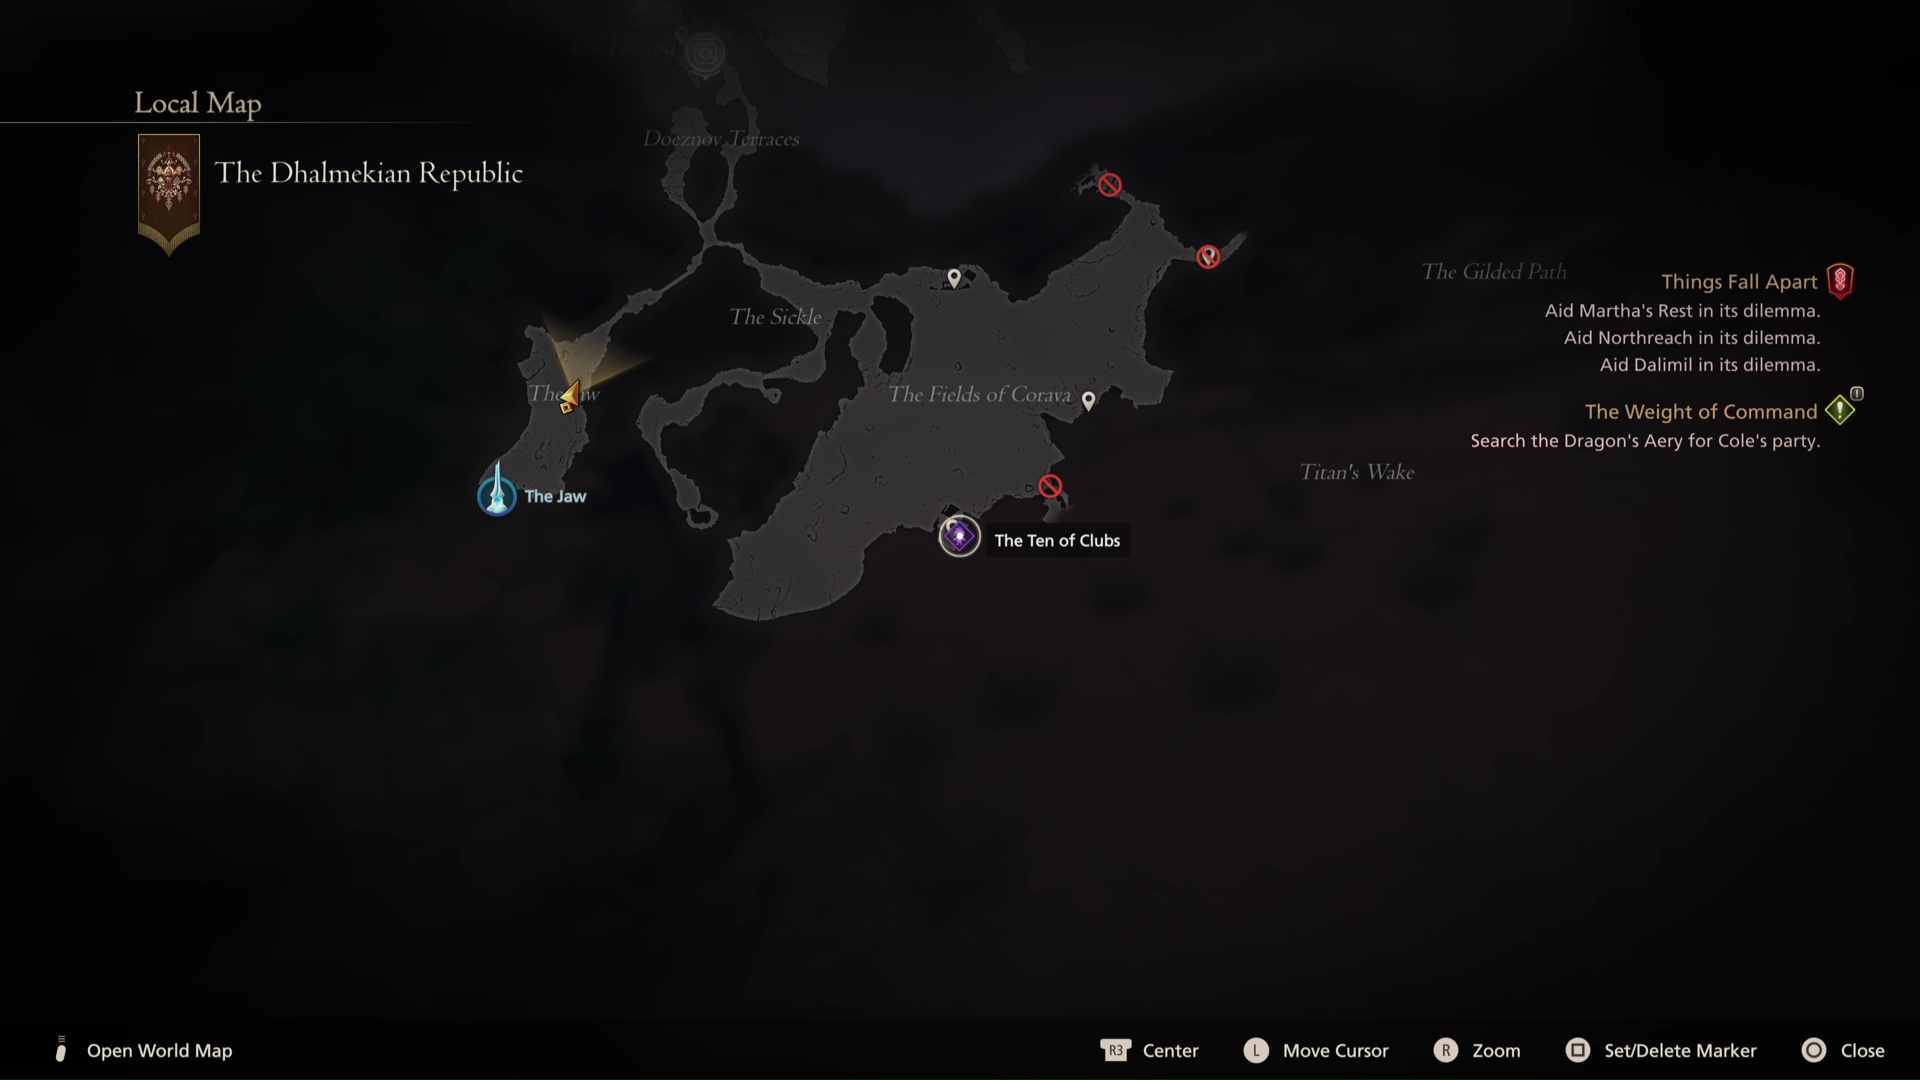
Another bandit, this one a big brute with an axe, the Ten of Clubs is at Vamare, the little outpost at the South of the Fields of Corova, not far from where the Soul Stingers were. The Ten of Clubs is deceptively dangerous, as their large, wild swings cover more area than you'd think, and do huge damage when they land. Play carefully and defensively - a little caution can render this goliath largely harmless.
The Mageth Brothers location
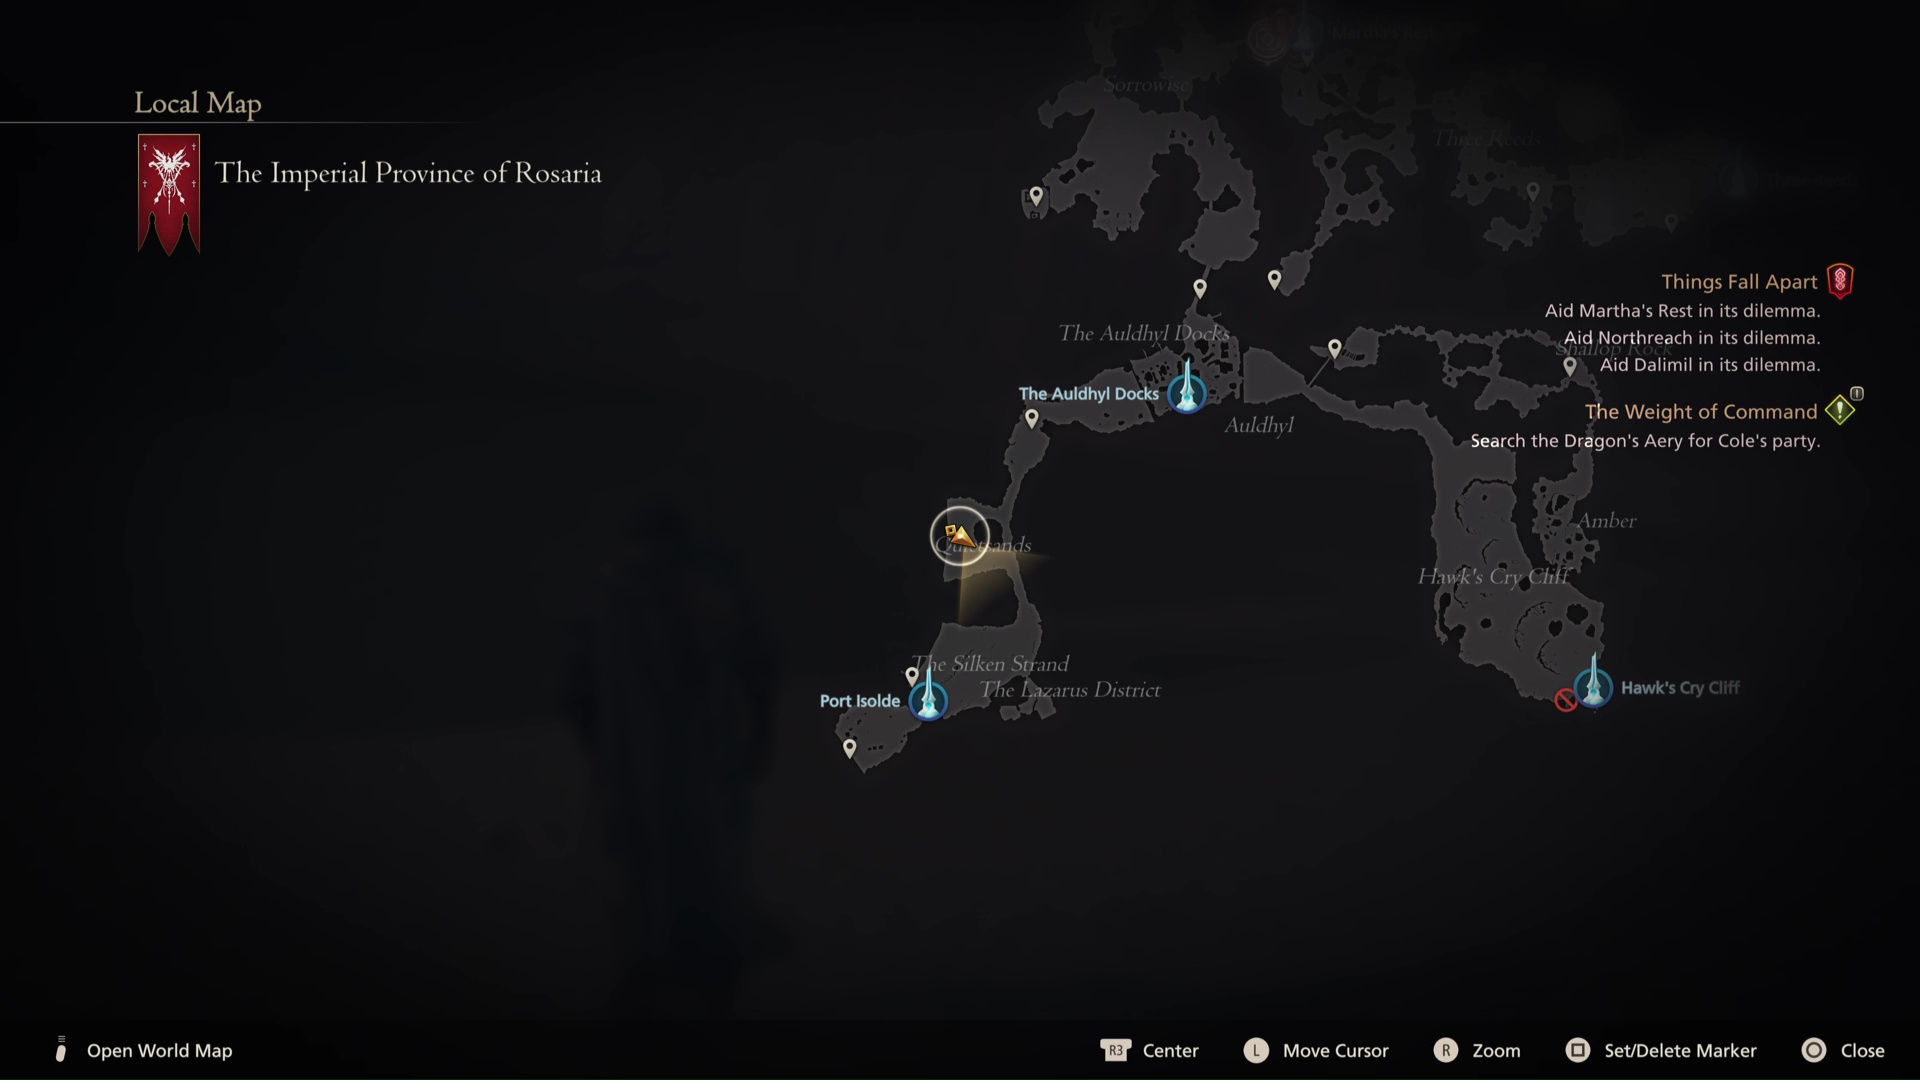
The Mageth Brothers might sound like spellcasters, but these thugs found on the Quietsands Beach to the North of Rosaria's Port Isolde are a lot more physical than intellectual. The Mageth Brothers are a trio of high-level bandit bruisers with axes who have a particular fondness for charge attacks. Trying to fight them all at once is a bad idea, so try and fight them one at a time, or use ranged AOE attacks to burn them safely from a distance.
Ruin Reawakened location
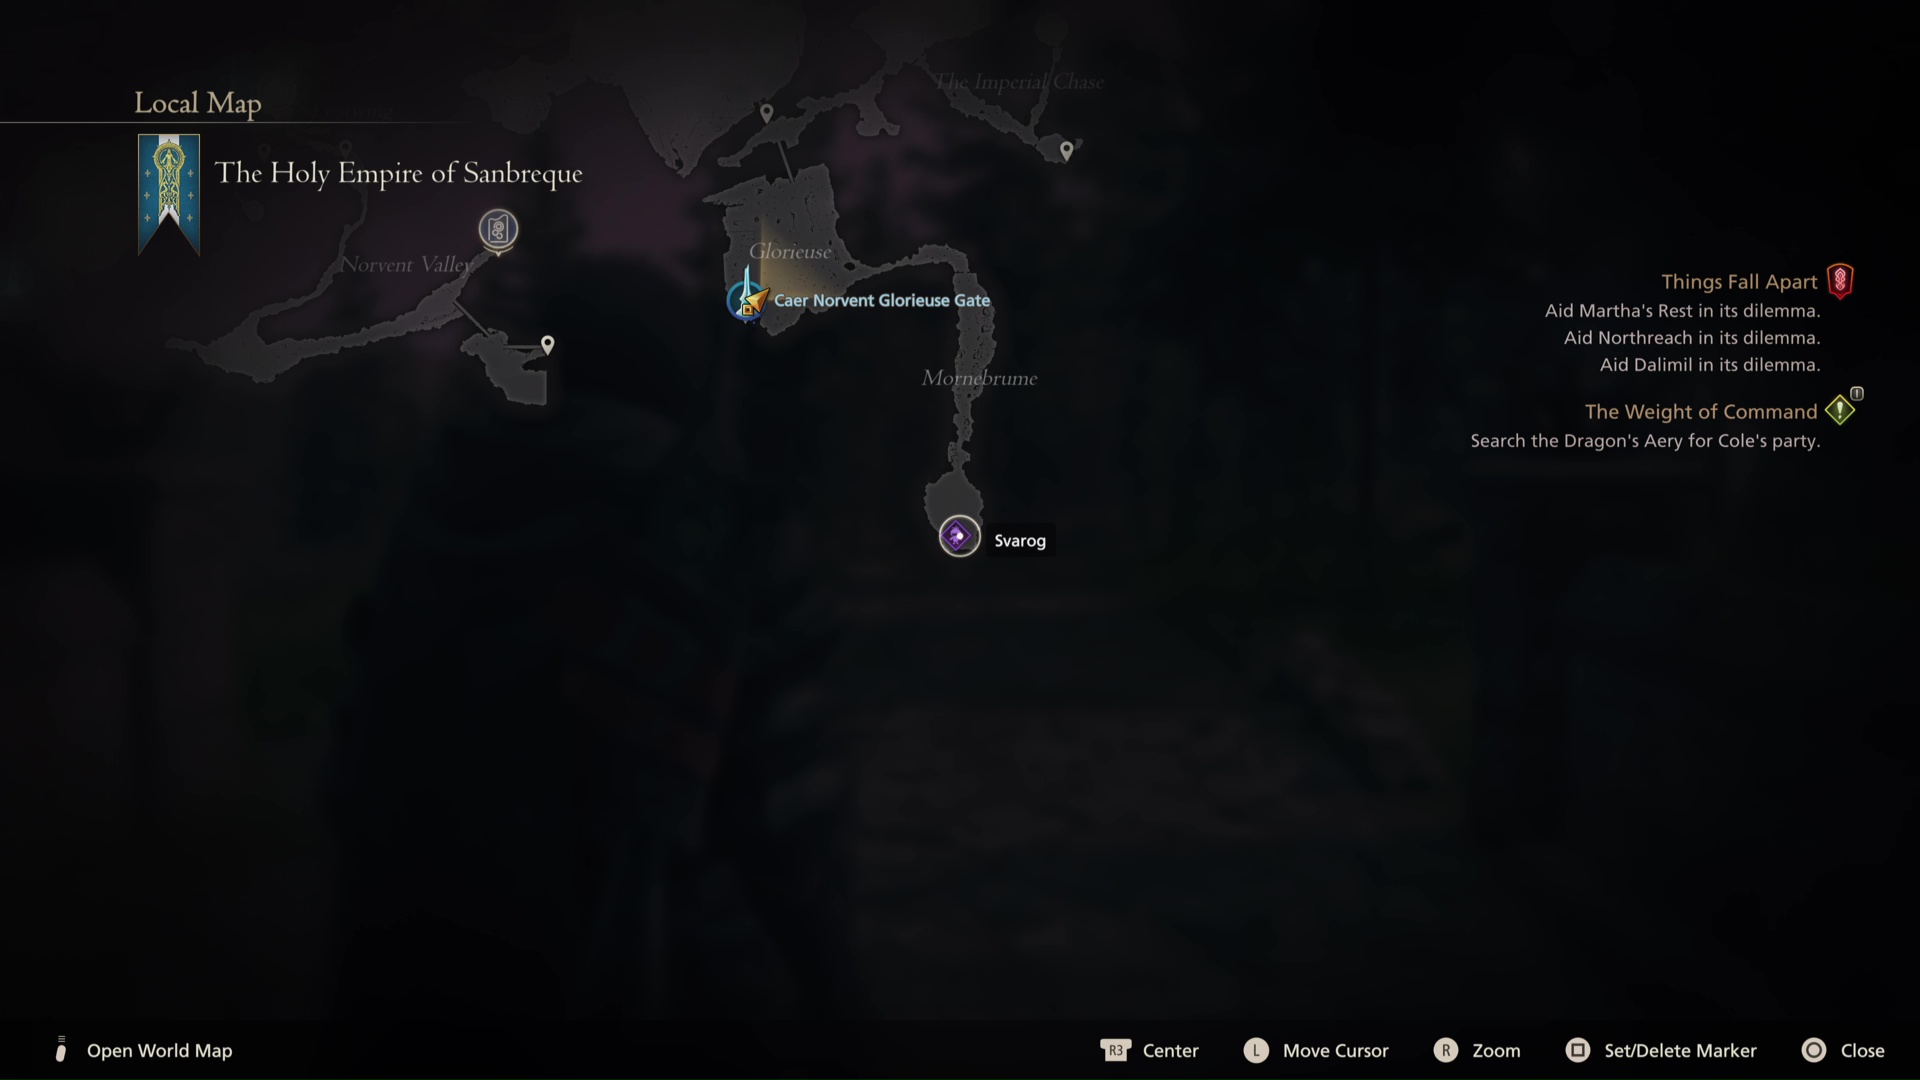
One of the hardest bosses in the game, Ruin Reawakened is actually a giant dragon called Svarog, a level 50 behemoth with a similar moveset to the White Dragon boss you fight in Sanbreque. Svarog is in Mornebrume, a dead-end forest path to the East of the Caer Norvent Glorieuse Gate South of Northreach. Like Atlas before it, you're almost certainly not ready for this boss fight yet - walk away and come back later, when you're level 40 at least (and probably higher). Svarog has a massive pool of health, a complex variety of moves, and no real weaknesses - so without any clear exploitable tactic, high stats and raw skill are all that'll see you through. Or lots of practice dying over and over.
The Pack location
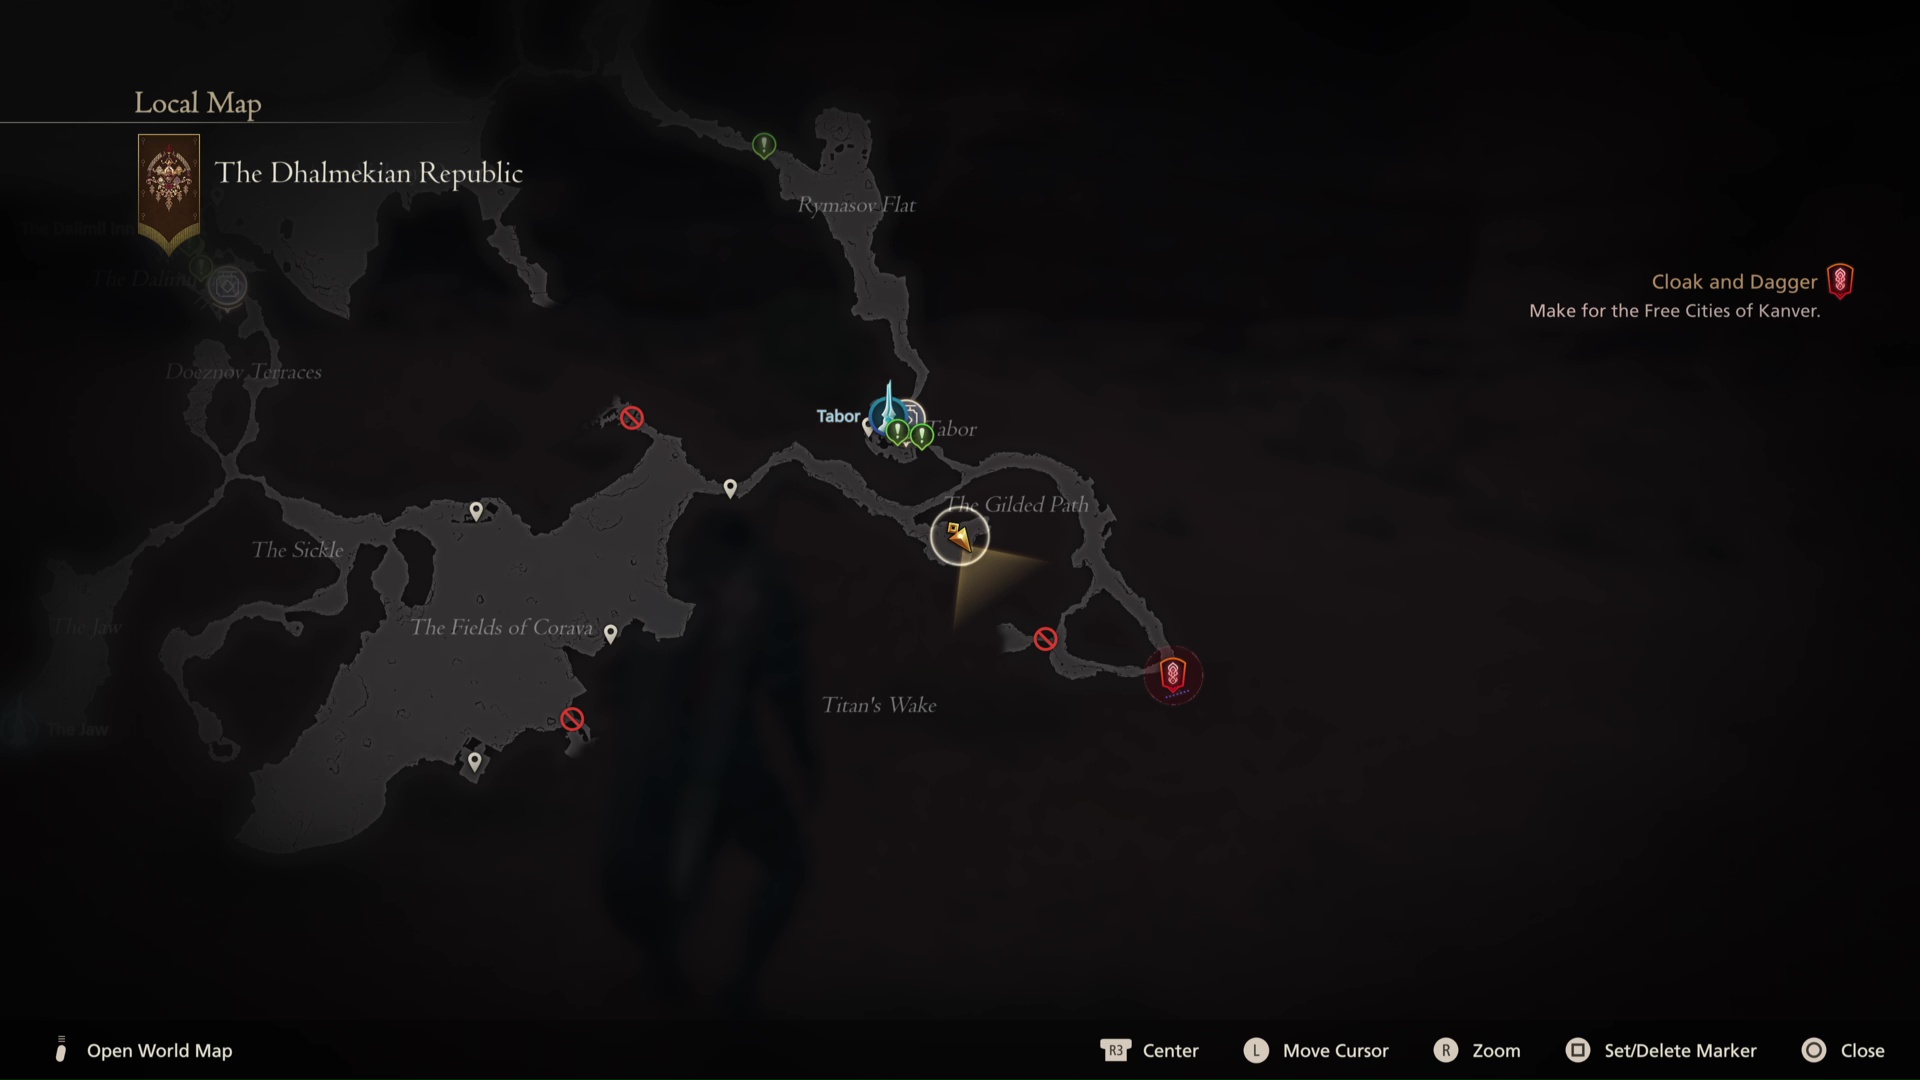
Much like the Grimalkin, the Pack is a group of deadly hounds instead of a single target. To find them, head South of Tabor in Dhalmekia to the Gilded Path, and take the West path at the Crossroads, before taking the first left South. This'll take you to a dead-end where the pack is waiting, a group of five "pack wolves". Area-of-effect attacks are your friends here, as the pack has no ranged powers and are easy to bait into a group. Once one is pretty hurt, focus on your Eikon powers on it and try to finish it for good, thinning the pack and making the rest of the fight easier. Repeat the process until victorious.
Dread Comet location
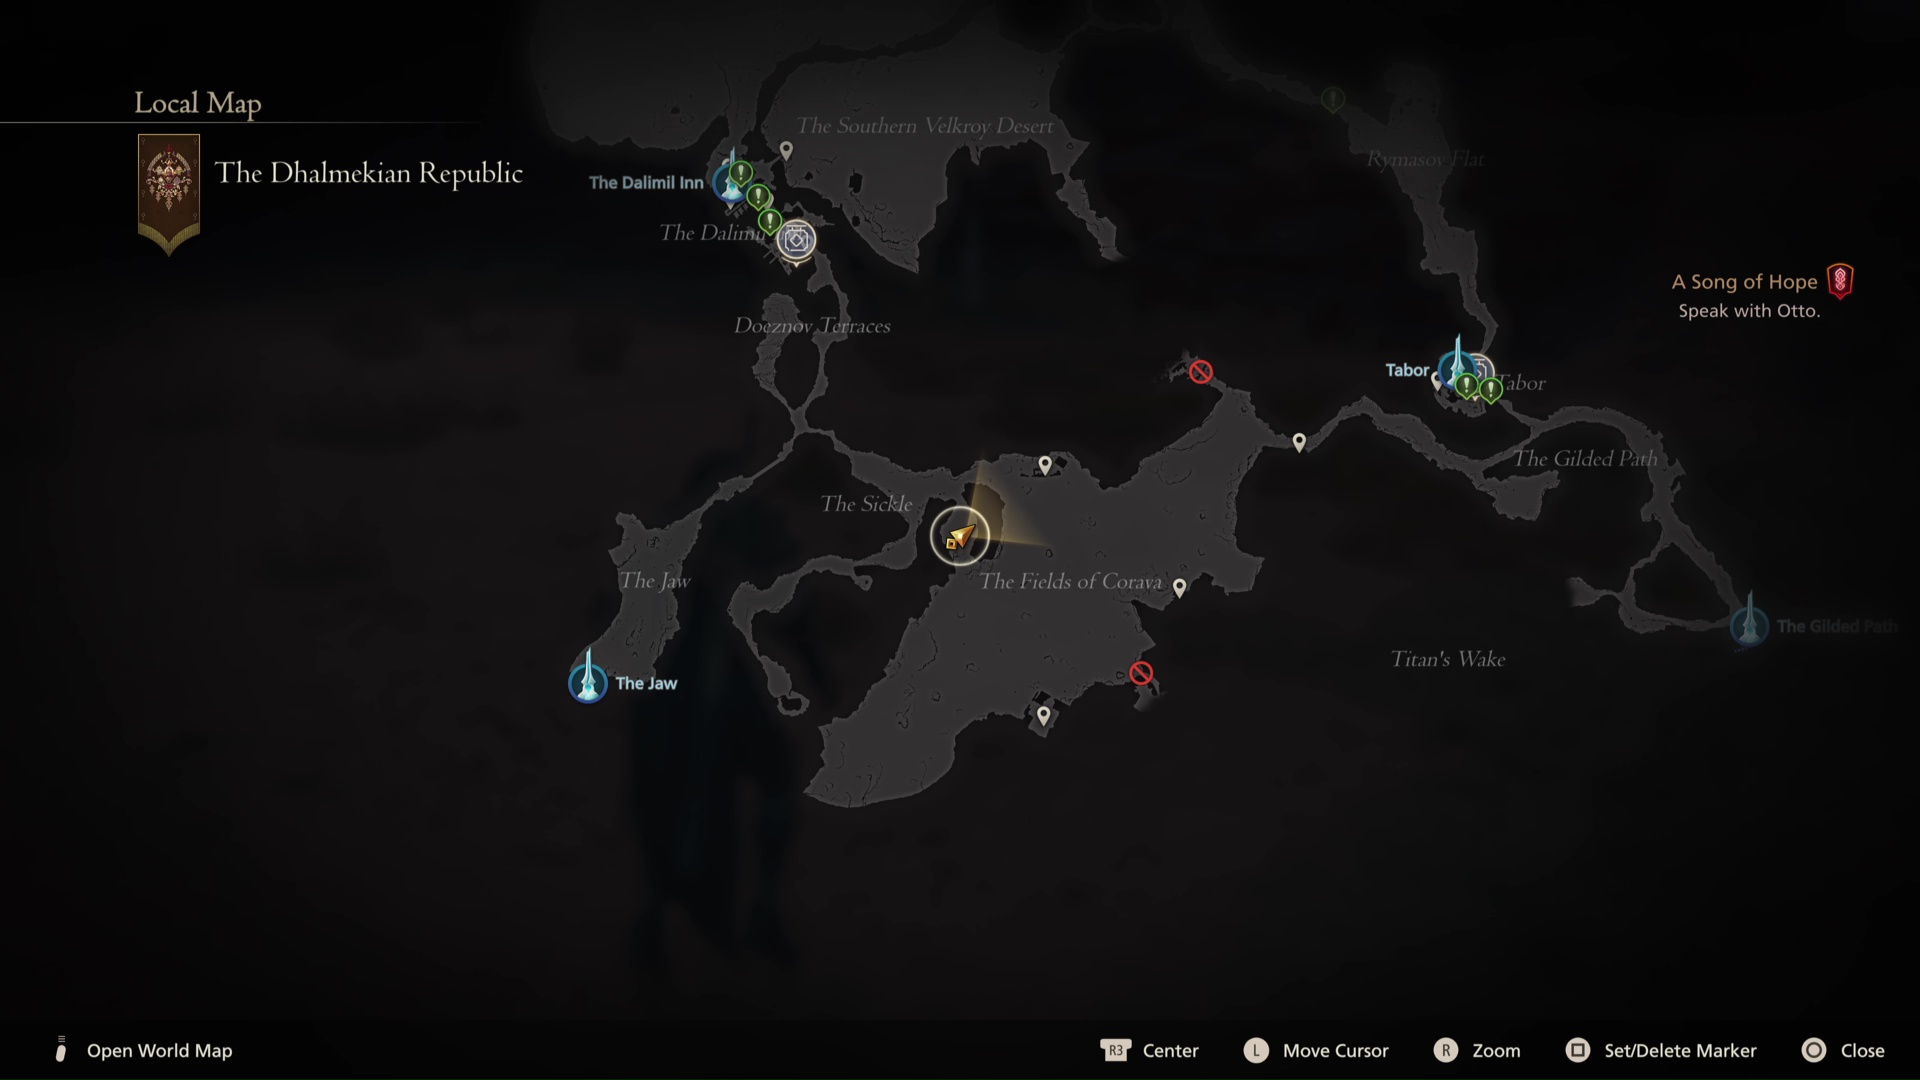
The Dread Comet is a large, vibrant Chocobo of all things, found in the Sickle - the crossroads between the Jaw and the Fields of Corova in South Dhalmekia. The Dread Comet goes hard with the falling meteors, which generate circles of energy that can be jumped over or evaded. Whichever you pick, the Comet basically tries to keep you occupied with defense so you can't get close and attack, but obviously the fight won't end until you do. A mix of evasion and the Phoenix Shift will help you close the distance, then hit it square in the beak.
Carrot the Morbol location
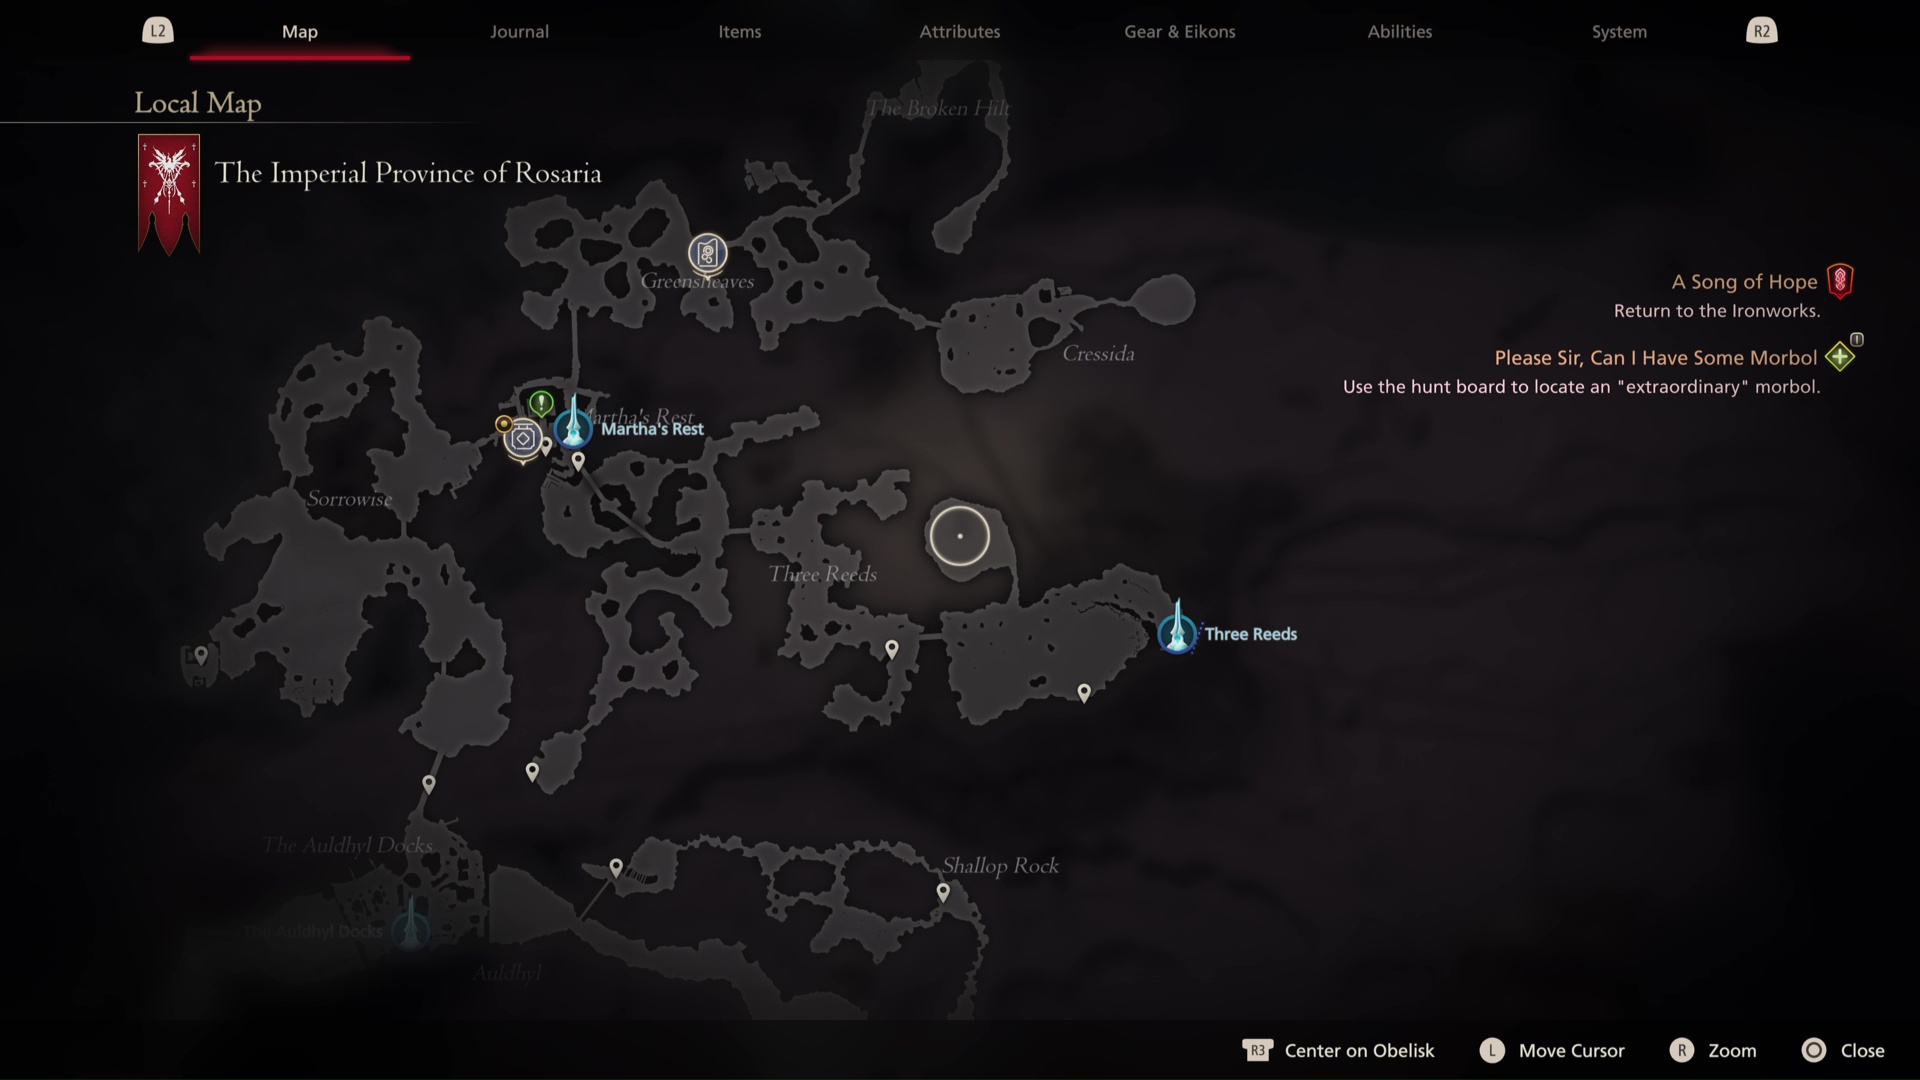
This hunt board notice doesn't reveal itself until you take the sidequest at the Hideaway called (sigh) "Please Sir, Can I Have Some Morbol", which is about getting a slice of this plant monster. The Morbol, called Carrot, is not hard to find - simply fast travel to Three Reeds in Rosaria and follow the main path until you see an opening on the right that leads to Whispering Waters. As you approach the center of this area, Carrot will appear. It's basically a Morbol identical to the one you fought at the beginning of the game, but with better stats, a brighter colour, and no quick-time events to help you do damage. Stay on its back and use its low mobility against it as much as possible.
Tricephalic Terror location
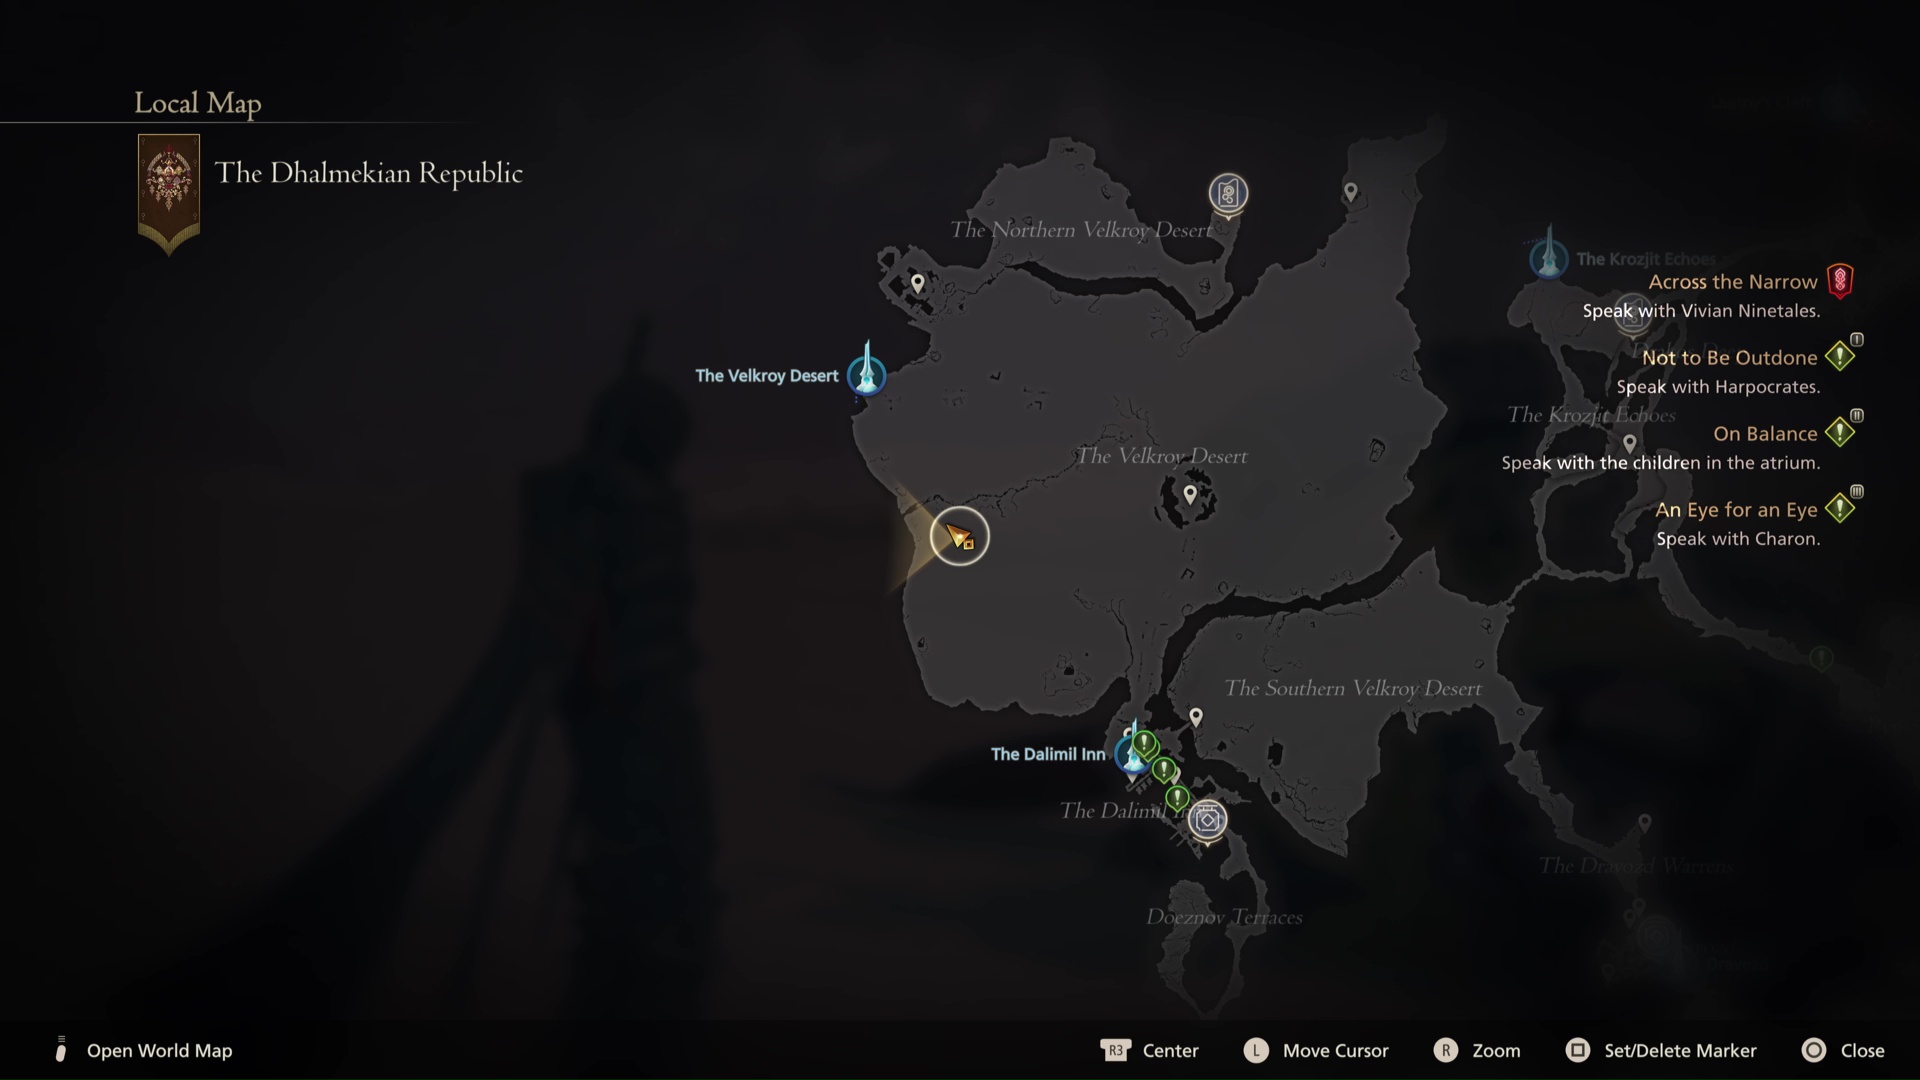
If you don't snigger at the name, you'll find the Tricephalic Terror is on the West side of the Velkroy Desert in Dhalmekia, in a section of sandy dunes that looks identical to any other. As you might've guessed from the board description, this Tricephalic Terror is a chimera called Gorgimera, and a particularly tough one, that focuses on a lot on varied area-of-effect attacks to keep you on the defensive. It's quite easy to accidentally skip out of the arena bounds during this fight, so be careful about where you run.
Pandemonium location
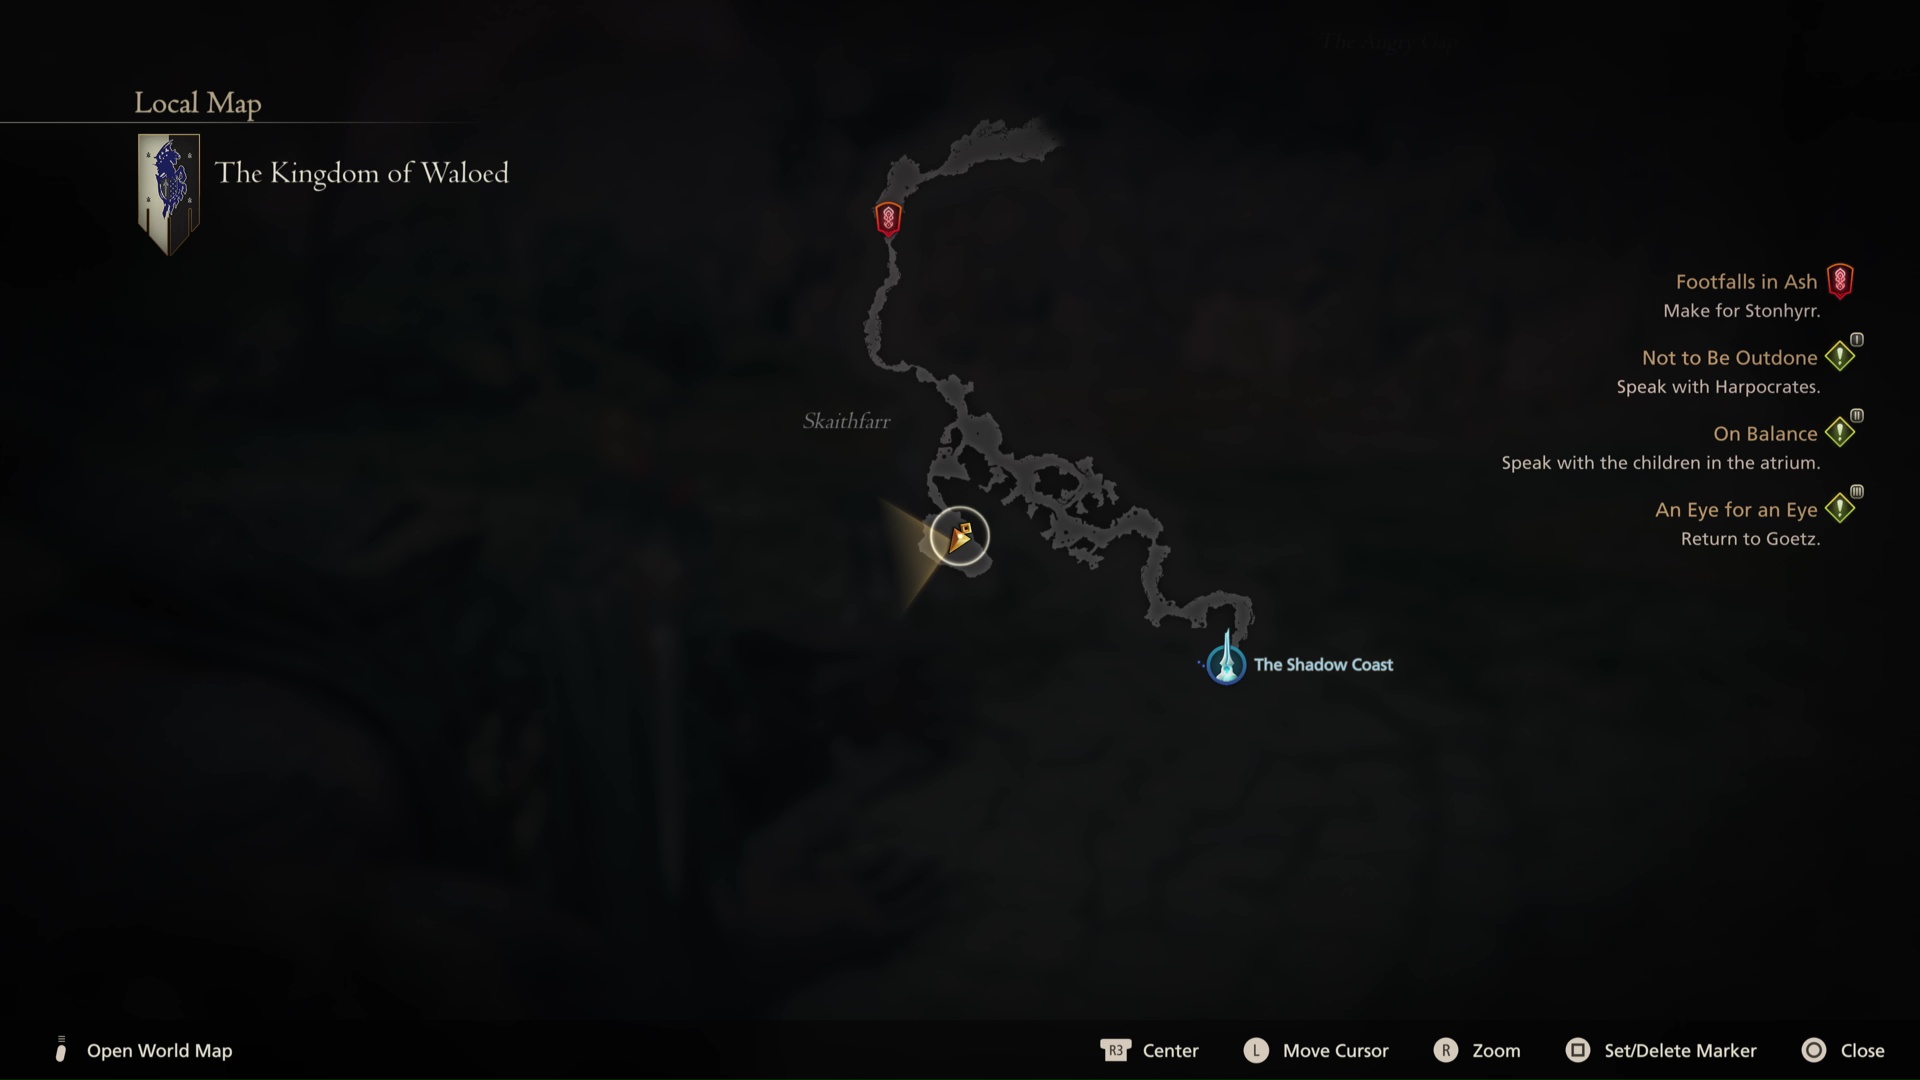
Pandemonium is the ultimate Orc, and refreshingly easy to find: simply fast travel to the Shadow Coast in Waloed, head North to the dangerous village of Skaithfarr, and take the obvious Southwest Road marked on the map. Pandemonium is waiting at the end, and is effectively a high-level version of the Orc Warlords you should be somewhat used to fighting by now - a lot of teleporting, wide-reaching magic attacks, and tanking blows rather than avoiding them.
Gobermouch location
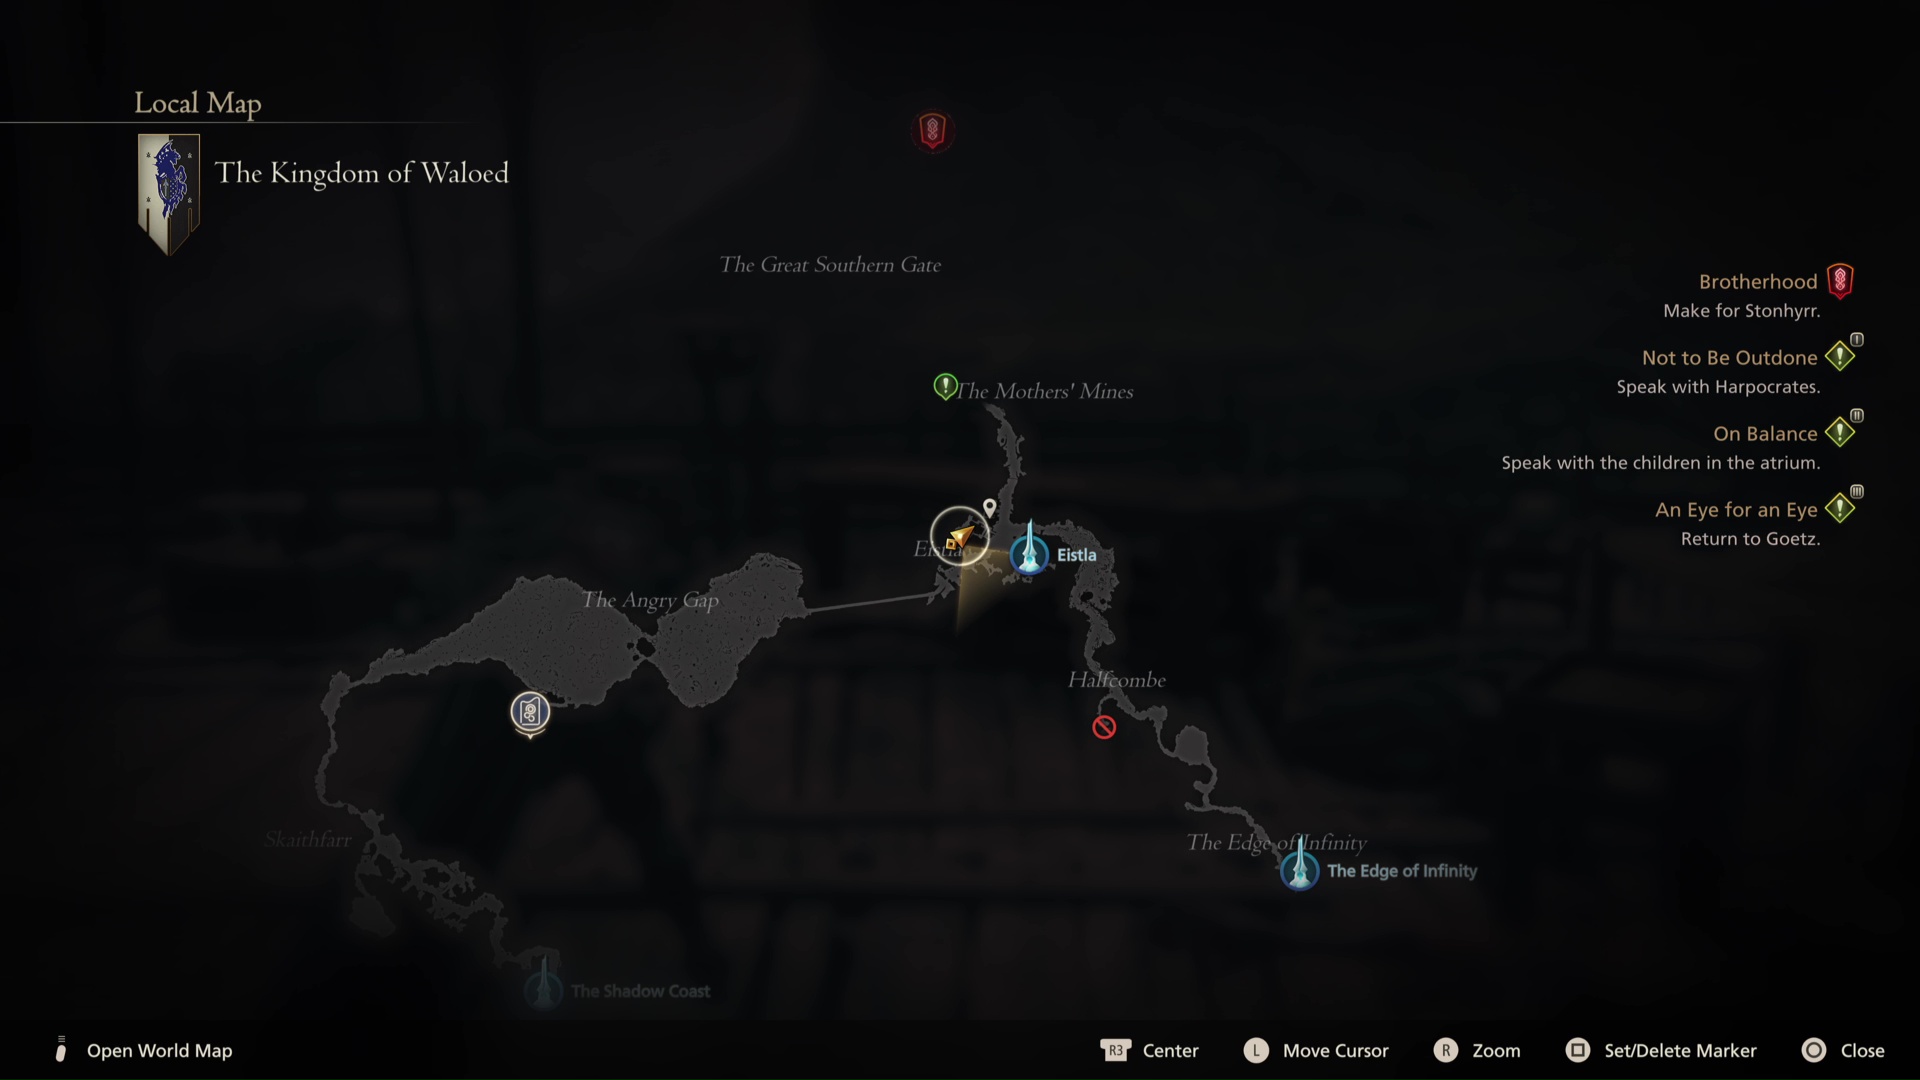
This hunt target is a goblin, but a more powerful one with a more diverse moveset. It still focuses on melee, and can be found in West Eistla, on the raised section of town up the ladder. Head up there to get ambushed by the little gremlin, then stay wary of getting caught in his long combo attacks.
Bygul location
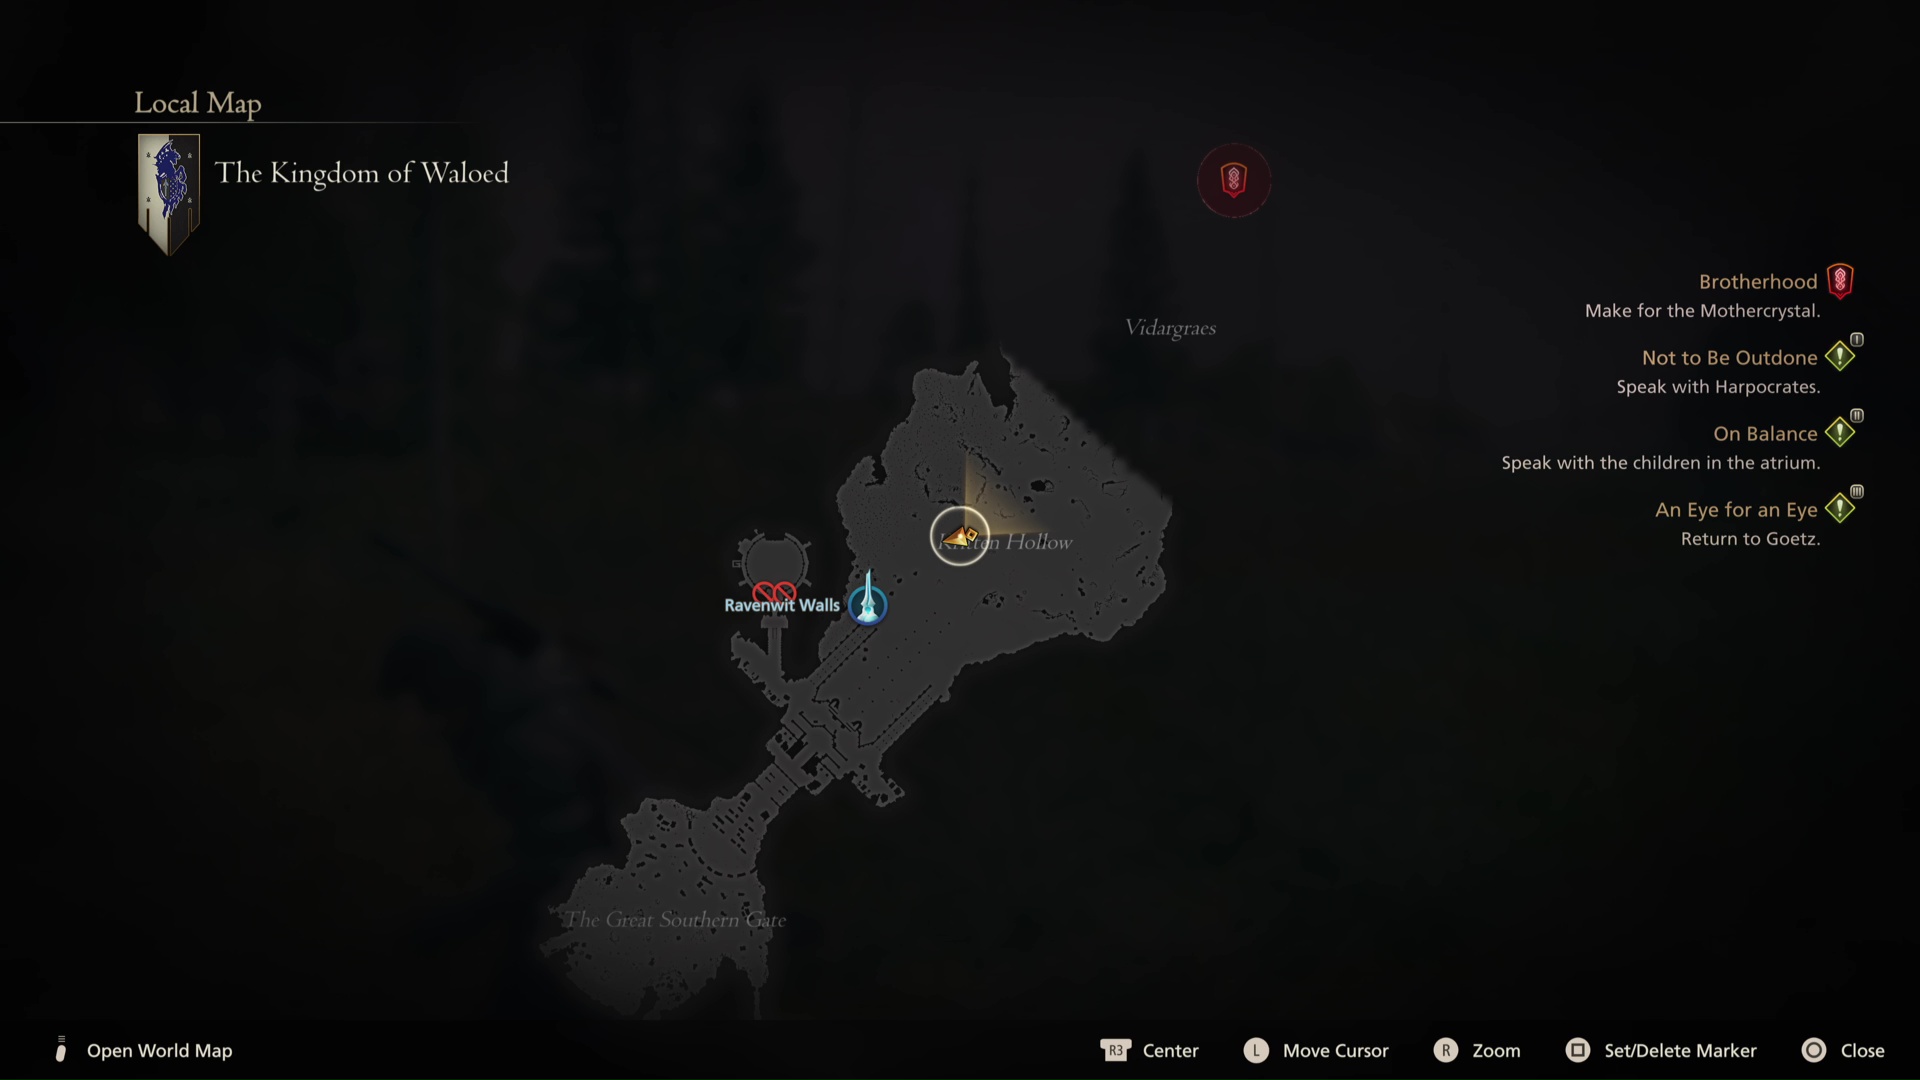
Bygul is waiting in Kritten Hollow in North Waloed, and isn't hard to spot - head down the central path from the fortress and it'll be on the left hand side. Bygul is an upgraded Couerl enemy, the big panthers with tentacles, so expect a fast-moving opponent who'll try to test your reaction speed and be most deadly at close range.
Agni location
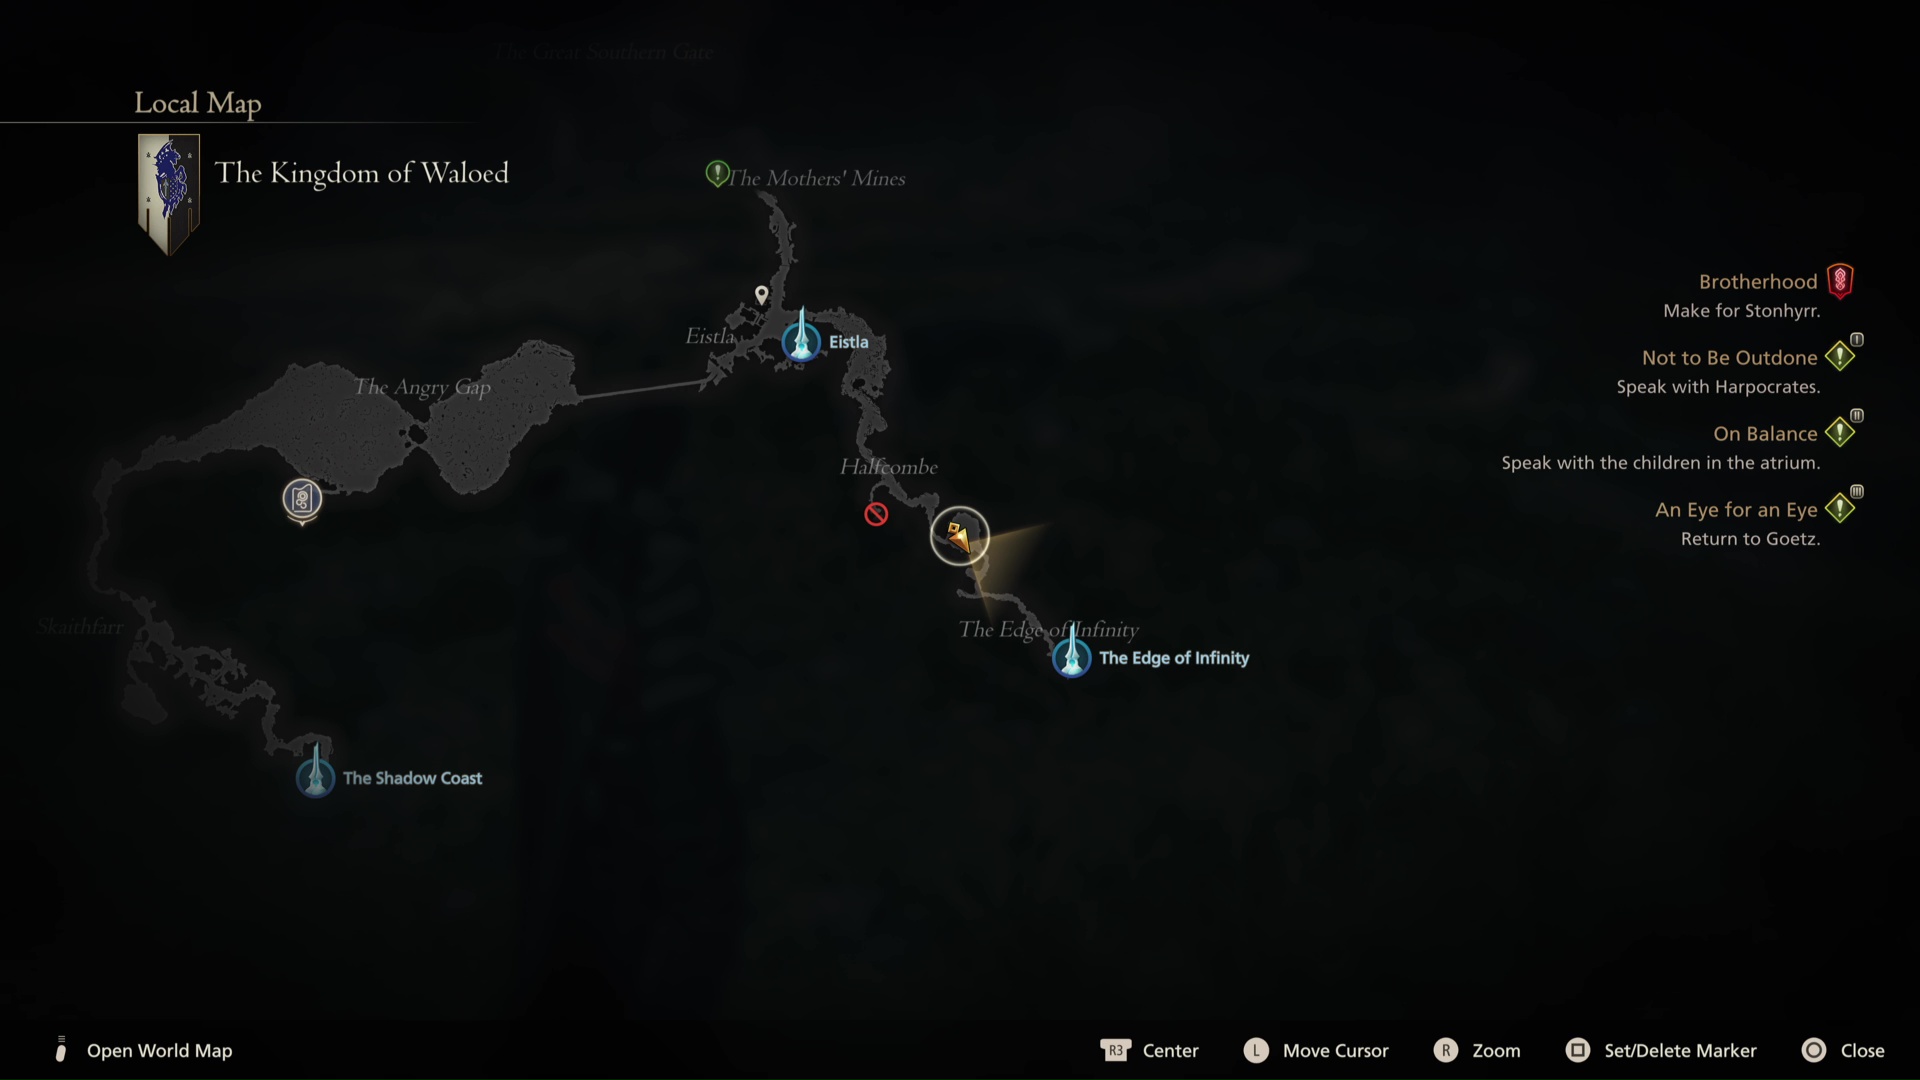
Agni is another easy one to find, simply waiting on the path between Eistla and the Edge of Infinity in Waloed, around the midpoint in Halfcombe. Agni is more powerful version of Fafnir you fought way, way earlier in the game, and focuses on bulky melee attacks and front-facing breath weapons, so staying behind the monster and focusing on agility will help give you the edge.
Usher to the Underworld Location
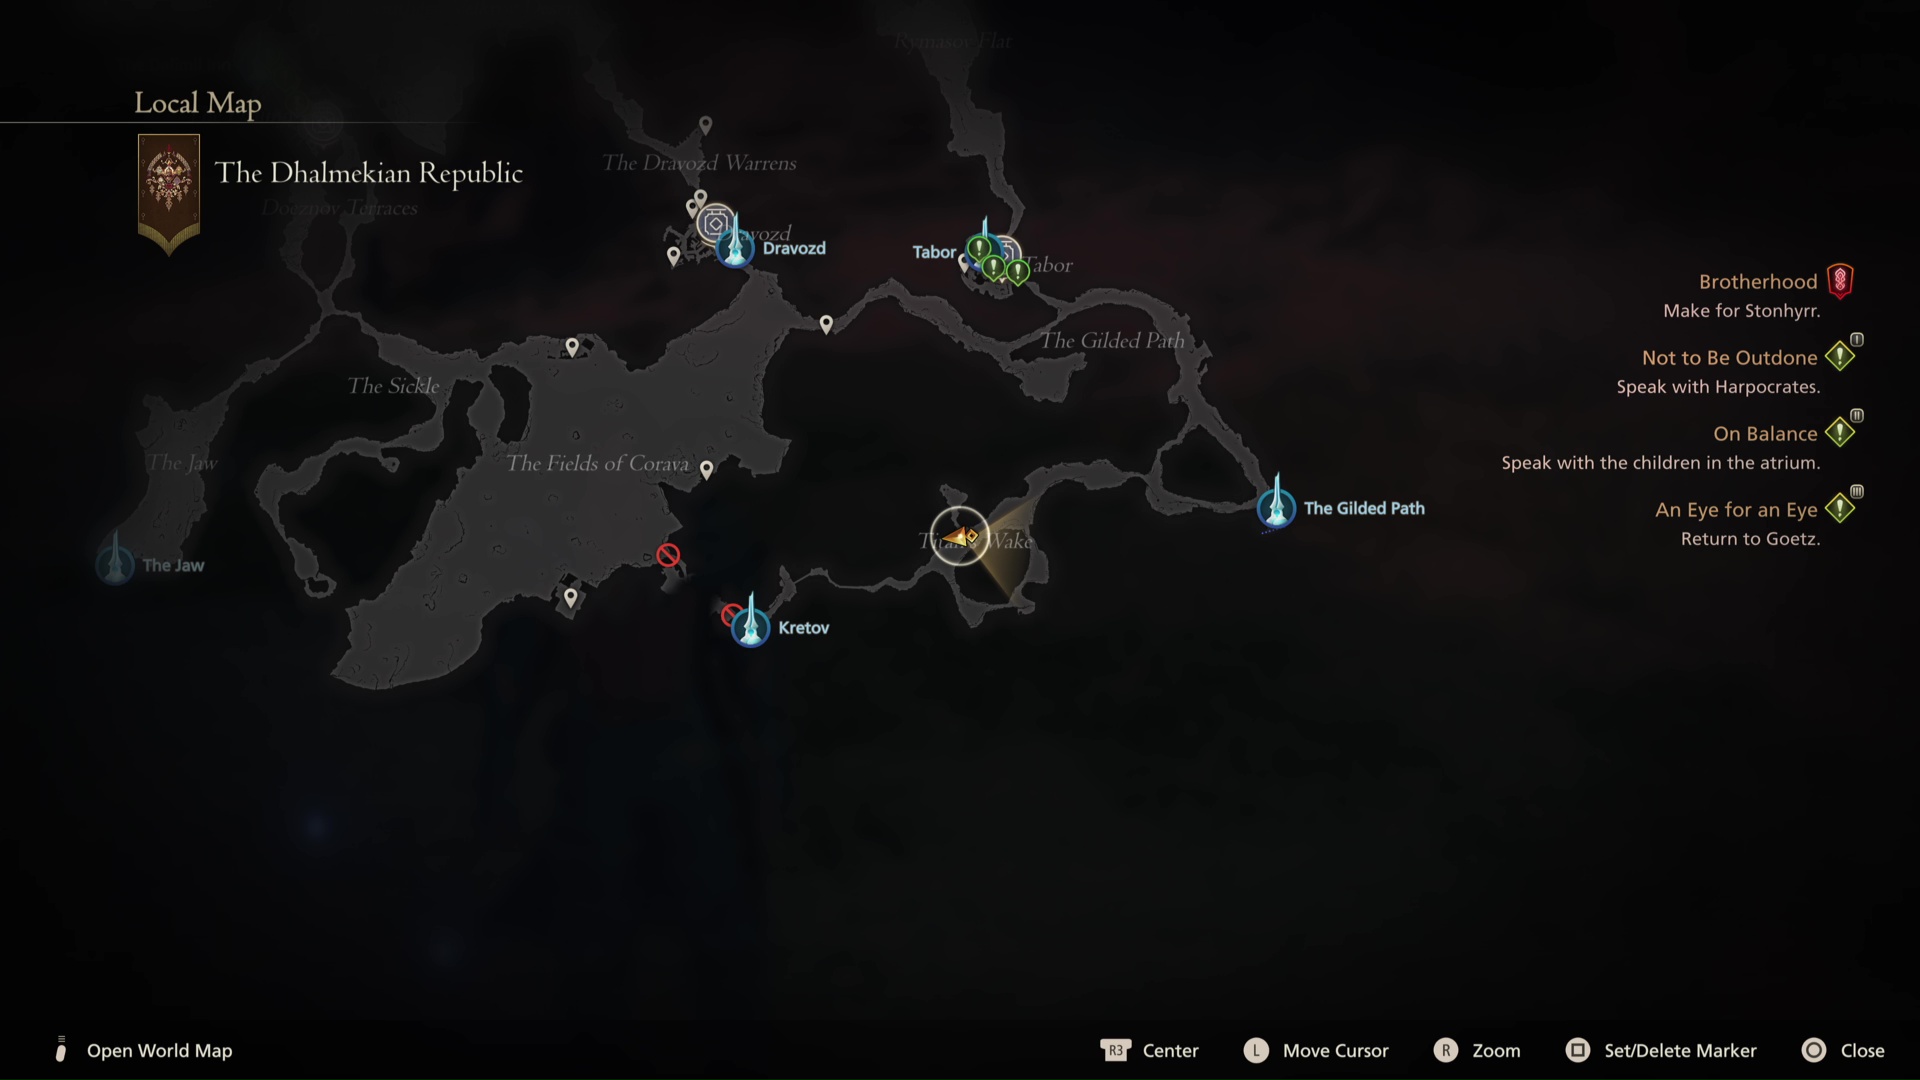
The Usher to the Underworld is found in the area of Titan's Wake in Southern Dhalmekia, somewhere you don't even need to go unless you're doing side content. Follow the Gilded Path from Tabor South, then hook West into Titan's Wake, where the Usher to the Underworld, aka Thanatos, is waiting on the North path. Thanatos is another Fallen Construct and a variation of the Undertaker boss that shows up from time to time, so expect a tank with powerful beam attacks whose major weakness is their slowness.
Blood Moon location
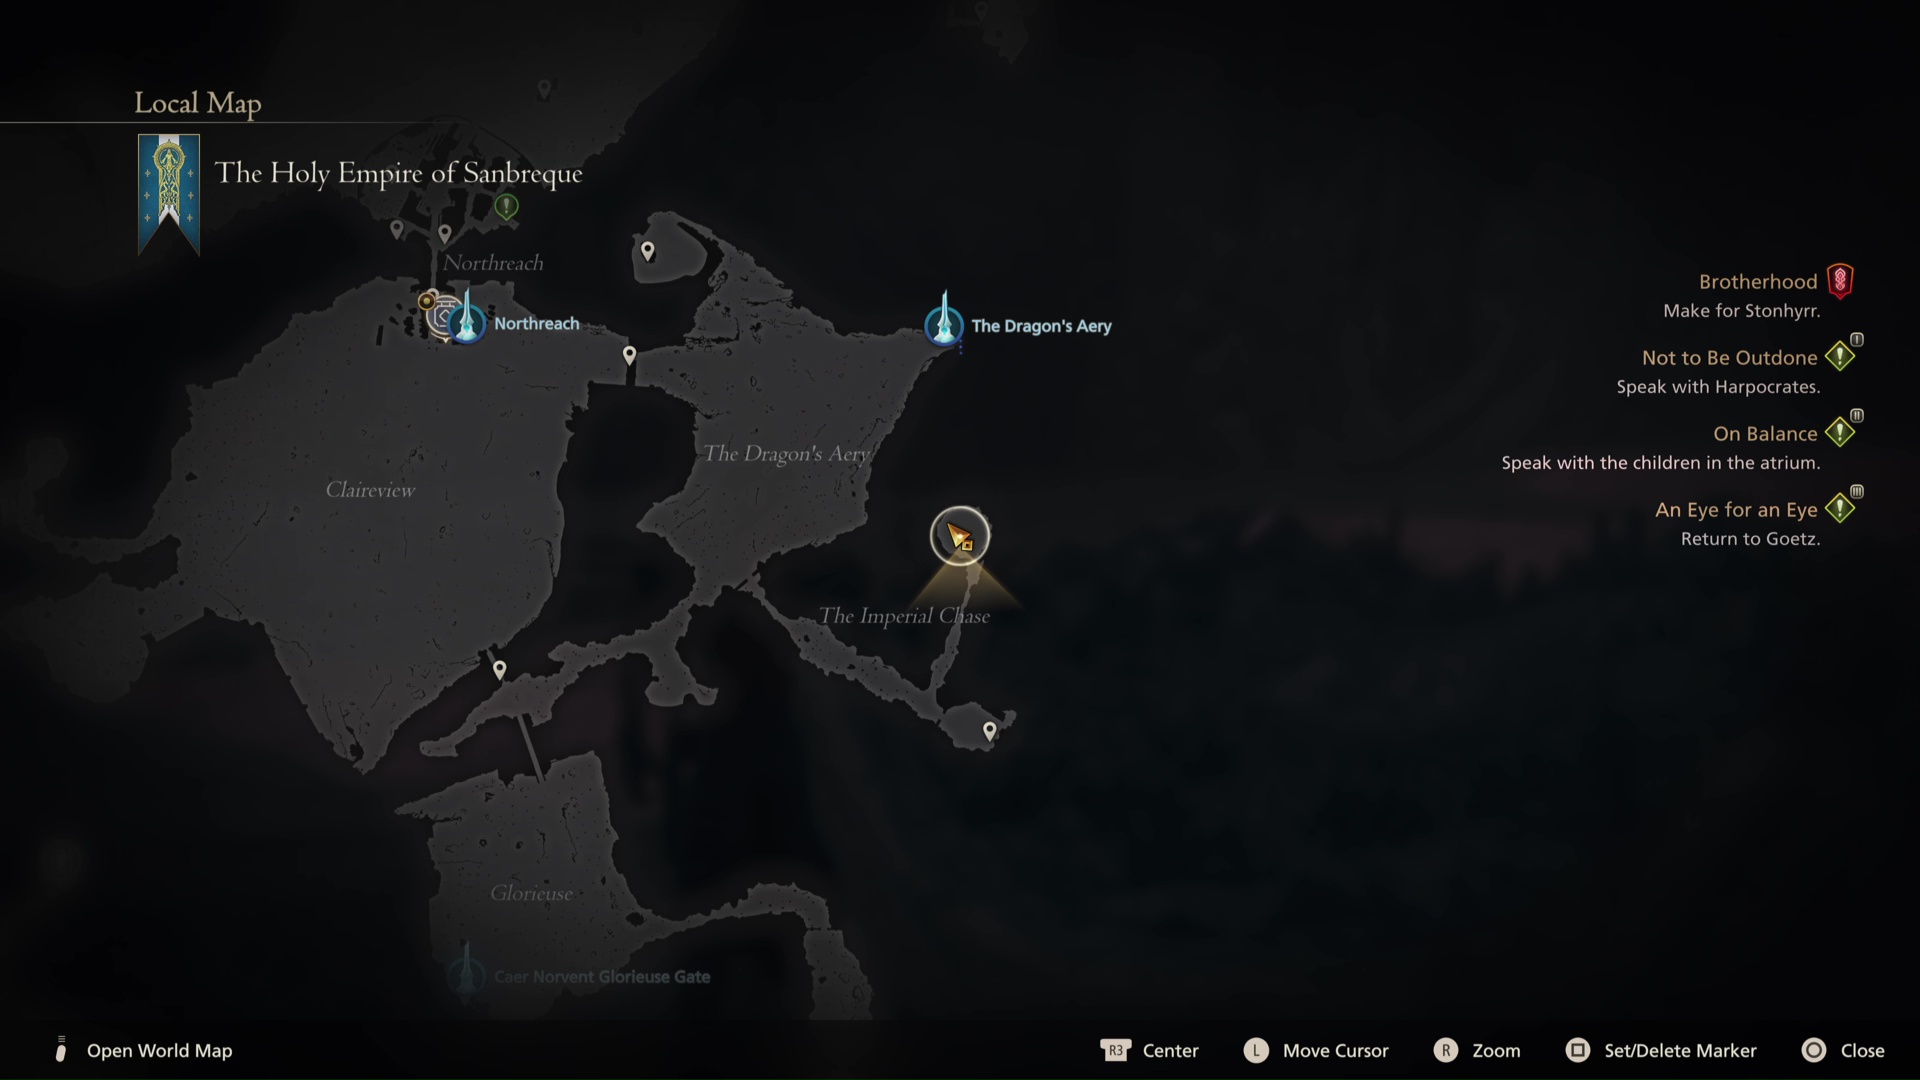
The Blood Moon might sound like a werewolf, but it's actually something else - and it's found once more in the Crock in Sanbreque, back where you fought the Bomb King! Exact same arena, only this time you're up against Terminus, a round orb that's an upgraded Fallen Control Node. Terminus wields beams fired in all directions as well as a piercing attack where it splits into two halves and tries to crush you, so agility or range are your best options here.
Wailing Banshee location
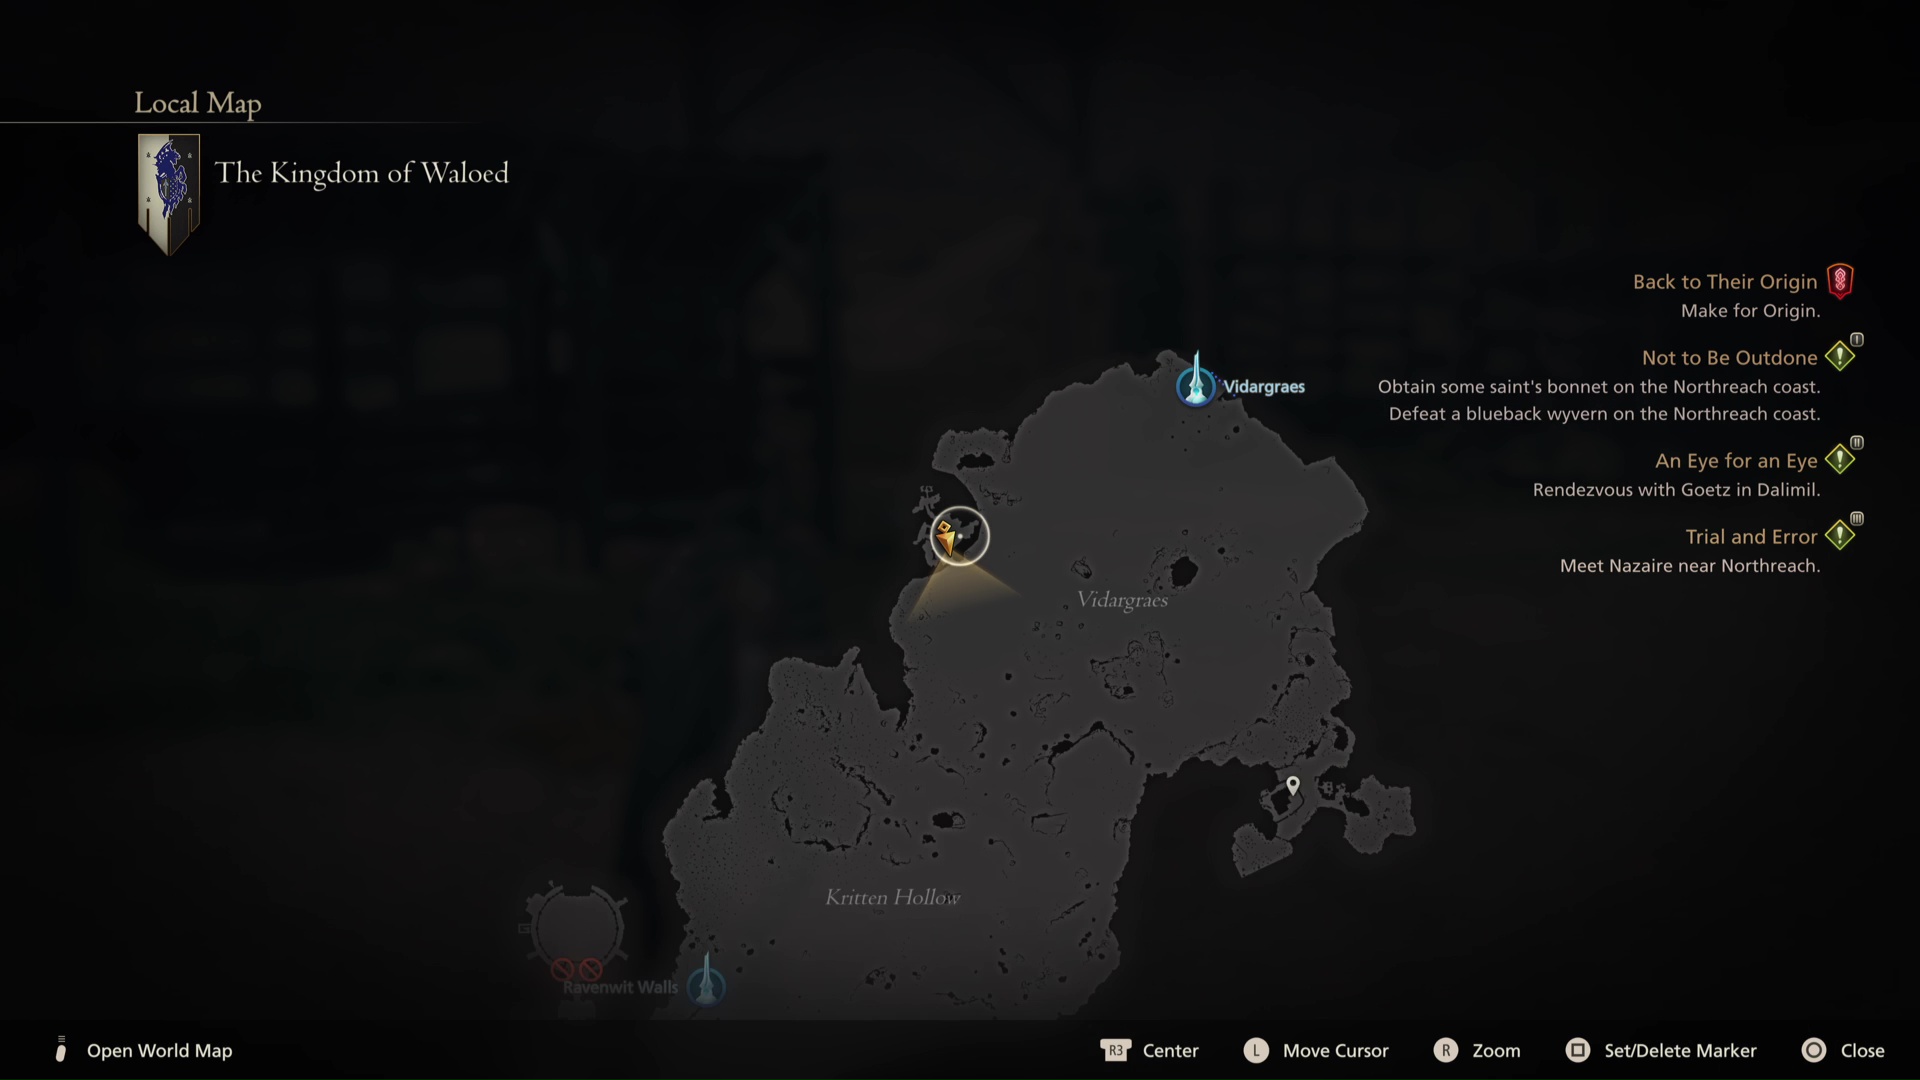
This boss is tied to a quest, or at least, you have to complete the side quest "An Inconvenient Truth", available at the Hideaway, before it'll appear on the board. Then just head back to Garnick in Waloed, where that quest took place, to find the monster Gizamaluk, one of the Garuda angels with the same focus on rapid speed and blasts of unpredictable energy. Gizamaluk is quick, but her telegraphed attacks can set a skilled player up for a lot of counterattacks, and her health isn't especially high for this point in the game.
The Grim Reaper location
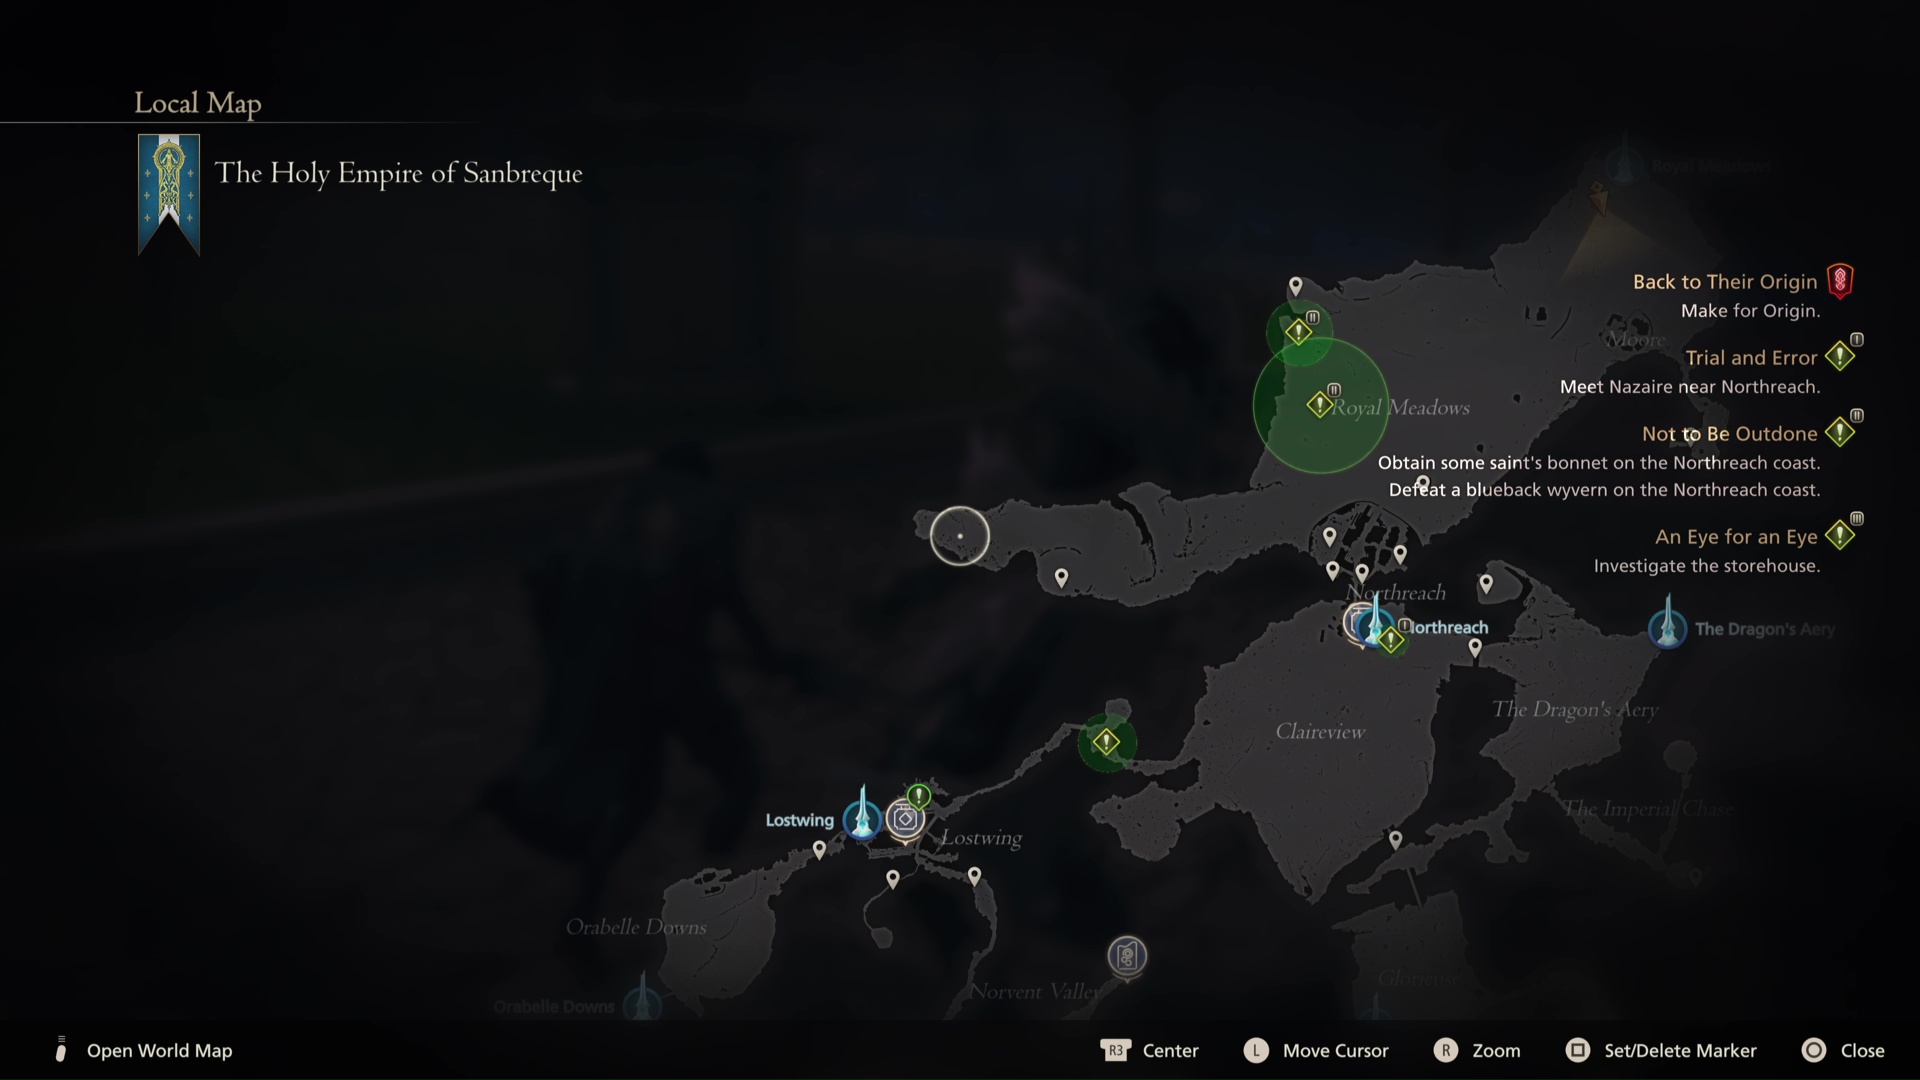
The Grim Reaper, actually known as the Prince of Death, won't unlock until you complete the Payback side quest for Gaute at the Hideaway, whereupon it should appear at Cape Orsiere, West of Northreach. The Prince of Death is an upgraded Lich enemy with the same wide scythe sweeps and fondness for teleporting into ambushes, so fast reactions will be essential. Still, it's a bit weedy in the hitpoints, so as long as you have evasion nailed, the rest should be fine.
Knight of the Splendent Heart location
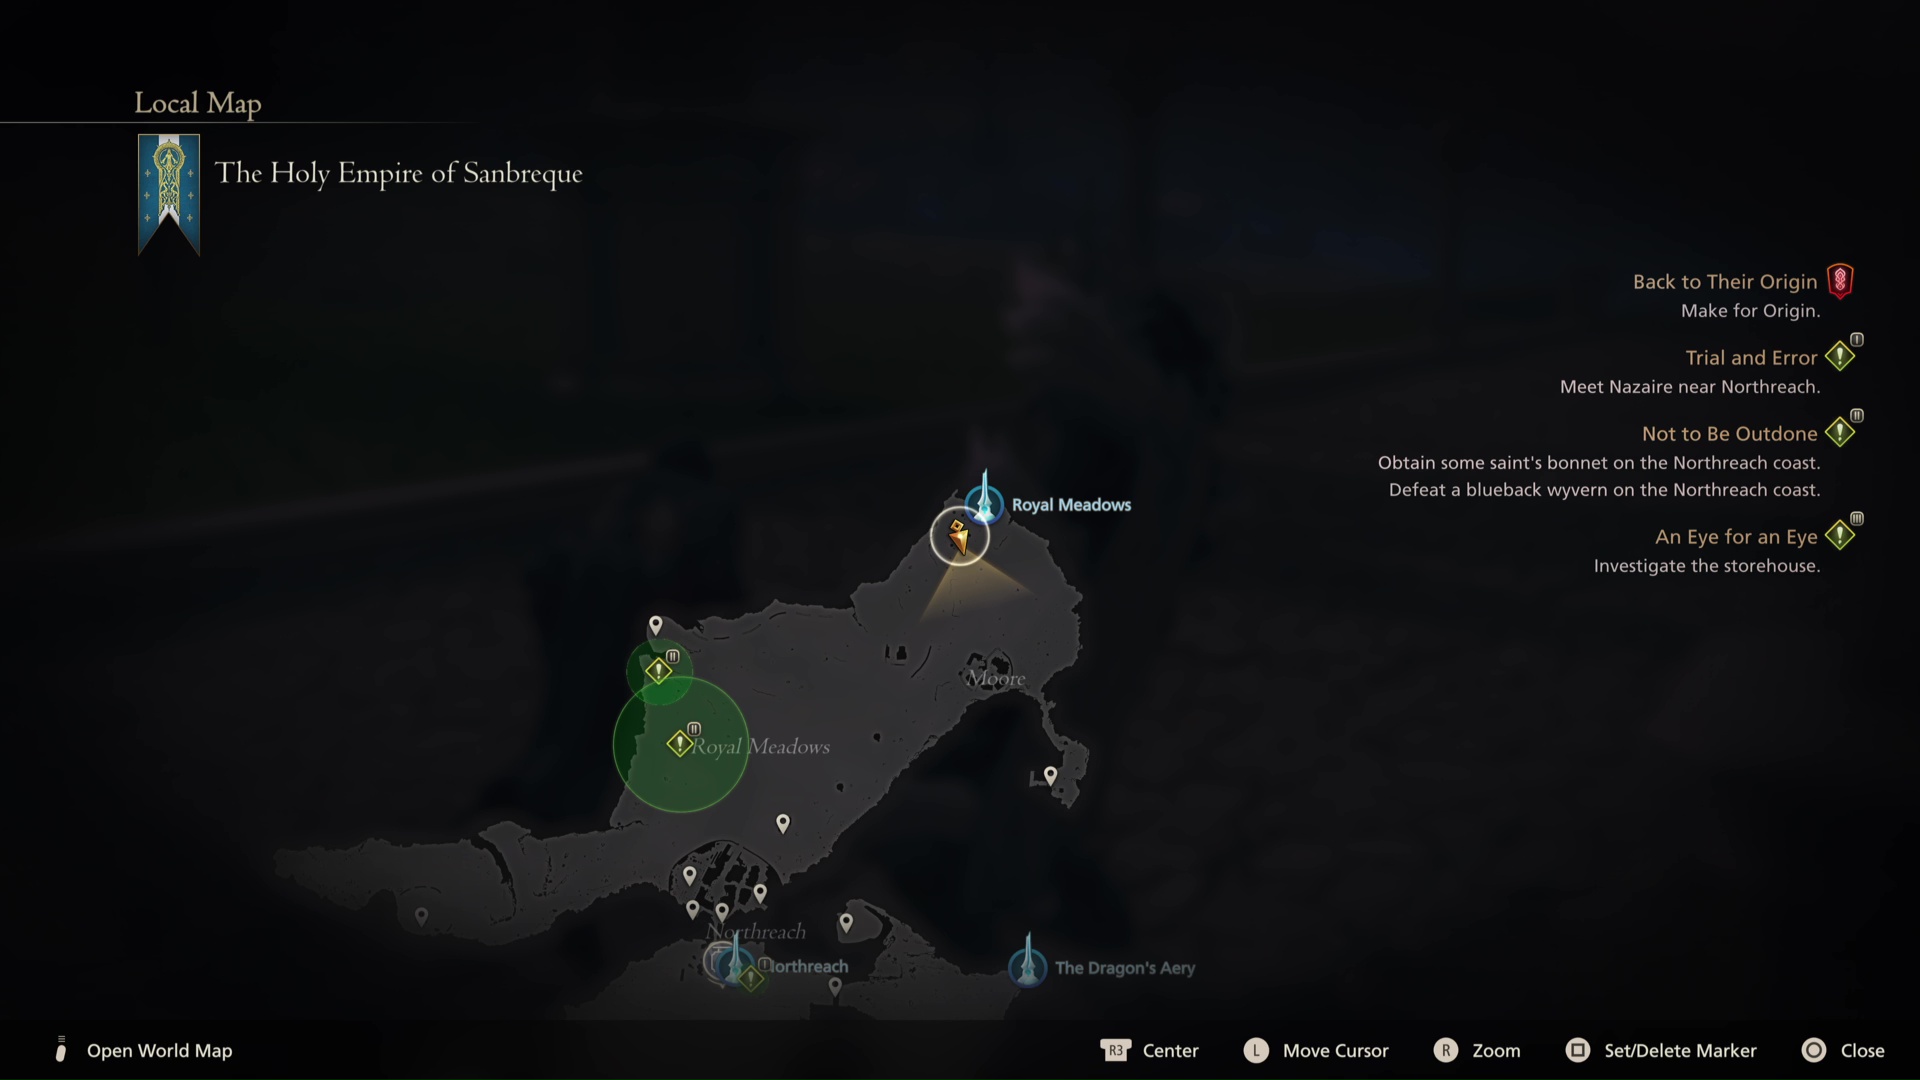
An enhanced version of the jumping knights you'll have fought many times, the Knight of the Splendent Heart is another Notorious Mark you need to have completed the payback Side quest to unlock. Once you do, head to the Penitent's Gate in North Sanbreque, North of the little town of Moore and next to the Royal Meadows fast travel point, if you've unlocked it already. The Knight of the Splendent Heart is something of a tank, and his fast melee strikes mean that parrying is a high-risk, high-reward strategy. Focus on singular, high-damage attacks you can break out quickly, like Rising Flames, to have the best chance.
How to unlock the Hunt Board and Nektar the Moogle
Of course, none of these targets can be fought until the Hunt Board, run by Nektar the Moogle, is unlocked. You'll actually encounter the Hunt Board and Nektar well in advance of it being active, with the Moogle simply telling you to come back later.
The Hunt Board unlocks after a certain point in the main story, after visiting Three Reeds and Martha's Rest for the second time to complete the mission "Release", which is around the time you can unlock a Final Fantasy 16 Chocobo mount. After that, head back to the Hideaway, and the Board will now be active in the lower left section of the hub area.
© GamesRadar+. Not to be reproduced without permission

Joel Franey is a writer, journalist, podcaster and Very Tired Man with a BA from Brunel University, a Masters from Sussex University and a decade working in games journalism, often focused on guides coverage but also in reviews, features and news. His love of games is strongest when it comes to groundbreaking narratives like Disco Elysium, UnderTale and Baldur's Gate 3, as well as innovative or refined gameplay experiences like XCOM, Sifu, Arkham Asylum or Slay the Spire. He is a firm believer that the vast majority of games would be improved by adding a grappling hook, and if they already have one, they should probably add another just to be safe. You can find old work of his at Eurogamer, Gfinity, USgamer, SFX Magazine, RPS, Dicebreaker, VG247, and more.

 Join The Community


