5 essential Warhammer painting tips everyone should learn
Become a painting master in no time
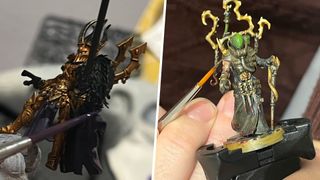
Whether you prefer the fantastical lands of Age of Sigmar or the grim dark future of Warhammer 40k, there's one thing that all hobbyists can agree on: there's nothing quite like a well-painted model. Indeed, many of us fell under the siren song of Games Workshop as kids, lured into hobby stores by the pristinely painted miniatures in the shop window (or at least that's how I got into it). Even those who prefer the sound of rattling dice to the sound of a rattle can would admit it's much more satisfying to march your legions against an opponent who's bothered to get some paint on his toy soldiers over battling a tide of never-ending grey.
The problem, of course, is that painting such small soldiers can be rather intimidating, even for those who've been in the hobby for years. Well, whether you're an aspiring Golden Demon winner who's just learning which end of the brush holds the paint or an older hobbyist looking to get back into the game, you're in the right place. We've put together a list of five handy tips for painting Warhammer that every hobbyist should know before dipping their brush in a paint pot.
1. Fail to prepare, prepare to fail
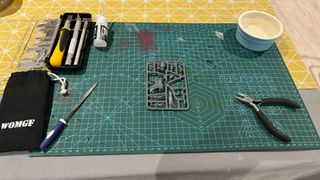
- Gather everything you need before painting
- Get clippers, a mold-line remover, file, and cutting mat
- Green Stuff two-part putty is always handy for fixing gaps
It may sound obvious to veteran hobbyists, but proper preparation is one of the best things you can do to ensure your paint job sings like an Aeldari Banshee. So, before you even start thinking about what shade of blue to slap on your Space Marines, ensure you have all the tools you need to build and clean your models properly.
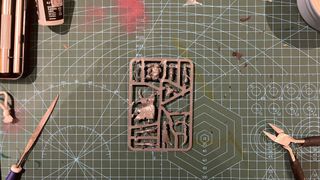
At the very least, that means having a good pair of sharp cutters for freeing your model from the sprue without damaging any pieces, a hobby knife for shaving off any unsightly mold lines, and a file of some kind for smoothing out lumps and bumps on your model. Don't forget to get some plastic glue as well. While super glue will hold plastic models together, it's incredibly brittle and dropped models can lose limbs before they've even seen the battlefield.
In addition, it's worth investing in a cutting mat to avoid damaging any surface you're working on (trust me on that) and some green stuff (either the liquid kind or the traditional two-part putty) for filling in any gaps on your model. This advice may sound simple, but you'd be surprised how many great paint jobs are ruined by ugly mold lines or gaps between model pieces.
2. Priming makes perfect


- Priming (e.g. spraying) a model helps paint stick
- Use white primer for a brighter effect and black for darker
- A metallic primer can help give your color-scheme a sheen
Whether it comes from an aerosol can or a paint pot and brush, the first layer of paint you give your model should always be a primer. This is important for two reasons. The first is because primer gives your other paints something to hold onto. Without it, the paint on your models can flake off, and they can end up looking like something even Nurgle would turn his nose up at.
Still, there's a more important reason to get to grips with primer, and that's because the color of primer you choose is fundamental to the final look of your model.
The reason for that is that properly prepared paint (more on that later) is imperceptibly translucent. As a result, if you throw some Baal Red on a Space Marine that's been primed white, the red will appear bright and noble, perfect for the sublime sons of Sanguinius. Meanwhile, if you paint the same color on a model that is based black, the red will look darker and more shadowed, making it more suitable for a World Eater Bezerker.
If you're feeling particularly bold, you might want to try a zenithal highlight
Other colors, like gold and silver, meanwhile will give the paint a slight metallic sheen (with gold making the metal look warm, while silver will give it a cooler look), so feel free to experiment with primer colours until you find the one that works for the paint job your working on. If you're feeling particularly bold, you might want to try a zenithal highlight – which is my next tip.
3. Reach the zenith…al highlight
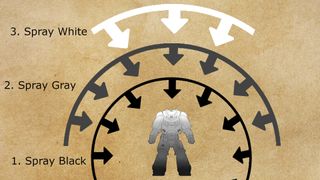
- Zenithal is spraying black, gray, and then white from above
- This provides natural shadows and highlights
- Useful for Contrast/Speed Paint
A zenithal highlight is a technique where you prime a model with a dark color and then apply lighter paints over the top to create a natural gradient. The idea is that this imitates the look of natural light and shadow. A zenithal highlight is usually done using an airbrush to prime a model entirely black, then adding a layer of grey to the top 2/3s of the model, and finally, some white to the top third. Once the models are correctly primed, the colors you paint over the top should (if properly prepared) show a natural gradient that looks realistic.
The cool thing about working within a zenithal is that you can move the gray and the white paint to change where the 'light source' is coming from, allowing for some really cinematic and dynamic-looking models. With that in mind, Zenithal is a bit tricky, so it's best reserved for the showcase models in your army — named characters or generic HQ units come to mind.
While a zenithal is typically applied using an airbrush, if you don't have one you can get a similar effect using a black and white rattle can or by using an old paintbrush to drybrush the lighter layers on. Be warned, though, as drybrushing can result in a slightly rougher gradient.
4. Thin your paints
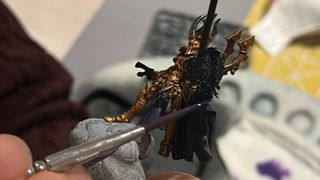
- Don't use paint straight from the point
- Use roughly 1 part water to 2 parts paint
- A wet palette can really help with this
"Thin your paints" has become a meme in the Warhammer community thanks to the modeling maestro Duncan Rhodes, but it really is the best advice you can give someone looking to improve their painting. Thin paints don't gunk up the gorgeous detail of your model; they look smoother and are easier to work with. Still, despite this being pretty ubiquitous advice given to all hobbyists, you'd be surprised how many people get this wrong, either committing hobby heresy and dipping their brushes straight in the paint pot or over-thinning their paints, which robs the paint of its ability to bind to the primer.
The general rule is that your base paints (the paint you use on the bulk of your models) should be two parts paint to one part water, but this changes depending on the brand of paint you're using and the colour, so it doesn't always hold true. An easy way to see if your paint is the right consistency is to use a palette primed in the color of the model you're painting. If you do this, you can quickly see how the paint will look as it dries without sacrificing a model for the greater good (not the Tau kind) of your paint scheme.
The first thing to do is not overload your brush with paint
Speaking of palettes, here's a bonus tip. Don't waste money on an expensive, specially designed palette. Instead, get a cheap plastic one with individual paint wells on it. With one of these, you can easily create what's known as a wet palette with the help of a kitchen towel and a bit of water. These are used by experienced painters to create really smooth transitions but also help keep your paints from drying out when doing some batch painting.
5. Don't be scared of edge highlighting


- Edge highlighting can really help your model pop
- It's easier than you think
- Looks amazing on Space Marines
Even the most experienced of painters can get a little intimidated when they hear the words 'edge highlighting.' This is a pretty simple technique where you apply paint to a sharp edge on a model to create a highlight. Like a zenithal highlight, the idea is to suggest that the light is hitting a hard surface and being reflected off, and this can be a great way to breathe some life into a flat-looking model. So, what makes it so intimidating? Well, it involves painting some pretty thin lines, and that can be scary, but if you do these three things, you'll quickly get to grips with it.
The first thing to do is not overload your brush with paint. You only need a small amount when highlighting, so there's no need to go overboard. Secondly, it's ten times easier to do a highlight when you use the edge of a brush instead of the tip. Using the edge, you'll have more control over the brush, and usually, you'll be able to move more smoothly along the edge instead of stopping and starting and getting paint everywhere.
The final recommendation comes down to stance. A shaky hand is the enemy of a good highlight, but if you put your elbows on a stable table and put your wrists together (forming a sort of triangle), you'll give yourself a really strong grip on your model and brush, which will make highlighting all the easier.
Bonus tip: Don't be afraid to experiment, and have fun!
- Bear in mind that this is supposed to be fun
- It's always helpful to experiment with techniques
- Failure is just a chance to learn and get better
There are many different techniques you can learn and technical paints you can use, all of which will make your models look amazing. With that in mind, you should definitely try your hand at everything – from drybrushing and edge highlighting to Contrast Paints and recess washes – because there's no wrong way to paint your minis, and it's only through experimentation that you'll find the methods you love to use while painting and those you hate.
The important thing is not to get stuck in a rut and only rely on one technique because if you do (and this comes from a very personal attachment to drybrushing), you'll end up in a hobby rut and stop advancing as a painter. Advanced techniques may feel intimidating when you get started, but you'll soon get the hang of it through practice and patience.
Finally, remember this – no one can tell you your paint job sucks. As long as you had fun doing it and are satisfied with the end result, then you've done a good job. And if you're not happy with it, well, guess what? You can always paint another one.
Want to get going with 40K for the first time? We've got advice on which of the Warhammer 40K starter sets you should buy.
Sign up to the GamesRadar+ Newsletter
Weekly digests, tales from the communities you love, and more
Tom Percival is an experienced editor and journalist with an expertise in the movie and TV industries. As well as contributing to GamesRadar+, you can also find Tom's work at sites like Dexerto, The Digital Fix, and UNILAD. He's also a film critic for BBC Radio Manchester. When he isn't writing about the biggest and most interesting movies around, he's probably distracted by Warhammer or spending too much time reading about Spider-Man.