
 Join The Community


Deathloop codes and combinations are the key (quite literally) to opening various locked doors and safes you'll encounter on your journey, and the bad news is that these are always randomised and therefore unique to your particular playthrough. That means there isn't a master list you can quickly use to look up the particular code you require, and instead you'll actually need to track down the relevant document or clue on your own run through Deathloop to receive the correct combination. Sorry about that! However, if you know where to look for the information then that process gets a whole lot easier, so things aren't as bad as they seem.
If you're looking for some broader assistance to get through the game, then follow these Deathloop tips to make sure you survive the day (again).
Due to this, all we can do right now is tell you where to go to find the Deathloop codes and combinations you need. Every door and safe can be opened, you just know where to look to get it. One thing to point out here as well is some locked doors are actually part of the main story, so you will never be able to open them until you reach a certain point in the campaign. That's handy to know before you waste an evening traipsing around the island looking for something (take that tip from experience). To help you with all this, we've outlined the location of all the locked doors, safes, and where you can find their Deathloop codes and combinations.
Tunnel Code
To get the tunnel code right at the start, you just have to play through the game until you reach the house. A few things will happen and shortly after you'll have the tunnel code. However, enter the code 0451 to get a trophy for the classic door code Easter egg.
Colt Safe code

You'll find Colt's safe right at the start of the game as part of the tutorial. Don't bother looking for it there though, as you'll find the combination in Fristad Rock in the AEON Security Office if you follow your objective. Hack the door to get in and look for a note behind the desk.
Updaam Smoking competition codes for the three lock door

You'll find a door protected by three locks in Updaam, with a note talking about rigging a smoking competition. Near the smoking machine you'll find a note on a table explaining 'The Pact of Smoke' and one of the codes you'll need from one of the competitors, Cassandra. To get the other codes you'll need to interfere with the machine by pressing the smoking machine button so that different competitors make it home and survive after the competition takes place at Noon.
If you press the button once, Vanya will survive. To find her code head to Karl's Bay after the Noon competition and go through the Gardens of Perception entrance. Head down the stairs to the right on the other side to Vanya's Restaurant. Inside you'll find Vanya's code on a letter in the back room, on the counter by the shelves with boxes on.
If you press the button twice then Anatoly will survive. To find him after the competition follow the same route you did to Vanya's Restaurant, but keep going past it and go around the back to reach his house. His code will be inside.
When you have all three numbers you can open the three code door and find… not a lot. All we've found in there is an occasional enemy and an audio diary for Harriet. Unless it contained something we collected elsewhere, it's a lot of hassle for very little reward.
Deathloop delivery booth codes
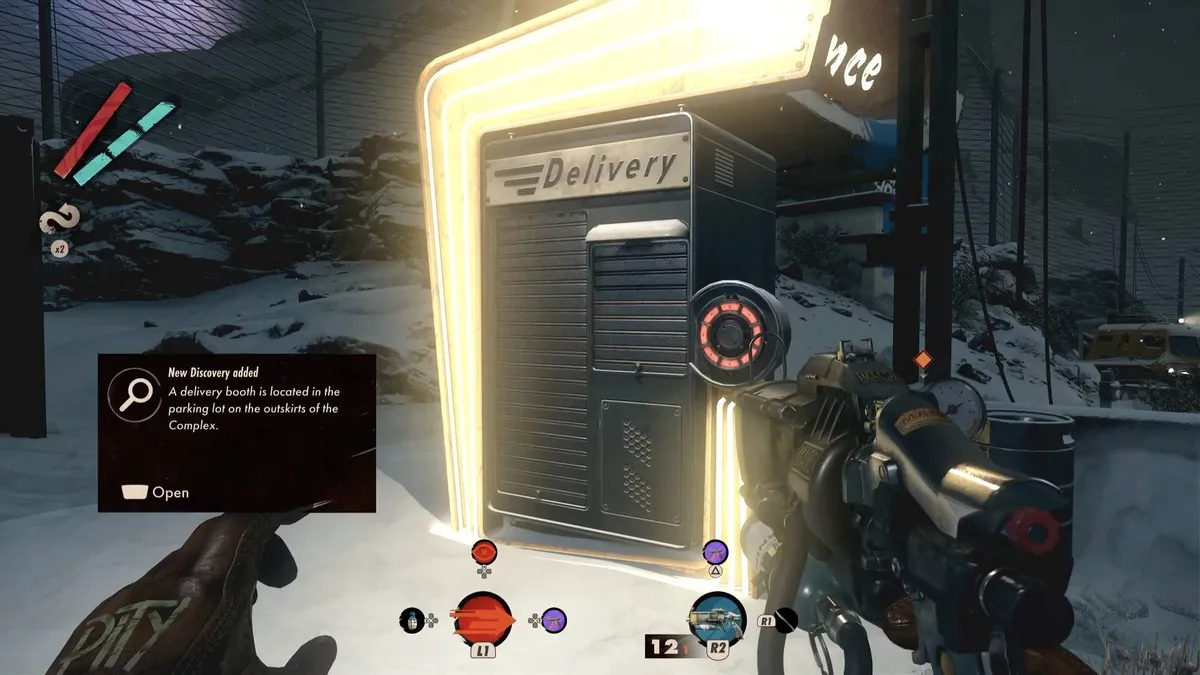
You'll find a delivery booth in every level, so you'll probably wonder where the Deathloop delivery booth code is and how to use it. To get these vending machines up and running you'll need to get inside Fia's bunker. On the upper level path to reach Fia and the reactor room you'll see a camera - this is watching over a door and inside you'll find a delivery booth in a state of disrepair. On a whiteboard in this room is the code to get the booths up and running. When they're working you'll be able to order a crank, battery, nullifier or turret, and it'll appear in the next time stage.
Updaam gate code

There is a locked gate right outside one of the Updaam tunnel entrances with a note saying that every time the phones dial out, the gate opens. Simply climb up to the level above the gate and to the right from where you can read the note, and you'll see two yellow phone booths. Hack the nearest one and then head back down to the gate to get the number as it opens.
Wengie Depressurization control code

You'll find the Wengie Depressurisation control when you first encounter her during the early part of the story to get Residium. There's an audio diary to the left that will tell you the location of the code. For us it was on the noticeboard in the lower level of the Lab Annex, although it might be somewhere else for you. The code will change every loop, so if you want to use the console you'll have to check this code every time. When you enter it, the Depressurisation control will switch to manual, and you'll then be able to seal the central chamber of Wengie's base using any of the buttons outside the doors leading in.
Library Safe

You'll find a safe in the middle of the floor in Updaam library at noon. It's actually a mission critical thing, so don't worry about getting into it until you need to. When it's time you can find the code to the Library safe in Aleksis' room in his Updaam mansion (this is the room with the minicom computer terminal), on a note from Jullianna about his AEON interview.
Queen of Riddles Safe at The Yerhva

While you're trying to find the Deathloop Queen of Riddles Yerhva answers you'll probably notice a Queen of Riddles Safe in The Yerhva. Again, like the Library safe this is eventually a mission critical goal, so there's no point looking for a code until it's time. When you have the objective to locate somewhere using a photograph, it will lead you to the place with the combination inside.
Otto's Workshop container crate in Karl's Bay

You find this locked container crate early on in Karl's Bay. If you just want to get in and see what's there, come back in the evening when it'll be open and you can grab one of the Deathloop Trinkets that will let you hack and detonate mines. Later you'll be able to get the actual door code as part of the story where you'll visit Updaam and prevent Otto's Workshop burning down, so you can read his terminal and get the details you need.
Maintenance Closet code in Karl's Bay

In Hangar 1 in Karl's Bay you can find a maintenance closet on the ground floor. The code to get in can be found in Hangar 2. If you go in through the main door, the code will be almost immediately opposite the hanging plane fuselage you can use to cross the hangar. This will open up the Maintenance Closet and provide a new way into Hangar 2, but you'll need the gas immunity Trinket to use it.
Updaam door with microphone / RAK Facility

You'll need a spoken password to open the microphone door in Updaam. To find that you'll need to visit the Archive Office in the afternoon, when the door will be left open and you can get in. It's the door just before you go down the stairs to reach the microphone door. Head to the second floor of the archive office and you'll find a note sticking out of a bookshelf, with the code word you need to open the door.
Three RAK passwords

Inside the RAK Facility Updaam microphone door, you'll find another microphone password door that requires three words this time. There's no quick way to do this; you'll have to read the 'Where the Powers Lies' note next to the lock, and then follow that quest to start the power generator at the Complex and open up all the Horizon Stations in each location. That will get you the three codes you need.
Fristad Rock doorbell bunker

This door is one of the hardest to open but also more than worth prioritising as you'll unlock a load of really useful info that will give you a massive head start in the game. On the coast near where you come out of the Tunnels in Fristad Rock, you can find a door behind some breakable wood. There's a doorbell there, but ringing it doesn't do anything. To get inside, go there in the afternoon when the tide has gone out and you'll be able to find a small opening in the new lower area, just by some wooden poles and part of the bunker structure jutting out.
Once inside you'll find a door with three locks on it and the first combination on a note. If you listen to the audio diary you can also find you'll discover that the commanding officer 'hacked the radio' in the morning to play the locations of the other codes. She means the hackable radios you can use for distractions so find one of those in the morning and hacking it to hear a variation on the following message:
"M13. Nine. H 26. Nine. R33. 16"
Yours will be slightly different for reasons we shall now explain: you might recognise the R33 as it's the grid reference for the Deathloop Fristad Rock bunker, which you can see marked on the map inside. The other codes are references to the Karl's Bay and Updaam map that will take you to a locked warehouse near the Treasure of the Ice exhibit with the giant mammoth animal, and a door inside the building next to Otto's Firework shop. Both will have doorbells you can ring and the number that follows each respective coordinate is the number of times to ring the doorbell to open the door. So head to each of the other two coordinates, ring the doorbell the right amount of times and you'll be able to get inside where you'll find one of the codes you'll need.
When you have all three codes you'll be able to open the Fristad Rock bunker where you'll find a lot of info about the Deathloop Visionaries that will help you reach them (things like security codes). You'll also find two Deathloop guns that alternately tag and damage tagged enemies, and a Dishonored Easter egg.
Complex Armory code

When you visit the Complex at noon and head into the underground base (under the leg of the Wheel shaped Stabilizer Core), you'll be able to discover Eternalists have blown open the armory. Inside you'll find a few things, but one is an armory with a code locked door. To open it you'll need to find the door above, which is near a circular vent and needs a single battery to open. Inside you'll find a note with the Armory Code.
Mask Maker Amador Door

While exploring Karl's Bay, you'll find a locked door in the Mask Shop (the one with the faces on). There's a note saying that the owner, Amador, is due to be sacrificed at Harriet's Morning ritual in Hangar 2. He's the guy on the hook being lowered into the gas, and if he dies then he won't be able to open the door later in the day. So, to get into the shop's locked door, disrupt the ritual in any way before the hook moves. As long as you stop it proceeding and Amador is alive when you leave, he'll be in his shop later in the day and his door will be open.

