Lost Planet - levels 1-5
We talk you through the first five levels
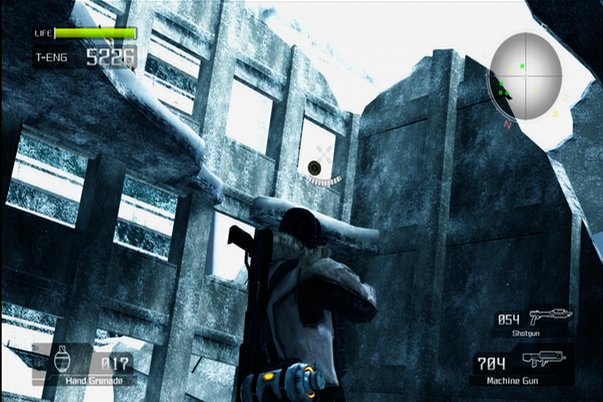
Level two provides the first true swarm of Akrid. Just after the beginning walk through an alley (where you'll find a shotgun and grenades), a seemingly endless army of larger bugs will start to plague you. You could stand and fight, constantly being knocked around until your T-ENG runs out, but the best action is to run. You can avoid the swarm for a bit by hanging to left wall all the way up to the giant archway, where you'll find the first target letter hovering inside a window on the left. Shoot the "S" and keep heading down the path, running from the Akrid as much as possible. If you're in a particularly angry mood, pull out the shotgun and start splattering Akrid tails all over the snow.
Past the archway and a small set of buildings, the path will split. Other than a data post, the right path is pointless. You'll only attract more Akrid by hanging around out here, so head left, avoid the new batch of insects and shoot through the membrane covering the cave on the right. Enter, and about halfway through the bugs'll ease off. Also, be sure to blast the glowing pods along the ceiling for a small T-ENG boost.
After the next membrane and data post, you'll see another long stretch of abandoned street. Before plowing through, look to the north - it’s a hangar housing a Vital Suit. Grabbing this little guy will save you tons of ammo and make the next bit a lot easier. Just rip through the smaller Akrid, then the larger ones that burst up and right around the corner some pirates will show. Seeing as you're armed with a dual-Gatling gun VS, the path should be no problem. When far-off pirates start launching rockets at you, aim for their wooden platform - this much larger target will splinter and fall apart after minimal VS fire.
Once inside the blown-out building, hit the nearby data post, climb all the way to the top and look east - you'll see an "O" target floating in the window. Next, up on the snowy highway, drop into the first pit and look south for a "T" token floating behind bars. Be sure to leave your newly acquired sled/mech combo up top - its extra defense will come in handy against an enemy VS further down the road.

There's a small train tunnel at the end of the road. It's a straight shot to the end, blasting and killing, but be sure you flick on the flashlight and tag another letter token hidden at the end of the tracks. It's floating to the far left, on top of some rubble. Proceed through the entryway and you're back outside at the pirate's fortress.
The best way to tackle this area is to head up the trench on the left and work your way up to the small house behind a couple of walls. Clear out the pirates, hit the data post on top of the roof and then take the rocket launcher from the roof of the larger house. Use it to blast down the two turrets to the east. With three rockets remaining, use 'em to shoot down the VS that's patrolling the flat area to the right of the turrets. Your rooftop view gives you a clean shot of the entire level. Oh, and grab the "R" token hiding inside the bottom floor of the house, just behind some crates.
Weekly digests, tales from the communities you love, and more
Head back down to where the VS was, clear out that area if you like, or just make a break for the fortress atop another hill. You've got all the letters, so any time left is solely for your own energy or ammo needs.
The boss is nothing more than a jumpy VS. Hop in your own (equipped with Gatling gun and shotgun) and shoot anything that moves.
A fomer Executive Editor at GamesRadar, Brett also contributed content to many other Future gaming publications including Nintendo Power, PC Gamer and Official Xbox Magazine. Brett has worked at Capcom in several senior roles, is an experienced podcaster, and now works as a Senior Manager of Content Communications at PlayStation SIE.


