You are now subscribed
Your newsletter sign-up was successful
Want to add more newsletters?

Every Friday
GamesRadar+
Your weekly update on everything you could ever want to know about the games you already love, games we know you're going to love in the near future, and tales from the communities that surround them.

Every Thursday
GTA 6 O'clock
Our special GTA 6 newsletter, with breaking news, insider info, and rumor analysis from the award-winning GTA 6 O'clock experts.

Every Friday
Knowledge
From the creators of Edge: A weekly videogame industry newsletter with analysis from expert writers, guidance from professionals, and insight into what's on the horizon.

Every Thursday
The Setup
Hardware nerds unite, sign up to our free tech newsletter for a weekly digest of the hottest new tech, the latest gadgets on the test bench, and much more.

Every Wednesday
Switch 2 Spotlight
Sign up to our new Switch 2 newsletter, where we bring you the latest talking points on Nintendo's new console each week, bring you up to date on the news, and recommend what games to play.

Every Saturday
The Watchlist
Subscribe for a weekly digest of the movie and TV news that matters, direct to your inbox. From first-look trailers, interviews, reviews and explainers, we've got you covered.

Once a month
SFX
Get sneak previews, exclusive competitions and details of special events each month!
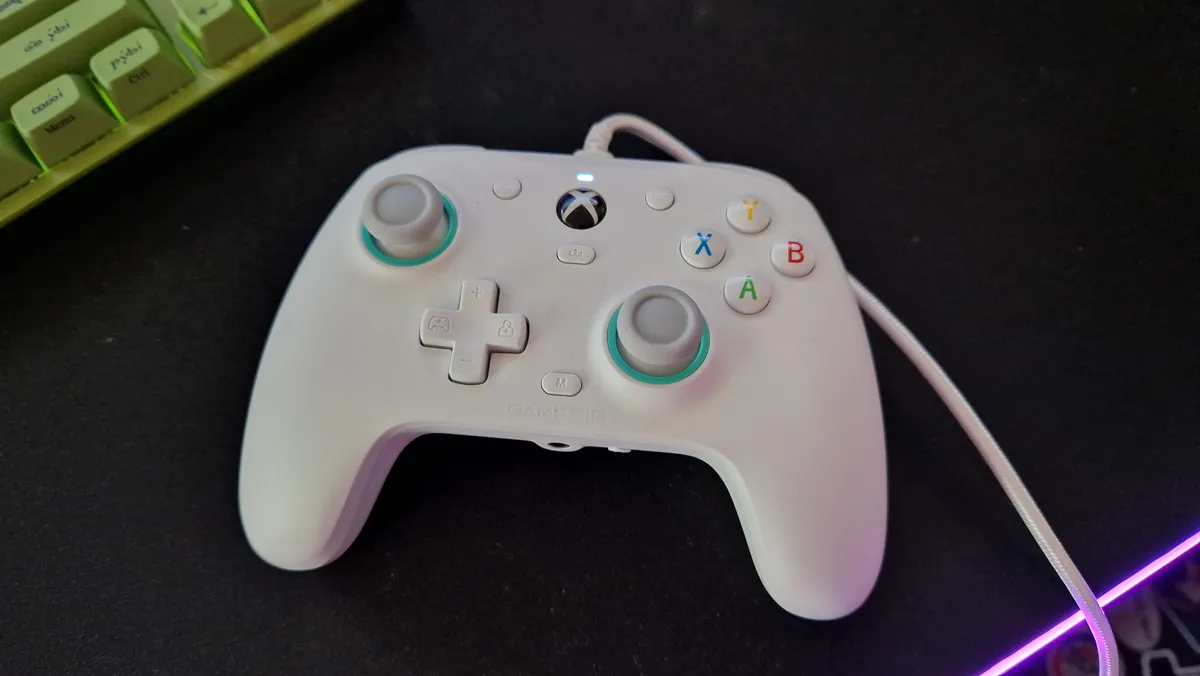
If you were lucky enough to unwrap a new gaming controller this Christmas, you may find that it has more buttons than you're typically used to. Whether it's for Switch 2, PS5, Xbox, or PC, the best controllers these days almost always sport some kind of additional buttons or paddles. Normally, these are back buttons integrated into the device's grips, but you might also find a few extra clickers next to the bumpers (R1, L1, RB, LB).
Each controller will have its own method of setting these buttons up the way you like them, but on the whole, assigning them can be done with the same basic process. I've reviewed loads of controllers during my time as the resident gamepad expert here at GamesRadar+, and setting up back buttons is the first thing I do when unboxing any review sample.
Setup 1: No software

The majority of controllers won't require you to use companion software or a mobile app to set up their extra buttons. A couple do, but we'll get to that later. A lot of controllers don't require it, but will have software you can use if you prefer.
If you have a controller from GameSir, PowerA, Turtle Beach, Victrix (PDP), Razer, or 8BitDo, you won't need to dabble in software to set up back buttons, but each brand will have its own variation on the steps I'm about to go through.
Step 1: Find your controller's function button
First off, you'll need to identify your gamepad's assignment button. On GameSir controllers, this is usually the "M" button; for other brands like 8BitDo, it's the button with the logo marked on it. For Razer pads, it's normally the button with a small circle on it. Again, your instructions will make this clearer for you.
Step 2: Mapping mode
All you'll need to do now is press that function button and wait until you see a flashing light that indicates the controller is entering its mapping mode. Sometimes, this won't happen until you press the function button and the back button you want to assign. Other times, it'll enter mapping mode when you hit the function button and the button assignment you're trying to map.
When the flashing starts, then you'll want to hit the button in the combination you haven't yet - so most likely, the button you're trying to duplicate to a back button.
So, for example, if you want to map the "A" button to your right-hand back button, you likely entered mapping mode by hitting:
"Function button" + the right-hand back button
Now that mapping mode is active, hit the "A" button, and it'll map, and the flashing will stop to indicate a button has been mapped.
If you entered mapping mode by hitting:
"Function button" + "A"...
Then press the right back button to complete the combination.
It can be handy to do this while playing a game so you can immediately check if your button mappings have taken.

Step 3: Checking, and profiling
Complete step 2 until you have mapped all the buttons on your controller to your desired settings. Now you can use a game to check that things are set up the way you want.
A lot of controllers will also have multiple profiles for you to setup. These can be useful if you want different back button assignments for different games. All you'll need to do to map a new profile is find the switch (usually found on the back of a pro controller) to change to a new profile, then complete step 2 again to create some different button assignments.
If you have trouble shifting profiles, again, adhere to your controller's instructions.
Setup 2: With software

Chances are, if your new pro controller has back buttons on it, it'll likely have optional PC or mobile software you can adjust it with. If you've got a controller like the Manba One, Nacon Revolution X Unlimited, or similar, that has a screen on it, you may have limited access to customization software on the controller itself.
Companion apps like these can be very powerful, and will let you get your full money's worth out of the gamepad you have in your hands. You'll be able to assign button mappings, yes, but you'll also be able to fully customize profiles, trigger and thumbstick sensitivities and deadzones, as well as the other features of your controller.
Step 1: Find your software
The first step here is to find your controller's official software. There may be a QR code on the box or on the instruction leaflet that'll take you straight to it. My advice is to make sure you're downloading something from your controller maker's official website - a few knock-offs exist, and you want to be careful you aren't getting scammed or hit with malware.

Step 2: Grab a USB cable
Most controllers, especially those from Nacon, will need you to be wired up to a PC to actually enact changes within companion software. This may mean you need to put your controller in wired mode using a switch on its back; just keep that in mind.
Good news, almost all controllers come with a USB to USB-C cable in the box, so you'll probably have one handy.
Step 3: Find the back button menu
This step is really easy, but open up the software, navigate to the button assignment tab or sub-menu, and use the diagram or image to map the buttons you want.
My recommended back button assignments

But what should you use these extra buttons for anyway? Well, in truth, whatever you like!
The best thing about back buttons is that they're yours to get creative with. Depending on the game you play the most, or the extra functions you'd feel most comfortable using back buttons for, you can assign them to what you want. There are no rules here.
If you're at a loss and you need some inspiration, it might help to think about why back buttons are so handy in the first place. Extra functions were initially put on controllers in an attempt to level the playing field in competitive shooting games, since players on PC who use a mouse and keyboard have more functionality at their fingertips and never need to yield control of the camera (and their aim). For that reason, you may want to assign your extra buttons to the controls that you feel most frequently force your thumbs away from the movement sticks. That way, you can always change your aim or move at a moment's notice.
I've been using controllers with back buttons for around five years now, and although I sometimes swap things out depending on the games I'm playing, I still use the following assignment as a blanket profile because I found it works best for the largest number of games.

If I have two back buttons:
The right back button will be set to "A", or X if you're on PlayStation. This helps with navigating menus or general interaction with UI, but in-game, it's really handy being able to jump at any given moment.
My left back button is set to "X", or Square if you're on PlayStation. Again, this can be really handy for quick menu navigation, but it's also a way to ensure I can reload while on the move.

If I have four back buttons:
I'll use those two assignments I've already mentioned on the bottom set of back buttons.
On the top right, I'll have it mapped to "R3" (clicking the right stick in). This is an oddly useful assignment to have across various games, because it tends to be used for lots of miscellaneous things. It could be an aim or a change camera shoulder button, it could be a camera zoom, or something else to do with the inventory. For me, it was originally set as my melee key in Hunt: Showdown, which was really useful because it meant I could charge an attack without it compromising my aim - so it just kind of stuck.
On the top left, I'll have left on the D-pad. Again, this is more specific to me playing Hunt: Showdown. In that game, hitting left on the D-pad pulls out your first tool, which is usually a small knife you use to dispatch monsters quietly with. I'm frequently pressing that button, and it takes my thumbs off the sticks, so it's much easier to have it as a back button.

If I have additional bumper buttons:
I'll use both of these to ensure my thumbs never need to come off the movement and camera sticks, so I'll almost always map them to the other two face buttons I haven't already set as back buttons.
If you think my back button assignments are a little weird, I don't blame you. Like I've said, it's about making these extra functions as useful to you as they can be. If you play Fortnite or Call of Duty, you'll probably have completely different assignments that'll work for you.
My advice is to play around with them to find the best options for you and your choice of game. My pro tip is to remember the "rule of thumb": the goal is to keep your thumbs firmly planted to their sticks, so it'll probably be more efficient to map your back buttons to the face buttons to ensure your thumbs aren't dancing about quite so often.
Still looking for your perfect pro controller? Check out the best PS5 controllers, the best Xbox Series X controllers, and the best Nintendo Switch 2 controllers.
You must confirm your public display name before commenting
Please logout and then login again, you will then be prompted to enter your display name.