Gears of War: Judgment strategy guide
Preview of BradyGames Official Strategy Guide

If you're looking for in-depth walkthroughs, collectibles guides, and comprehensive multiplayer coverage for Gears of War: Judgment, look no further. Here's a glimpse into BradyGames' hardcover Collector's Edition Strategy Guide.
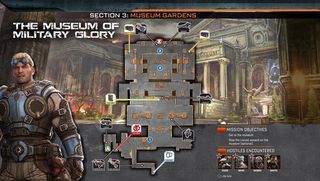
SECTION 3: MUSEUM GARDENS
MISSION OBJECTIVES
- Get to the museum.
- Stop the Locust assault on the museum (optional).
RIBBONS AND SCORING
Accept the Declassify option and put the Hammerburst to use against the first Kantus that appears. Then switch to the Sawed-Off Shotgun and move through the gardens in search of an opportunity to kill two or more enemies at once for a Nothin’ But Bits ribbon. Should no such opportunities arise, aim low on the Drones to down them. Then rush in and grab one for a meatshield and snap its neck for an execution bonus. Clear the upper walkway and then grab the OneShot leaning against the column and take cover near the rail. Other than the occasional Clusterluck ribbon possibly earned if the Declassified option isn’t accepted (or a Hat Trick earned with the Longshot), your big scoring chance comes from the Shish-Kashot ribbon. The key to earning three Stars on this mission is to rack up as many Shish-Kashot ribbons as possible, and that means using the OneShot to kill two or more enemies at once. Keep your head down and watch for a Boomer and Kantus to approach single file, then open fire with the OneShot. Try to get three Shish-Kashot ribbons before killing the last Locust. Listen for your squad’s alerts to incoming Tickers and quickly switch to a rifle or shotgun. Kick them away and then quickly open fire to shoot them out of the air for an Oakley ribbon.
SHISH-KASHOT: Kill at least two enemies with a single OneShot round.
NOTHIN’ BUT BITS: Kill multiple enemies with a single Sawed-Off Shotgun blast.
OAKLEY: Kick a Ticker and shoot it out of the air.
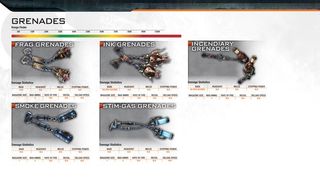
GRENADES
- Gears can carry up to four grenades of a single type in addition to their two weapons.
- Grenades can be thrown while wielding a gun, without the need to holster your firearm first.
- Grenades can be thrown, planted in the ground as a proximity mine, or blind-tossed from behind cover.
- Onyx Ammo Caches yield one grenade of the last type that you had equipped.
FRAG GRENADES
Frag Grenades are the most common and most lethal of all of the grenade types. Frag Grenades deliver intense damage across a 10-meter radius and are capable of killing multiple foes with a single explosion. Frag Grenades can be thrown with tremendous accuracy over considerable distances and offer a superb way of closing Emergence Holes from afar. Hold the Aim Weapon button to bring up the targeting reticle and maneuver the trajectory path to hit your mark. Try bouncing the grenade off of walls or the ceiling to hit enemies behind cover. Frag Grenades make excellent proximity mines—plant them inside chokepoints to lure enemies to their death. It’s possible to “bag and tag” a meatshield by pressing the Throw Grenade button while in control of a downed enemy. The COG sticks the hostage with a grenade and kicks him forward, ideally toward a group of enemy reinforcements! Frag Grenades are extremely critical in “no health regen” scenarios and very useful for helping to take out Serapedes.
INK GRENADES
Rather than explode with instantaneous damage, Ink Grenades release a cloud of toxic gas that damages over time. Enemies caught in the cloud will most certainly be downed—or worse—if unable to extricate themselves from the situation in a speedy manner. These ink clouds don’t just inflict damage, but they also blur enemy vision and stun those in the affected area as well. While not as lethal as a Frag Grenade, a well-thrown Ink Grenade can temporarily neutralize multiple Locust and buy the Gears time to scavenge for weapons and ammo, seek cover, or move in for the kill. Ink Grenades are relatively rare during both the Judgment and Aftermath Campaigns, and are seldom found away from the corpse of a Kantus. Ink Grenades can be planted as a proximity mine, but it will rarely result in a kill. Tagging an enemy with an Ink Grenade is far more effective.
INCENDIARY GRENADES
Incendiary Grenades are extremely rare in the Campaign portion of the game and can only be found in the Aftermath Campaign, if dropped by a Locust. Incendiary Grenades are similar to Ink Grenades in that they inflict damage over time, but they neither stun nor blur enemy vision. That said, a direct hit is almost guaranteed to result in a kill. Incendiary Grenades are useful for softening up multiple kills, cutting off the enemy’s advance, and for flushing enemies out of cover.
SMOKE GRENADES
Incendiary Grenades are extremely rare in the Campaign portion of the game and can only be found in the Aftermath Campaign, if dropped by a Locust. Incendiary Grenades are similar to Ink Grenades in that they inflict damage over time, but they neither stun nor blur enemy vision. That said, a direct hit is almost guaranteed to result in a kill. Incendiary Grenades are useful for softening up multiple kills, cutting off the enemy’s advance, and for flushing enemies out of cover.
STIM-GAS GRENADES
Kilo Squad comes into contact with Stim-Gas Grenades on several occasions during the Judgment Campaign. These unique grenades instantly heal anyone within the area of effect. They are particularly helpful during those few Declassified missions in which the squad’s ability to recover health has been disrupted. To use a Stim-Gas Grenade, simply toss it at the ground and note the circular area of effect. A cloud of “+” icons surrounds the character, alerting you to the benefits they provide. Stim-Gas Grenades, like Smoke Grenades, are far more common in the multiplayer portion of the game and are described in greater detail in this book’s Multiplayer Arsenal chapter.
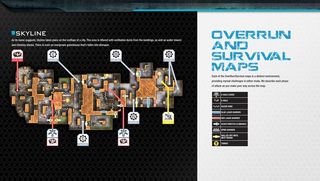
OVERRUN AND SURVIVAL MAPS
PHASE 1
The Scout perch to the southwest of the E-Hole is an excellent location. You can spot approaching Locust and fire upon enemies attacking the E-Hole, all without dropping down. As the Locust, send Wretches to counter. The Troika next to the E-Hole is useful on defense until all fortifications are gone, after which it will likely get quickly destroyed by Locust attacking the Cover. Fall back to the raised platform to the east and bombard the E-Hole area with Booshka fire. An aggressive Ticker assault via the northern approach can quickly remove all barriers. The Tickers can then move in to attack the E-hole Cover before defenders on the southern end of the map have time to react.
PHASE 2
The Troika on the high platform north of the E-Hole is essential in this round’s early stages while fortifications stand. Have an Engineer occupy the lower area to the west, deploying Sentry Turrets to kill or slow enemies while a teammate mans the Troika. The Scout perch southeast of the E-Hole provides a decent perspective on approaching Locust, but it has limited visibility of the E-Hole Cover. Abandon this position when all barriers have fallen.
PHASE 3
The Troika, laser barrier, and electric fence make the northern approach a hazardous one for the Locust. The COG should take full advantage of this defensive position. Attempt to rush past incoming heavies, such as the Mauler and Giant Serapede, to attack their rear. Instead, push the attack on the southern side of the map. This is a large area to traverse with a Scout perch to get past. But once past the final barrier, the generator is right there. Use the Scout perch to the south of the generator to defend its southern approach. There is a stairwell to this platform’s rear that other classes can use to reach it.
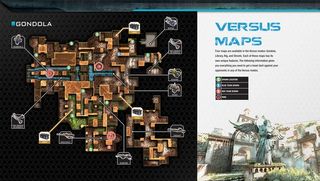
VERSUS MAPS
Four maps are available in the Versus modes: Gondola, Library, Rig, and Streets. Each of these maps has its own unique features. The following information gives you everything you need to get a head start against your opponents in any of the Versus modes. Gondola takes place at Ocean Breeze, a coastal resort town owned by Donaldson & Marlow. A storm looms on the horizon, lending an air of tension to the area.
WATCH YOUR STEP
Remember, in Versus mode you can drop off ledges as a quick way down, but it costs you health. The main feature of the map is the Gondola, which runs from the docks on the east side up to the resort in the west. Apartments, like the Coastal Villas, and retail businesses, such as Gitte’s Hotel, litter this tiered-village, making passageways cramped. The multi-tiered layout often forces you to fight on close stairways and around tight corners. Because of the constricted quarters, short-range weapons are extremely powerful here. This map offers the Scorcher and Digger Power Weapons, which are excellent tools to get the job done. This map has two Frag Grenade locations. Each one rests in a gondola. You can only access the gondolas at the upper levels of the resort or down by the docks. You can chuck grenades from the gondola at enemies passing below you.
FREE-FOR-ALL
Free-for-All is a chaotic melee where everyone guns for each other. Make sure you go after the Power Weapons as quickly as possible. Though not a Power Weapon, either Shotgun has a massive advantage on this map due to its one-shot kill capability at short range.
TEAM DEATHMATCH
In Team Deathmatch, moving as a team and watching each other’s backs is key. If you like using sniper weapons, grabbing the Longshot and hanging out above the waterfall area is a good plan; you can provide cover to your teammates. If you prefer to fight up close and personal, the short-range Power Weapons let you dominate this area’s tight passageways. The Frag Grenades are always useful. To get the most out of them, toss them into the heavily trafficked area in the map’s center, where two streams run between the Boomshield and the Digger.
DOMINATION
To Dominate this map, capture and hold points A and C, which are quickly accessible from each other. Acquire the Scorcher midway between points A and C and stay in between the points to defend both quickly. If the opposing team has already captured points A and C, don’t lose hope! Grab the Mortar on the roof near point C and quickly clear the Domination rings with its massive area-of-effect attack.
DIG CAREFULLY
While the Digger is very deadly, it does not dig through walls or rock. It instead pops out of the ground and detonates right away if it hits an obstacle. Be careful where you aim when using this weapon so it doesn’t detonate in your face.
ROLL AND HOP
Because most battles on Gondola take place in close quarters, you often find yourself in a duel. When this happens, roll and Look Out Below. When holding point C, keep an eye on the bridge above. Enemies can easily drop grenades or fire from this position in relative safety. The action may migrate to the waterfall, but tends to move to the outer corridors and stairways. The Scorcher position tends to be a hot spot on the battlefield due to this weapon’s close-range strength.
Sign up to the GamesRadar+ Newsletter
Weekly digests, tales from the communities you love, and more
