All The Legend of Zelda Breath of the Wild Korok Seeds locations number 900 in total, all of which are sent to Hestu for increased inventory space. You can find a lot simply by wondering the world, but if you want to get them all, you'll need some help - and that's were we come into things.
The reason for putting yourself through this is because finding all 900 will let you add extra inventory slots for your weapons and shields. This might mean finding all the Korok Seeds could be Link's most challenging adventure yet, so we've laid out all the locations with maps for finding them all. Good luck, and happy hunting!
Hestu locations and reward for all 900 seeds
Breath of the Wild Hestu locations

You can find Korok seeds before encountering Hestu, but if you want to start trading them in for inventory slots, you'll need to locate him first.
Locations #1 – Duelling Peaks Tower region
Head north from Dueling Peaks Stable towards Kakario Village, following the main story, and shortly after crossing Kakariko Bridge, you'll spot Hestu standing next to a tree on the right side of the path.

He'll ask you to retrieve his maracas and after completing his quest, you can start upgrading. The first level upgrade for each category costs one seed, the second level costs two, and so on.
After unlocking a few extra slots for you, Hestu announces his departure for Korok Forest, so you'll need to track him down again for more inventory space.
Location #2 – Any region
Hestu's next location will be the first stable you visit after he moves on from the road to Kakario Village.

In my case, this was the Riverside Stable, directly opposite the Wahgo Katta Shrine. For others, he's popped up at Wetlands Stable and Woodland Stable. Wherever your next stable is, he'll be close by.
Location #3 – Korok Forest, Woodland Tower region

The forest is in the Woodland Tower region, and this is Hestu's third and final location.
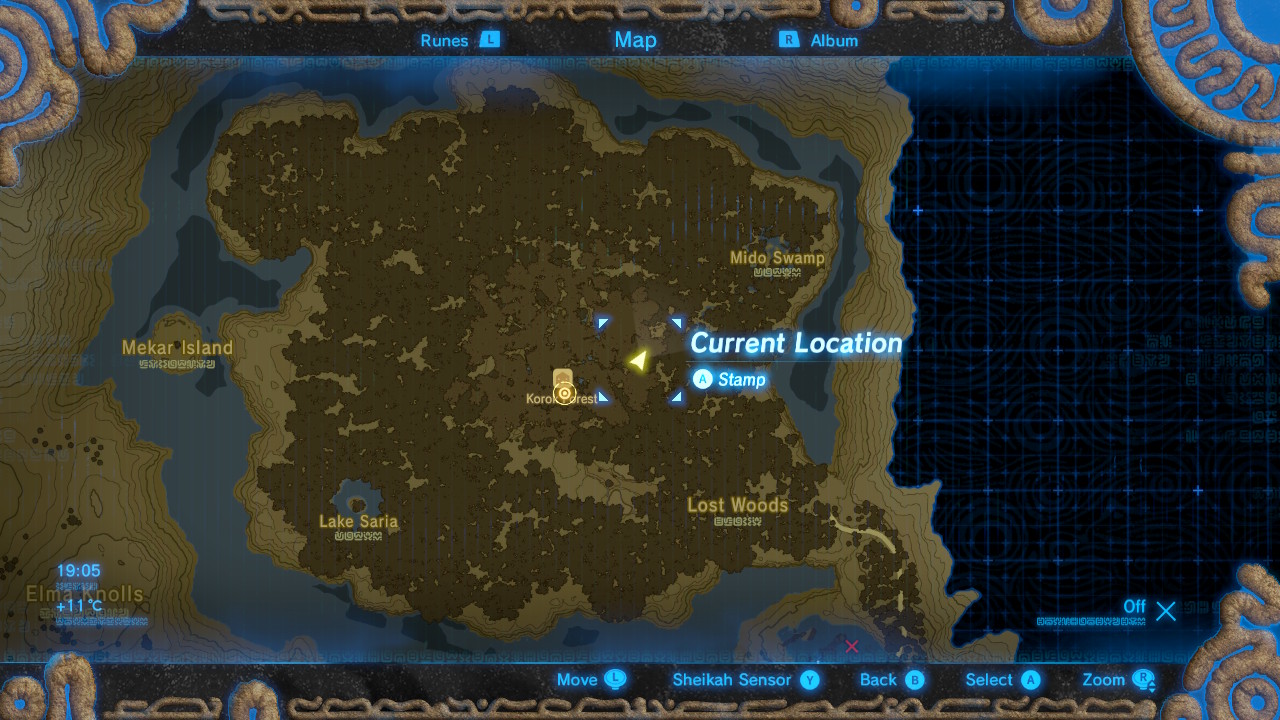
To reach the forest, you'll have to enter via the Lost Woods to the southeast. At the entrance, there's are some ruins next to a torch. Follow the torches until it seems like their path has ended.

Head west and you'll come to a pair of torches next to a tree that has a chest hidden inside. Grab the loot, and then grab the mobile torch on the ground.

Follow the embers from the torch and it will lead you to the entrance of the forest.

Hestu is off to the right of the Great Deku Tree.
Should you collect all 900 seeds, you'll receive Hestu's Gift, which lets you trigger Hestu's snazzy dance routine any time you want.
Seems like a fair reward for all that work.
Korok Seed puzzle categories
Korok Seed puzzle categories

Finding Koroks in Breath of the Wild is generally a simple affair if you know what to look for.
Because there are so many of the little blighters, we'll break them down into categories and then mark the map with their locations, letting you know which category the Koroks fall into so you know what to keep an eye out for.
Hiding Koroks

Koroks can be hiding under rocks, in piles of leaves, or inside blocks of ice. The rocks might be hidden in a tree, or underneath a heavy slab that can be moved using Stasis.

If we've marked a Korok location under this category, look for something suspicious, and you'll find a Korok.
Rings

The easiest types of rings to find a Korok in, are those in the water made up water lilies and he like. All you have to do is dive into them and the Korok will reveal itself.

The more infuriating ones, like the rocky protrusions found in water, require you to throw a rock into them. There will always be piles of them nearby, and they'll respawn after a few minutes if you use them all. If it seems like it's impossible, try thinking outside of the box and utilising your various powers.
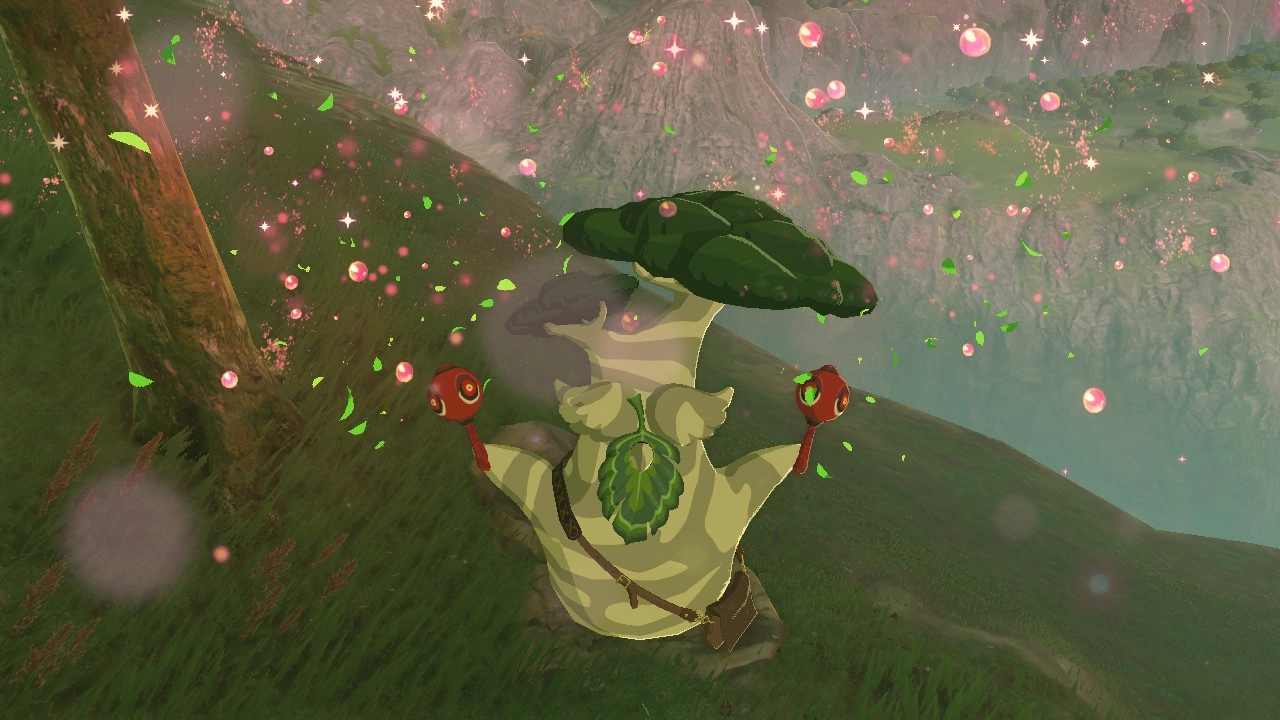
Petals

Often, you'll find these swirly, sparkly clouds at the top of very high things like flagpoles. Other times you'll spot them racing around on a set route. Examine them to find the Korok.
Flowers

A solitary yellow flower growing in the middle of nowhere is a sure sign of a Korok. When you approach them, they'll disappear into the ground and pop up closeby. Follow the trail to the end and you'll find the Korok.

Alternatively, you may also find groups of flowers that you need to interact with in a specific order, for example, ascending from one flower up to five.
Archery

Sometimes, you'll need to shoot something for the Korok to pop out. The most obvious archery spots are those marked with pinwheels.

Standing next to them will prompt balloons to appear, or acorns to start flying around.
Some of them will be pots dangling from a bridge, secreted in the trunk of a tree, or a suspicious piece of fruit begging to be shot down.
Rock formations

If you come across a formation of rocks in a pattern, search the surrounding area for a rock to complete it. It may be a circle, cross, or other shape.

If you're struggling to find one, it's usually in the direction of the gap.
Boulder puzzles

These puzzles involve rolling boulders around, or arranging them in a certain way.

You'll need to give them a little shove to send them on their way, whether that's between a couple of trees on the edge of a cliff, or into a yawning chasm, or use Magnesis to move them around.
Cube formations

Occasionally, you'll stumble across two sets of metal cubes.

You'll need to use Magnesis to rearrange them so that they mirror one another.
Food offering

When you come across statues with plates in front of them, drop the foodstuff required into the empty tray. Most of the time this is apples, but the plates around the empty statue will indicate what's needed.
Race

Tree stumps with a leaf pattern on indicated that there's a timed run to beat as soon as you step on it.

You need to get through the ring before the end of countdown to reveal the Korok. Sometimes, the race will require you to be on horseback and jump over hurdles, so watch out for those.
Tree pattern

If you spot a line of trees that includes an odd-man-out when it comes to the arrangement of fruit hanging from them, pluck or shoot down the fruit to make them all match, and a Korok is sure to appear.
Sometimes the pattern will extend to torches that you need to light so that they're all burning.
Great Plateau Tower
Great Plateau Tower Korok locations
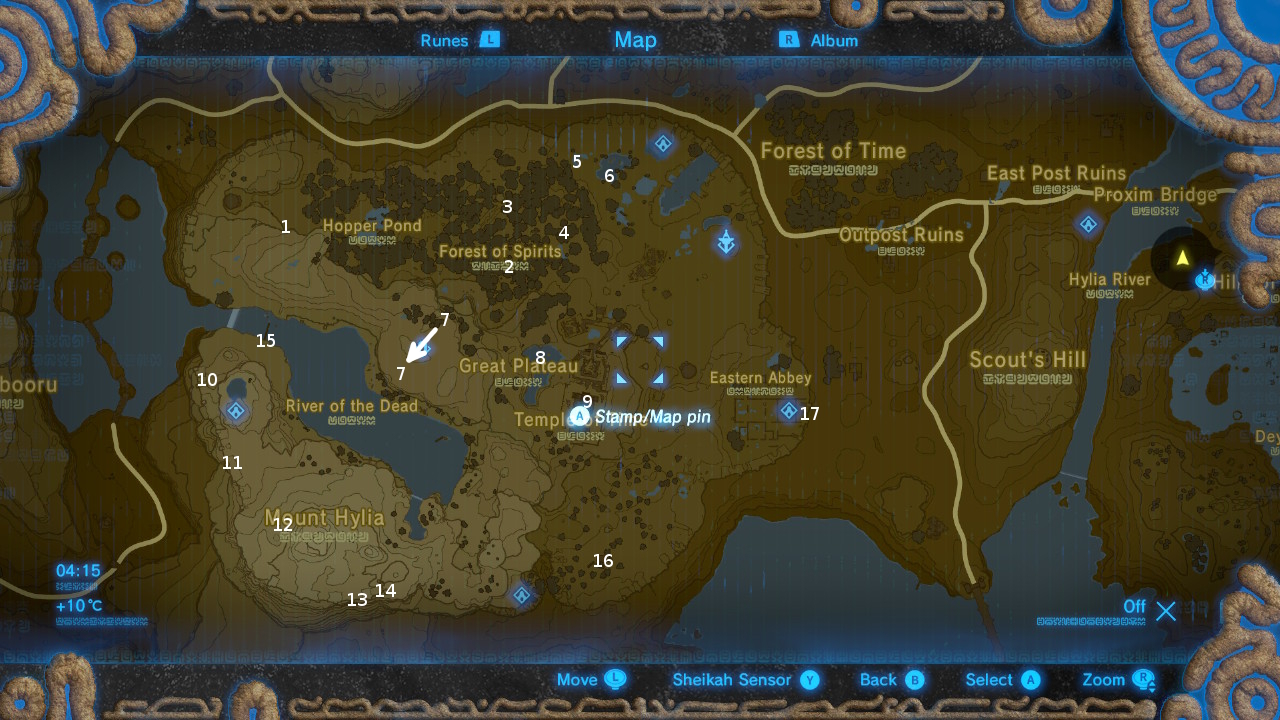
There are 17 Korok's in the Great Plateau Tower region. Check the number for the category the Korok Seed puzzle falls into, and look around the marked area on the map for the corresponding object in the environment.
- #1 - Cube formation
- #2 - Hiding Korok
- #3 - Flowers
- #4 - Hiding Korok
- #5 - Hiding Korok
- #6 - Boulder puzzle
- #7 - Petals (Inside Shrine of Resurrection)
- #8 - Rings
- #9 - Petals
- #10 - Hiding Korok
- #11 - Cube formation
- #12 - Rock formation
- #13 - Hiding Korok
- #14 - Hiding Korok
- #15 - Petals
- #16 - Petals
- #17 - Hiding Korok
Dueling Peaks Tower
Dueling Peaks Tower Korok locations
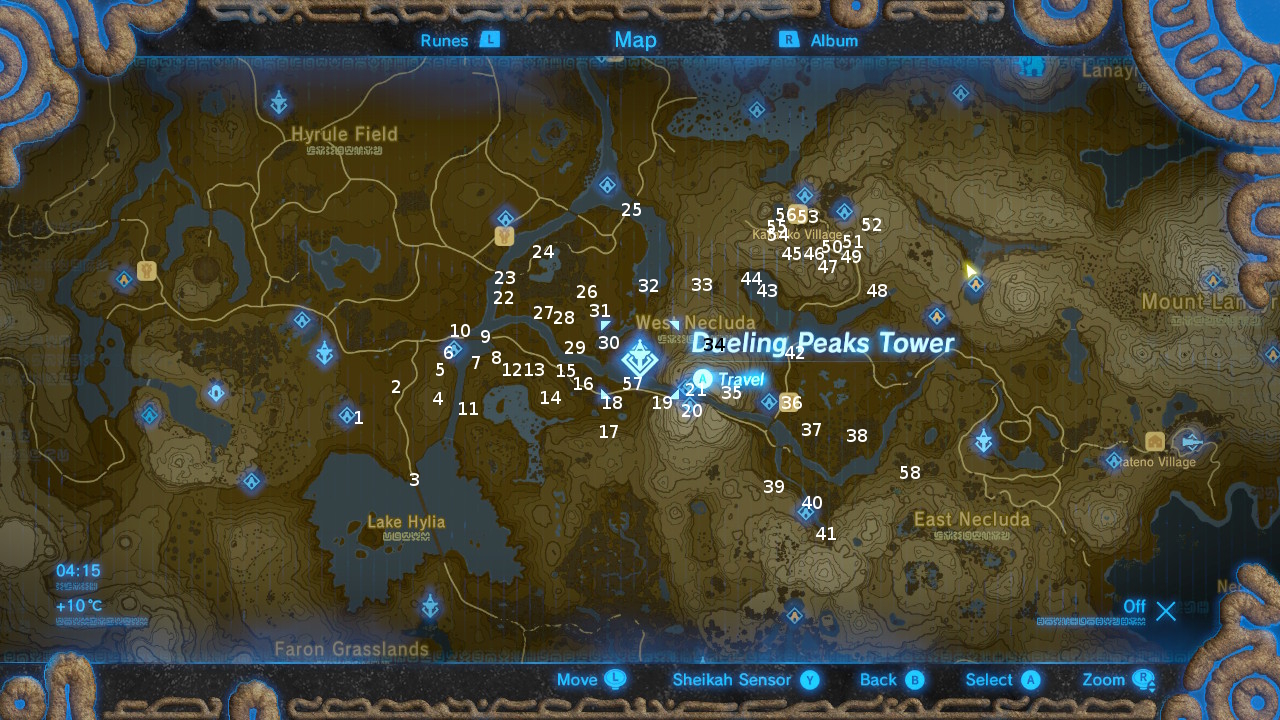
- #1 - Hiding Korok
- #2 - Flowers
- #3 - Tree Pattern
- #4 - Hiding Korok
- #5 - Boulder puzzle
- #6 - Rings
- #7 - Cube formation
- #8 - Hiding Korok
- #9 - Hiding Korok
- #10 - Petals
- #11 - Petals
- #12 - Archery
- #13 - Flowers
- #14 - Hiding Korok
- #15 - Boulder Puzzle
- #16 - Hiding Korok
- #17 - Hiding Korok
- #18 - Archery
- #19 - Hiding Korok
- #20 - Food offering
- #21 - Hiding Korok
- #22 - Hiding Korok
- #23 - Archery
- #24 - Hiding Korok
- #25 - Hiding Korok
- #26 - Boulder puzzle
- #27 - Archery
- #28 - Boulder puzzle
- #29 - Petals
- #30 - Hiding Korok
- #31 - Race
- #32 - Hiding Korok
- #33 - Hiding Korok
- #34 - Food offering
- #35 - Boulder puzzle
- #36 - Petals
- #37 - Hiding Korok
- #38 - Archery
- #39 - Hiding Korok
- #40 - Hiding Korok
- #41 - Hiding Korok
- #42 - Rings
- #43 - Rings
- #44 - Rings
- #45 - Tree Pattern
- #46 - Hiding Korok
- #47 - Hiding Korok
- #48 - Petals
- #49 - Cube formation
- #50 - Hiding Korok
- #51 - Archery
- #52 - Hiding Korok
- #53 - Food offering
- #54 - Archery
- #55 - Hiding Korok
- #56 - Rings
- #57 - Flowers
- #58 - Archery
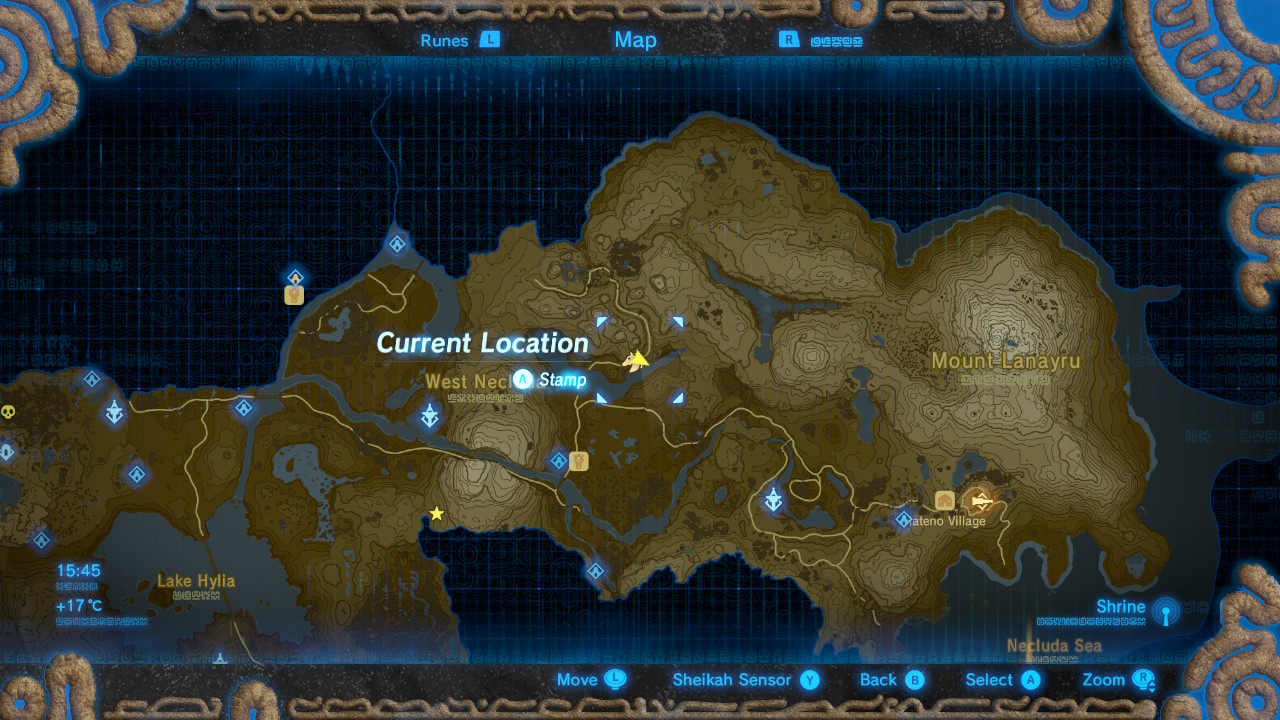
Hateno Tower
Hateno Tower Korok locations

Hateno Tower region is home to 70 Korok Seeds. This time the markers are split over two maps.
- #1 - Archery
- #2 - Hiding Korok
- #3 - Hiding Korok
- #4 - Boulder puzzle
- #5 - Food offering
- #6 -Cube formation
- #7 - Rings
- #8 - Rings
- #9 - Archery
- #10 - Tree pattern
- #11 - Rings
- #12 - Hiding Korok
- #13 - Tree pattern
- #14 - Rock formation
- #15 - Race
- #16 - Rock formation
- #17 - Rings
- #18 - Archery
- #19 - Food offering
- #20 - Flowers
- #21 - Rings
- #22 - Rock formation
- #23 - Flowers
- #24 - Hiding Korok
- #25 - Cube formation
- #26 - Archery
- #27 - Hiding Korok
- #28 - Hiding Korok
- #29 - Archery
- #30 - Rings
- #31 - Hiding Korok
- #32 - Hiding Korok
- #33 - Petals
- #34 - Rings
- #35 - Flowers
- #36 - Hiding Korok
- #37 - Race
- #38 - Race
- #39 - Archery
- #40 - Rings
- #41 - Tree pattern
- #42 - Rings
- #43 - Cube formation
- #44 - Hiding Korok
- #45 - Archery
- #46 - Rock Formation
- #47 - Hiding Korok
- #48 - Rings
- #49 - Boulder puzzle
- #50 - Food offering
- #51 - Cube formation
- #52 - Rock formation
- #53 - Race
- #54 - Petals
- #55 - Hiding Korok
- #56 - Hiding Korok
- #57 - Rock formation
- #58 - Rock formation
- #59 - Hiding Korok
- #60 - Boulder puzzle
- #61 - Boulder puzzle
- #70 - Flowers

- #62 - Tree pattern
- #63 - Hiding Korok
- #64 - Archery
- #65 - Hiding Korok
- #66 - Petals
- #67 - Petals
- #68 - Hiding Korok
- #69 - Petals
Lanayru Tower
Lanayru Tower Korok locations
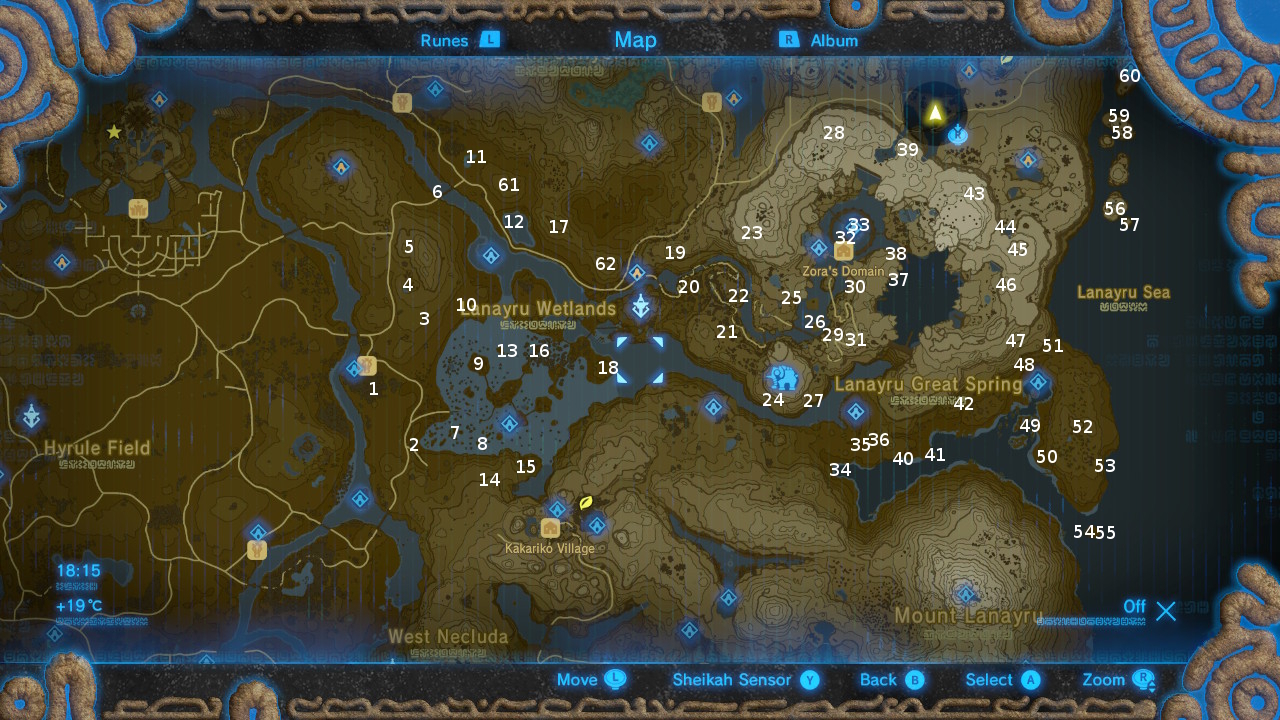
- #1 - Hiding Korok
- #2 - Hiding Korok
- #3 - Rock formation
- #4 - Rock Formation
- #5 - Archery
- #6 - Rings
- #7 - Petals
- #8 - Tree pattern
- #9 - Boulder puzzle
- #10 - Rock formation
- #11 - Petals
- #12 - Rings
- #13 - Hiding Korok
- #14 - Food offering
- #15 - Petals
- #16 - Archery
- #17 - Race
- #18 - Rock formation
- #19 - Petals
- #20 - Hiding Korok
- #21 - Rings
- #22 - Boulder puzzle
- #23 - Cube formation
- #24 - Cube formation
- #25 - Flowers
- #26 - Rock formation
- #27 - Petals
- #28 - Hiding Korok
- #29 - Petals
- #30 - Hiding Korok
- #31 - Hiding Korok
- #32 - Petals
- #33 - Petals
- #34 - Rock formation
- #35 - Hiding Korok
- #36 - Flowers
- #37 - Hiding Korok
- #38 - Cube formation
- #39 - Petals
- #40 - Hiding Korok
- #41 - Hiding Korok
- #42 - Petals
- #43 - Hiding Korok
- #44 - Boulder puzzle
- #45 - Flowers
- #46 - Cube formation
- #47 - Hiding Korok
- #48 - Cube formation
- #49 - Rings
- #50 - Hiding Korok
- #51 - Hiding Korok
- #52 - Archery
- #53 - Flowers
- #54 - Flowers
- #55 - Rock formation
- #56 - Rings
- #57 - Hiding Korok
- #58 - Hiding Korok
- #59 - Hiding Korok
- #60 - Flowers
- #61 - Race
- #62 - Race
Faron Tower
Faron Tower Korok Locations
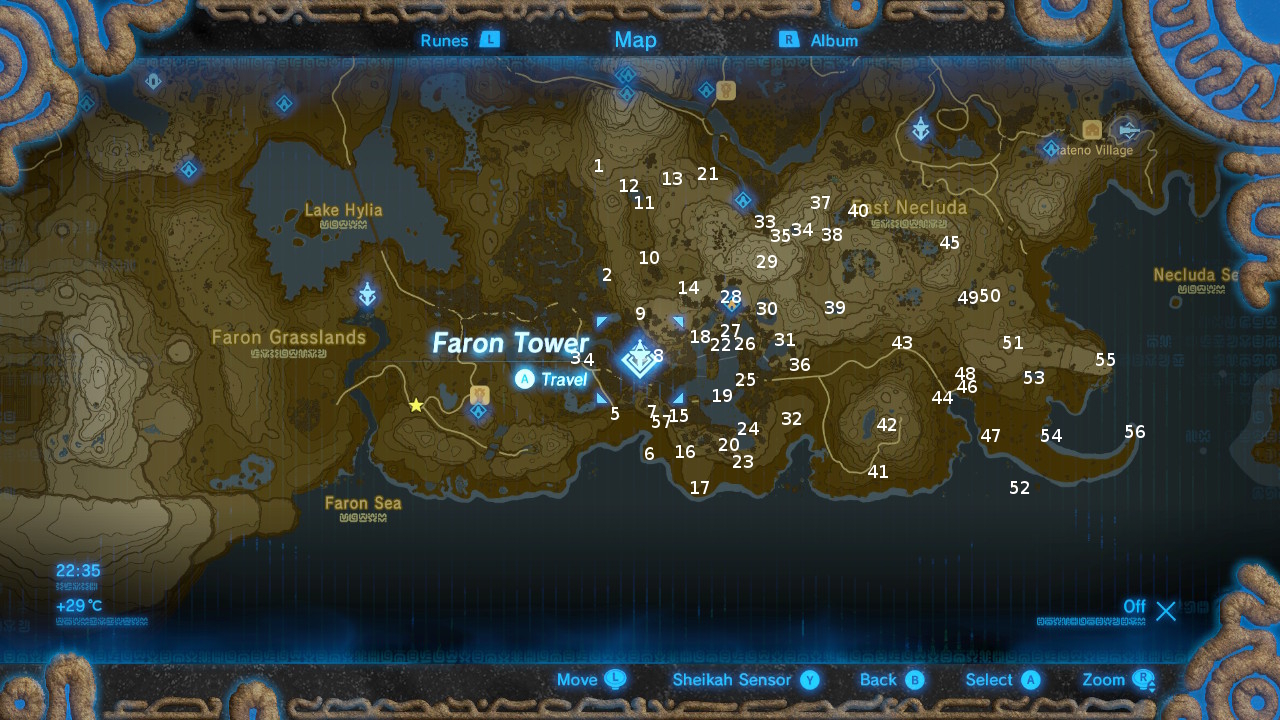
- #1 - Race
- #2 - Hiding Korok
- #3 - Flowers
- #4 - Archery
- #5 - Hiding Korok
- #6 - Rock formation
- #7 - Food offering
- #8 - Food offering
- #9 - Petals
- #10 - Flowers
- #11 - Rock formation
- #12 - Archery
- #13 - Archery
- #14 - Race
- #15 - Hiding Korok
- #16 - Hiding Korok
- #17 - Archery
- #18 - Cube formation
- #19 - Archery
- #20 - Food offering
- #21 - Hiding Korok
- #22 - Flowers
- #23 - Hiding Korok
- #24 - Cube formation
- #25 - Archery
- #26 - Hiding Korok
- #27 - Race
- #28 - Boulder puzzle
- #29 - Hiding Korok
- #30 - Tree pattern
- #31 - Cube formation
- #32 - Rock formation
- #33 - Hiding Korok
- #34 - Rings
- #35 - Flowers
- #36 - Tree pattern
- #37 - Hiding Korok
- #38 - Hiding Korok
- #39 - Food offering
- #40 - Petals
- #41 - Rock formation
- #42 - Hiding Korok
- #43 - Hiding Korok
- #44 - Archery
- #45 - Rings
- #46 - Flowers
- #47 - Rock formation
- #48 - Rock formation
- #49 - Flowers
- #50 - Hiding Korok
- #51 - Petals
- #52 - Rings
- #53 - Rings
- #54 - Rings
- #55 - Hiding Korok
- #56 - Hiding Korok
- #57 - Hiding Korok
Lake Tower
Lake Tower Korok locations
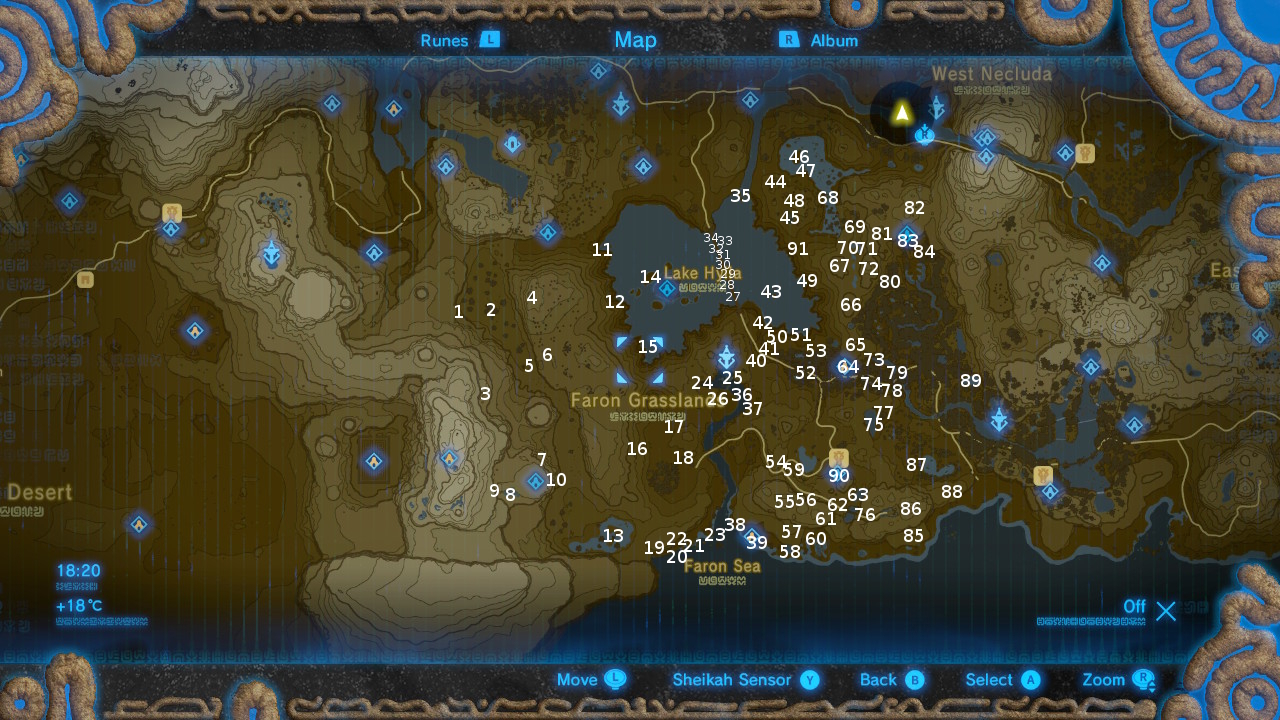
- #1 - Cube formation
- #2 - Archery
- #3 - Hiding Korok
- #4 - Petals
- #5 - Archery
- #6 - Archery
- #7 - Hiding Korok
- #8 - Petals
- #9 - Archery
- #10 - Cube formation
- #11 - Race
- #12 - Hiding Korok
- #13 - Race
- #14 - Petals
- #15 - Cube formation
- #16 - Food offering
- #17 - Race
- #18 - Flowers
- #19 - Hiding Korok
- #20 - Petals
- #21 - Petal
- #22 - Hiding Korok
- #23 - Rock formation
- #24 - Hiding Korok
- #25 - Cube formation
- #26 - Rock pattern
- #27 - Hiding Korok
- #28 - Flowers
- #29 - Petals
- #30 - Hiding Korok
- #31 - Archery
- #32 - Hiding Korok
- #33 - Rings
- #34 - Rings
- #35 - Cube formation
- #36 - Rings
- #37 - Hiding Korok
- #38 - Hiding Korok
- #39 - Hiding Korok
- #40 - Boulder puzzle
- #41 - Petals
- #42 - Hiding Korok
- #43 - Cube formation
- #44 - Boulder puzzle
- #45 - Boulder puzzle
- #46 - Boulder puzzle
- #47 - Hiding Korok
- #48 - Flowers
- #49 - Archery
- #50 - Boulder puzzle
- #51 - Archery
- #52 - Hiding Korok
- #53 - Boulder puzzle
- #54 - Archery
- #55 - Archery
- #56 - Boulder puzzle
- #57 - Petals
- #58 - Rings
- #59 - Rock formation
- #60 - Cube formation
- #61 - Rock formation
- #62 - Boulder puzzle
- #63 - Rings
- #64 - Boulder puzzle
- #65 - Hiding Korok
- #66 - Tree pattern
- #67 - Flowers
- #68 - Petals
- #69 - Cube formation
- #70 - Petals
- #71 - Petals
- #72 - Hiding Korok
- #73 - Rings
- #74 - Flowers
- #75 - Rings
- #76 - Rock formation
- #77 - Hiding Korok
- #78 - Petals
- #79 - Boulder puzzle
- #80 - Boulder puzzle
- #81 - Hiding Korok
- #82 - Boulder puzzle
- #83 - Hiding Korok
- #84 - Cube formation
- #85 - Cube formation
- #86 - Hiding Korok
- #87 - Race
- #88 - Rock formation
- #89 - Petals
- #90 - Race
- #91 - Boulder puzzle
Wasteland Tower
Wasteland Tower Korok locations

- #1 - Petals
- #2 - Tree pattern
- #3 - Tree pattern
- #4 - Petals
- #5 - Petals
- #6 - Petals
- #7 - Race
- #8 - Petals
- #9 - Archery
- #10 - Food offering
- #11 - Tree pattern
- #12 - Flowers
- #13 - Hiding Korok
- #14 - Tree pattern
- #15 - Hiding Korok
- #16 - Rock formation
- #17 - Petals
- #18 - Cube formation
- #19 - Hiding Korok
- #20 - Archery
- #21 - Flowers
- #22 - Cube formation
- #23 - Tree pattern
- #24 - Cube formation
- #25 - Flowers
- #26 - Rock formation
- #27 - Hiding Korok
- #28 - Hiding Korok
- #29 - Cube formation
- #30 - Hiding Korok
- #31 - Archery
- #32 - Cube formation
- #33 - Cube formation
- #34 - Race
- #35 - Race
- #36 - Hiding Korok
- #37 - Hiding Korok
- #38 - Cube formation
- #39 - Petals
- #40 - Race
- #41 - Hiding Korok
- #42 - Archery
- #43 - Boulder puzzle
- #44 - Hiding Korok
- #45 - Archery
- #46 - Cube formation
- #47 - Cube formation
- #48 - Race
- #49 - Hiding Korok
- #50 - Hiding Korok
- #51 - Cube formation
- #52 - Race
- #53 - Rock formation
- #54 - Hiding Korok
- #55 - Cube formation
- #56 - Cube formation
- #57 - Cube formation
- #58 - Petals
- #59 - Boulder puzzle
- #60 - Archery
- #61 - Rock formation
- #62 - Hiding Korok
- #63 - Hiding Korok
- #64 - Hiding Korok
- #65 - Hiding Korok
- #66 - Hiding Korok
- #67 - Hiding Korok
- #68 - Rock formation
- #69 - Archery
- #70 - Hiding Korok
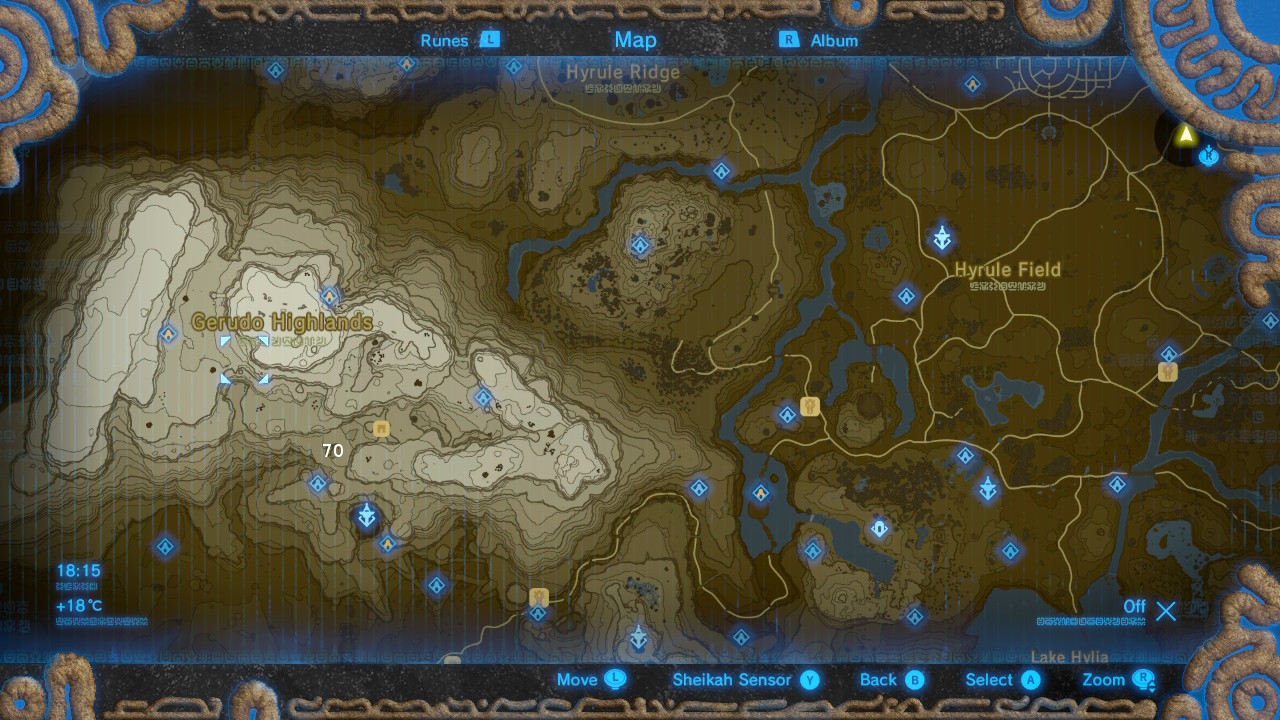
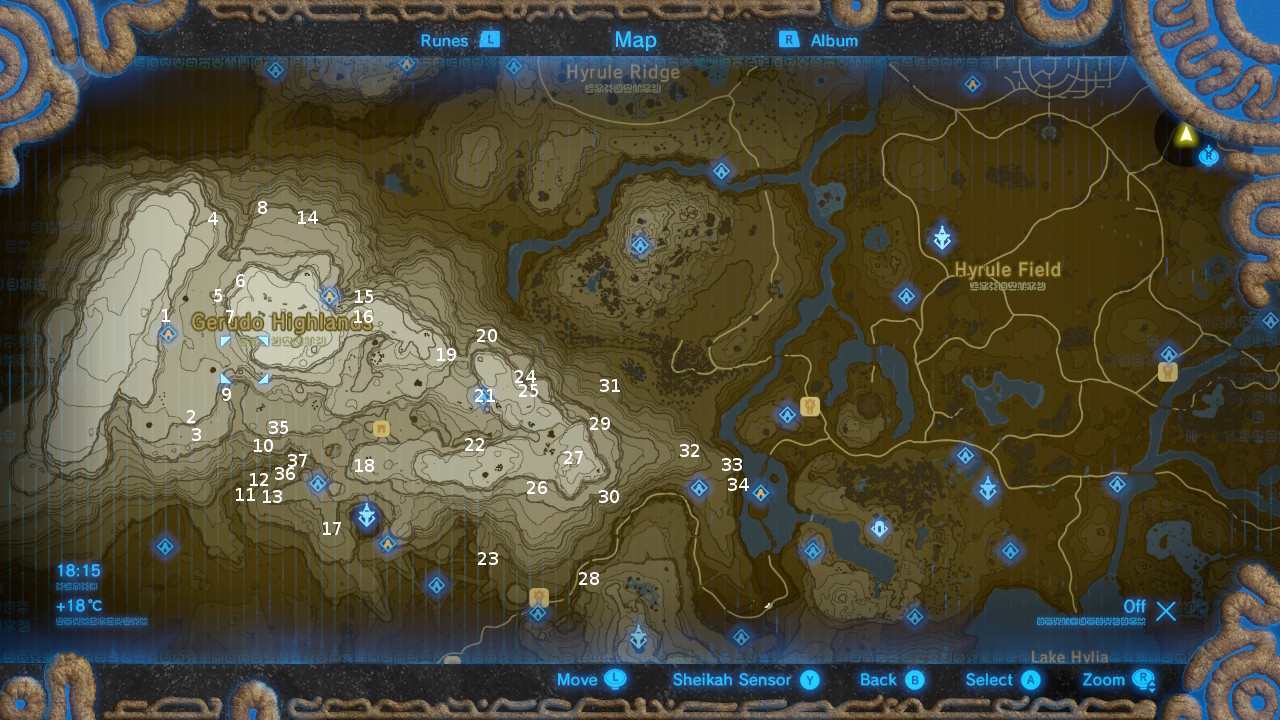
Gerudo Tower
Gerudo Tower Korok locations
- #1 - Hiding Korok
- #2 - Hiding Korok
- #3 - Rock formation
- #4 - Boulder puzzle
- #5 - Cube formation
- #6 - Archery
- #7 - Flowers
- #8 - Race
- #9 - Race
- #10 - Cube formation
- #11 - Food offering
- #12 - Food offering
- #13 - Rock formation
- #14 - Rock formation
- #15 - Hiding Korok
- #16 - Rock formation
- #17 - Archery
- #18 - Boulder puzzle
- #19 - Cube formation
- #20 - Rock formation
- #21 - Hiding Korok
- #22 - Rock formation
- #23 - Cube formation
- #24 - Petals
- #25 - Hiding Korok
- #26 - Rock formatino
- #27 - Hiding Korok
- #28 - Race
- #29 - Rock formation
- #30 - Cube formation
- #31 - Archery
- #32 - Rock formation
- #33 - Hiding Korok
- #34 - Cube formation
- #35 - Petals
- #36 - Food offering
- #37 - Food offering
Central Tower
Central Tower Korok locations
A hefty amount of Koroks are hiding in this region, so we've had to spread them over two maps.

- #1 - Rings
- #2 - Hiding Korok
- #3 - Hiding Korok
- #4 - Petals
- #5 - Petals
- #6 - Race
- #7 - Petals
- #8 - Hiding Korok
- #9 - Hiding Korok
- #10 - Hiding Korok
- #11 - Petals
- #12 - Food offering
- #13 - Hiding Korok
- #14 - Cube formation
- #15 - Hiding Korok
- #16 - Archery
- #17 - Cube formation
- #18 - Food offering
- #19 - Rings
- #20 - Race
- #21 - Petals
- #22 - Hiding Korok
- #23 - Petals
- #24 - Hiding Korok
- #25 - Petals
- #26 - Hiding Korok
- #27 - Hiding Korok
- #28 - Archery
- #29 - Archery
- #30 - Archery
- #31 - Hiding Korok
- #32 - Hiding Korok
- #33 - Hiding Korok
- #34 - Boulder puzzle
- #35 - Hiding Korok
- #36 - Rings
- #37 - Petals
- #38 - Hiding Korok
- #39 - Archery
- #40 - Hiding Korok
- #41 - Hiding Korok
- #42 - Hiding Korok
- #43 - Hiding Korok
- #44 - Rock formation
- #45 - Race
- #46 - Archery
- #47 - Hiding Korok
- #48 - Hiding Korok
- #49 - Archery
- #50 - Hiding Korok
- #51 - Petals
- #52 - Archery
- #53 - Archery
- #54 - Race
- #55 - Archery
- #56 - Hiding spot
- #57 - Rings
- #58 - Flowers
- #59 - Hiding Korok
- #60 - Tree pattern
- #61 - Hiding Korok
- #62 - Archery
- #63 - Petals
- #64 - Archery
- #65 - Archery
- #66 - Hiding Korok
- #67 - Hiding Korok
- #68 - Boulder puzzle
- #69 - Petals
- #70 - Flowers
- #71 - Hiding Korok
- #72 - Cube formation
- #73 - Rings
- #74 - Hiding Korok
- #75 - Archery
- #76 - Flowers
- #77 - Food offering
- #78 - Petals
- #79 - Food offering
- #80 - Hiding Korok
- #81 - Petals
- #82 - Archery
- #83 - Archery
- #84 - Flowers
- #85 - Petals
- #86 - Petals
- #87 - Rock formation
- #88 - Cube formation
- #89 - Hiding Korok
- #90 - Boulder puzzle
- #91 - Rings
- #92 - Rock formation
- #93 - Archery
- #94 - Archery
- #95 - Rock formation
- #96 - Hiding Korok
- #97 - Rings
- #98 - Archery
- #99 - Hiding Korok
- #100 - Race
- #101 - Hiding Korok
- #102 - Archery
- #103 - Hiding Korok
- #104 - Petals
- #105 - Hiding Korok
- #106 - Archery
- #107 - Petals
- #108 - Archery
- #109 - Hiding Korok
- #110 - Hiding Korok
- #111 - Archery
- #115 - Rings
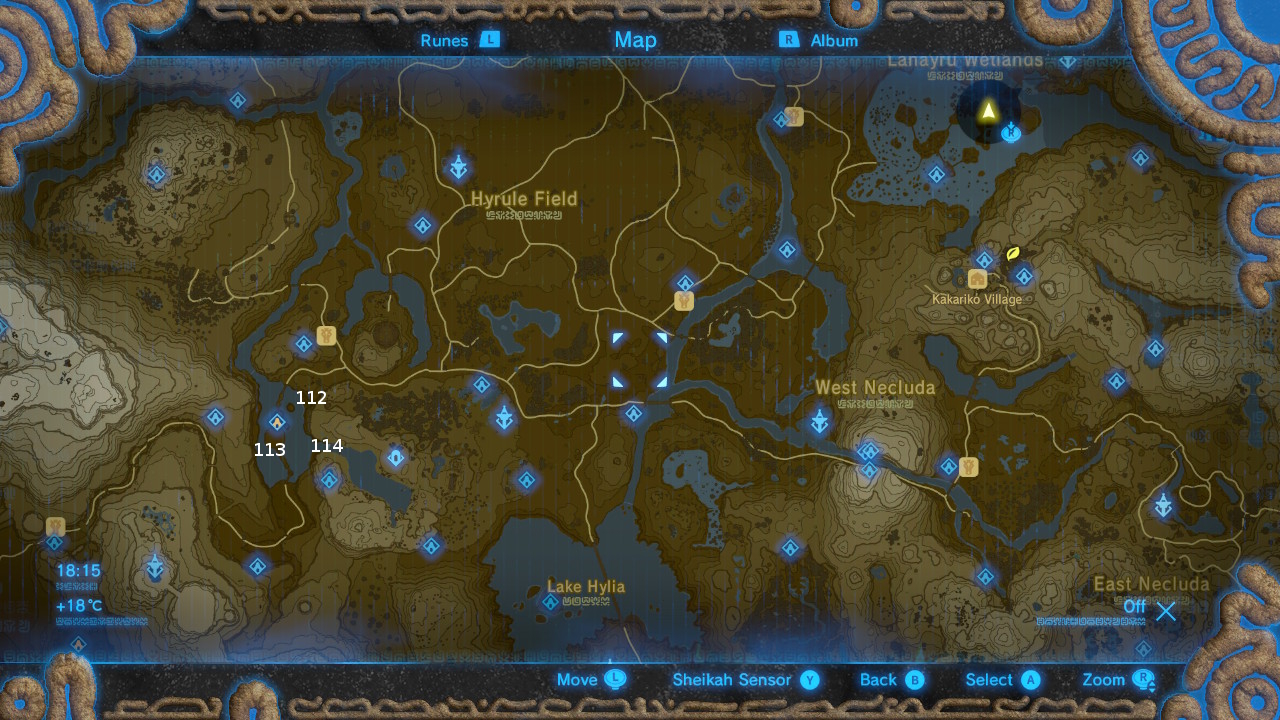
- #112 - Rings
- #113 - Rings
- #114 - Rings
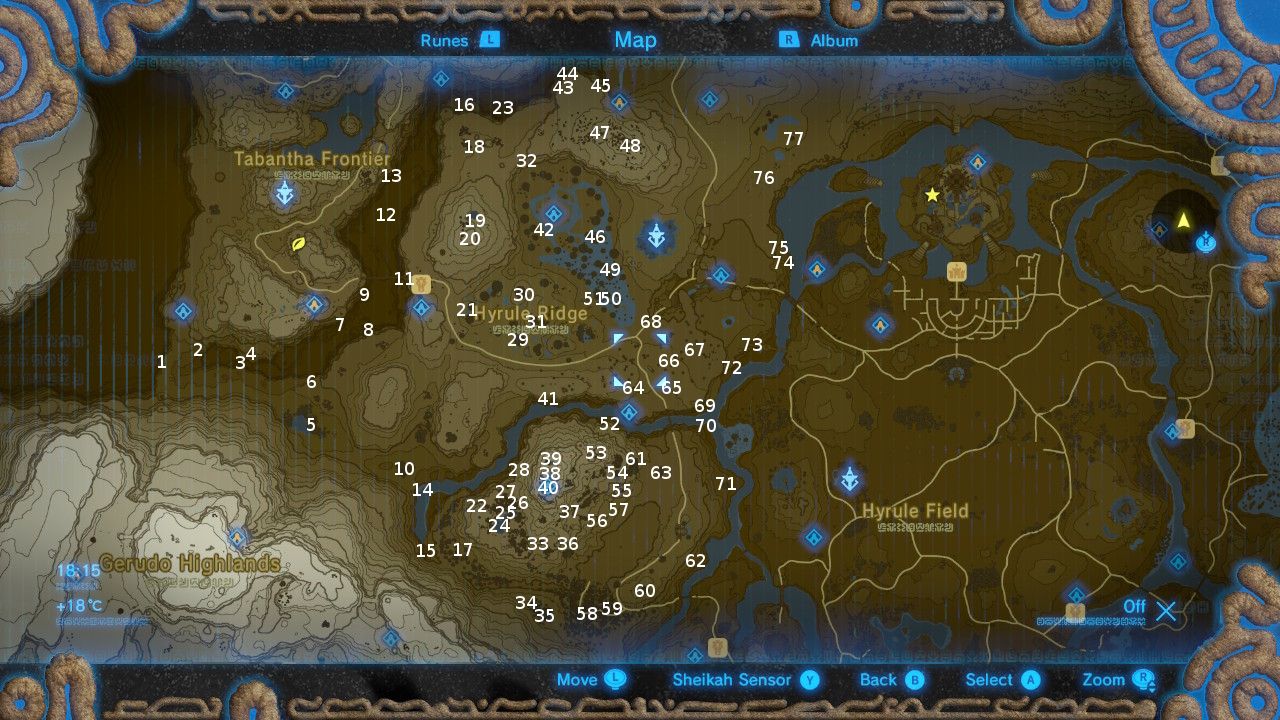
Ridgeland Tower
Ridgeland Tower Korok locations
- #1 - Archery
- #2 - Rock formation
- #3 - Hiding Korok
- #4 - Race
- #5 - Flowers
- #6 - Hiding Korok
- #7 - Hiding Korok
- #8 - Hiding Korok
- #9 - Cube formation
- #10 - Archery
- #11 - Race
- #12 - Petals
- #13 - Hiding Korok
- #14 - Hiding Korok
- #15 - Hiding Korok
- #16 - Race
- #17 - Hiding Korok
- #18 - Hiding Korok
- #19 - Hiding Korok
- #20 - Hiding Korok
- #21 - Petals
- #22 - Hiding Korok
- #23 - Rock formation
- #24 - Rings
- #25 - Boulder puzzle
- #26 - Flowers
- #27 - Hiding Korok
- #28 - Rock formation
- #29 - Race
- #30 - Archery
- #31 - Archery
- #32 - Hiding Korok
- #33 - Boulder puzzle
- #34 - Archery
- #35 -Hiding Korok
- #36 - Hiding Korok
- #37 - Race
- #38 - Flowers
- #39 - Hiding Korok
- #40 - Hiding Korok
- #41 - Hiding Korok
- #42 - Petals
- #43 - Hiding Korok
- #44 - Cube formation
- #45 - Hiding Korok
- #46 - Rock formation
- #47 - Petals
- #48 - Race
- #49 - Race
- #50 - Rings
- #51 - Flowers
- #52 - Archery
- #53 - Hiding Korok
- #54 - Petals
- #55 - Hiding Korok
- #56 - Archery
- #57 - Archery
- #58 - Archery
- #59 - Food offering
- #60 - Food offering
- #61 - Archery
- #62 - Hiding Korok
- #63 - Archery
- #64 - Tree pattern
- #65 - Flowers
- #66 - Petals
- #67 - Hiding Korok
- #68 - Race
- #69 - Hiding Korok
- #70 - Cube formation
- #71 - Hiding Korok
- #72 - Hiding Korok
- #73 - Archery
- #74 - Boulder puzzle
- #75 - Cube formation
- #76 - Flowers
- #77 - Hiding Korok
Tabantha Tower
Tabantha Tower Korok locations
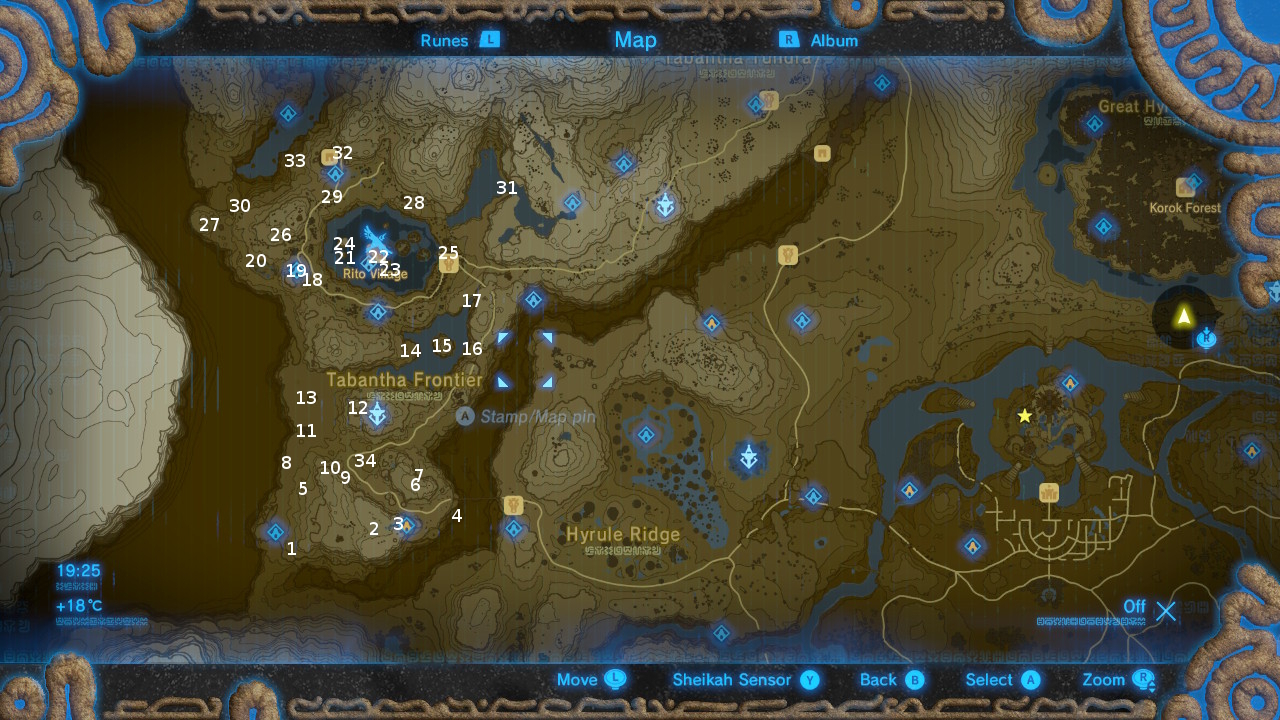
- #1 - Flowers
- #2 - Race
- #3 - Rings
- #4 - Cube formation
- #5 - Hiding Korok
- #6 - Archery
- #7 - Food offering
- #8 - Food offering
- #9 - Hiding Korok
- #10 - Boulder puzzle
- #11 - Boulder puzzle
- #12 - Hiding Korok
- #13 - Rock formation
- #14 - Cube formation
- #15 - Hiding Korok
- #16 - Hiding Korok
- #17 - Rings
- #18 - Flowers
- #19 - Rock formation
- #20 - Hiding Korok
- #21 - Race
- #22 - Archery
- #23 - Hiding Korok
- #24 - Food offering
- #25 - Hiding Korok
- #26 - Food offering
- #27 - Hiding Korok
- #28 - Hiding Korok
- #29 - Boulder puzzle
- #30 - Rock formation
- #31 - Rings
- #32 - Petals
- #33 - Flowers
- #34 - Race
Hebra Tower
Hebra Tower Korok locations
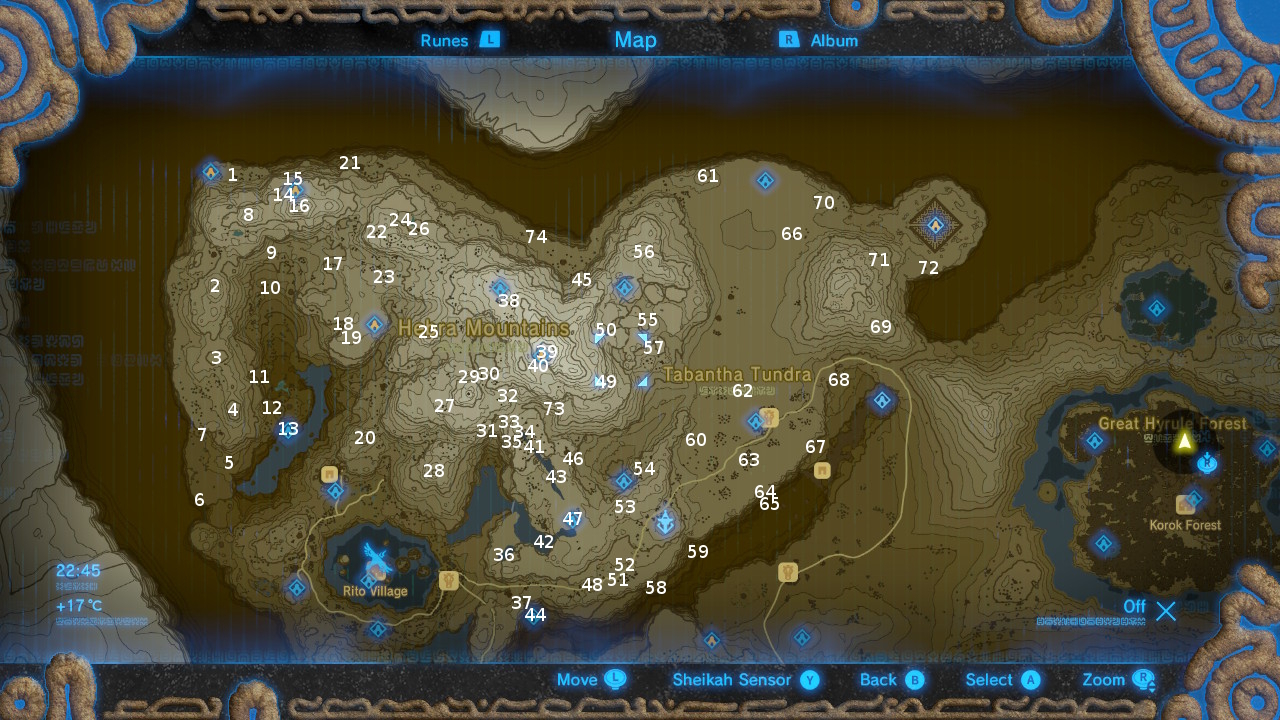
- #1 - Cube formation
- #2 - Hiding Korok
- #3 - Petals
- #4 - Hiding Korok
- #5 - Hiding Korok
- #6 - Archery
- #7 - Race
- #8 - Race
- #9 - Rock formation
- #10 - Flowers
- #11 - Flowers
- #12 - Rock formation
- #13 - Hiding Korok
- #14 - Flowers
- #15 - Hiding Korok
- #16 - Archery
- #17 - Petals
- #18 - Hiding Korok
- #19 - Hiding Korok
- #20 - Hiding Korok
- #21 - Rock formation
- #22 - Hiding Korok
- #23 - Archery
- #24 - Hiding Korok
- #25 - Archery
- #26 - Petals
- #27 - Hiding Korok
- #28 - Archery
- #29 - Petals
- #30 - Petals
- #31 - Petals
- #32 - Archery
- #33 - Race
- #34 - Archery
- #35 - Hiding Korok
- #36 - Rings
- #37 - Petals
- #38 - Petals
- #39 - Hiding Spot
- #40 - Hiding Spot
- #41 - Archery
- #42 - Petals
- #43 - Flowers
- #44 - Petals
- #45 - Petals
- #46 - Hiding Korok
- #47 - Hiding Korok
- #48 - Hiding Korok
- #49 - Rock formation
- #50 - Hiding Korok
- #51 - Flowers
- #52 - Boulder puzzle
- #53 - Hiding Korok
- #54 - Boulder puzzle
- #55 - Archery
- #56 - Hiding Korok
- #57 - Petals
- #58 - Hiding Korok
- #59 - Hiding Korok
- #60 - Hiding Korok
- #61 - Archery
- #62 - Petals
- #63 - Hiding Korok
- #64 - Archery
- #65 - Hiding Korok
- #66 - Hiding Korok
- #67 - Boulder puzzle
- #68 - Hiding Korok
- #69 - Boulder puzzle
- #70 - Rock formation
- #71 - Cube formation
- #72 - Archery
- #73 - Petals
- #74 - Rock formation
Woodland Tower
Woodland Tower Korok locations
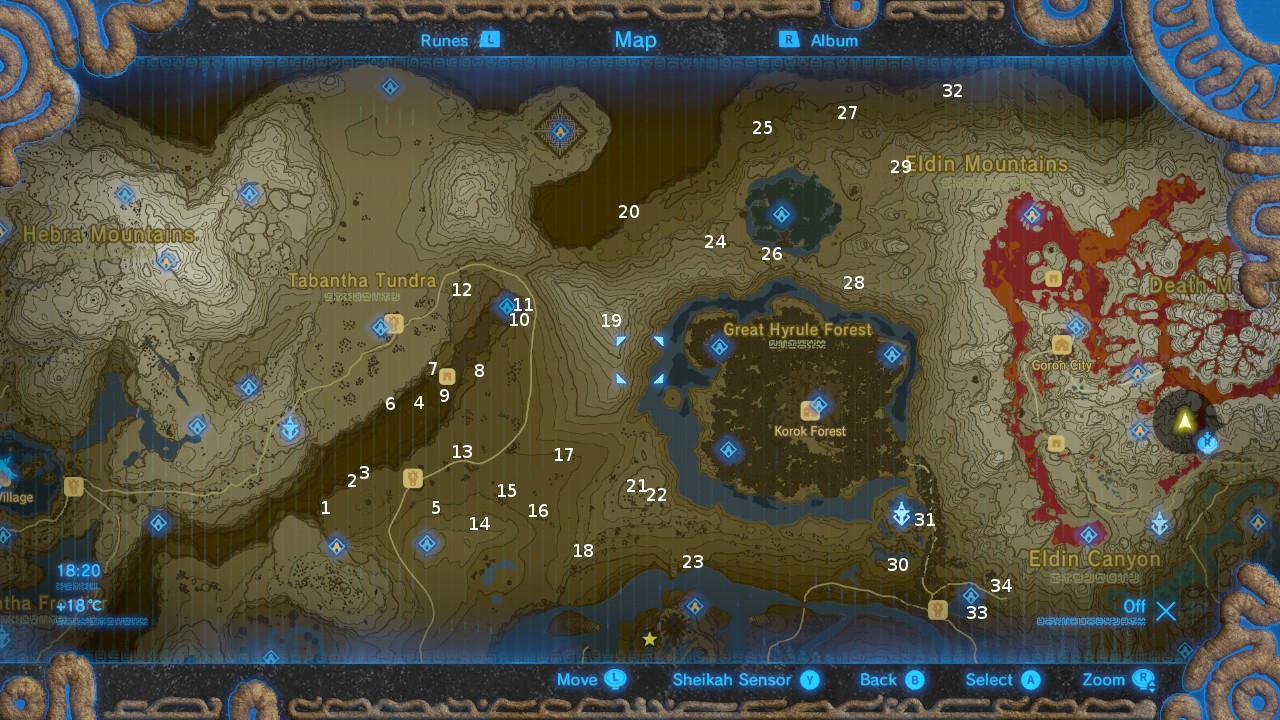
- #1 - Hiding Korok
- #2 - Hiding Korok
- #3 - Hiding Korok
- #4 - Hiding Korok
- #5 - Hiding Korok
- #6 - Hiding Korok
- #7 - Hiding Korok
- #8 - Hiding Korok
- #9 - Hiding Korok
- #10 - Cube formation
- #11 - Hiding Korok
- #12 - Petals
- #13 - Race
- #14 - Petals
- #15 - Rock formation
- #16 - Archery
- #17 - Hiding Korok
- #18 - Hiding Korok
- #19 - Hiding Korok
- #20 - Archery
- #21 - Archery
- #22 - Hiding Korok
- #23 - Hiding Korok
- #24 - Hiding Korok
- #25 - Hiding Korok
- #26 - Archery
- #27 - Cube formation
- #28 - Archery
- #29 - Archery
- #30 - Hiding Korok
- #31 - Hiding Korok
- #32 - Rock formation
- #33 - Rings
- #34 - Rock formation
- #35 - Hiding Korok
Eldin Tower
Eldin Tower Korok locations

- #1 - Rock formation
- #2 - Boulder puzzle
- #3 - Race
- #4 - Archery
- #5 - Hiding Korok
- #6 - Hiding Korok
- #7 - Hiding Korok
- #8 - Hiding Korok
- #9 - Race
- #10 - Petals
- #11 - Rock formation
- #12 - Boulder puzzle
- #13 - Cube formation
- #14 - Archery
- #15 - Petals
- #16 - Race
- #17 - Hiding Korok
- #18 - Hiding Korok
- #19 - Boulder puzzle
- #20 - Hiding Korok
- #21 - Rings
- #22 - Rock formation
- #23 - Hiding Korok
- #24 - Hiding Korok
- #25 - Archery
- #26 - Hiding Korok
- #27 - Cube formation
- #28 - Rock formation
- #29 - Hiding Korok
- #30 - Archery
- #31 - Hiding Korok
- #32 - Race
- #33 -Hiding Korok
- #34 - Race
- #35 - Hiding Korok
- #36 - Cube formation
- #37 - Rings
- #38 - Hiding Korok
- #39 - Hiding Korok
- #40 - Rock formation
- #41 - Hiding Korok
- #42 - Cube formation
- #43 - Rock formation
Akkala Tower
Akkala Tower Korok locations
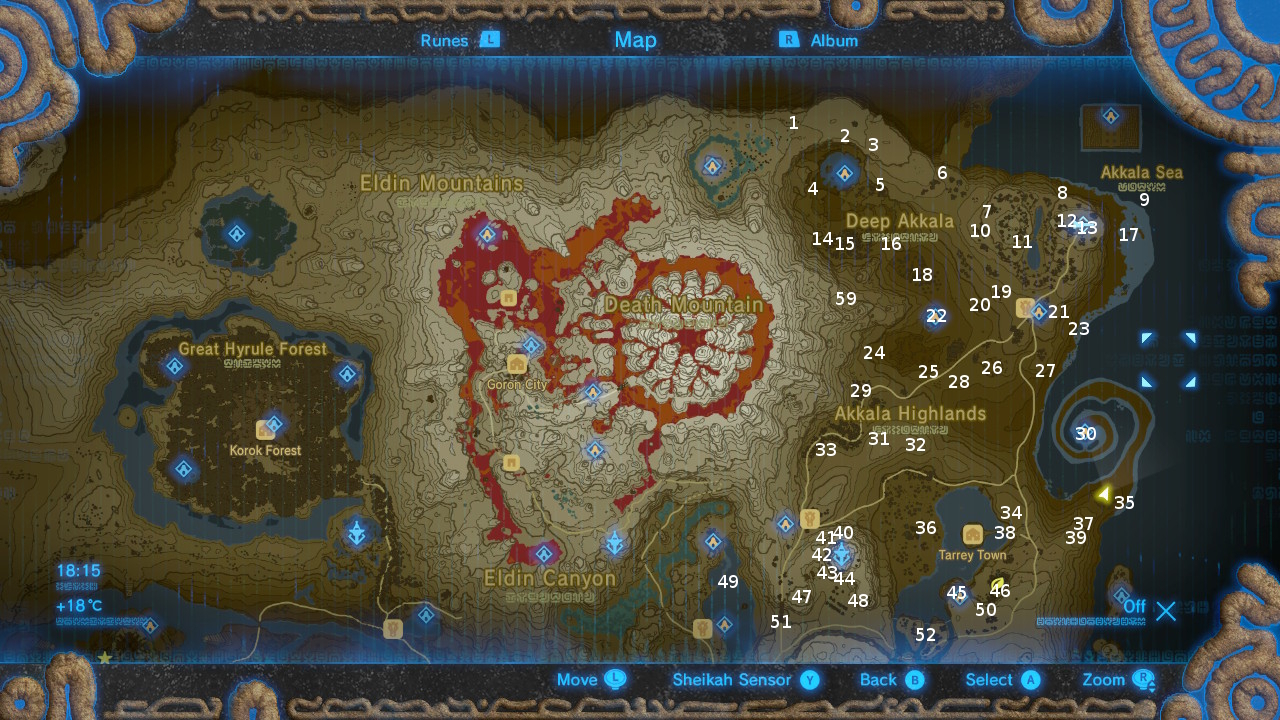
- #1 - Hiding Korok
- #2 - Rock formation
- #3 - Hiding Korok
- #4 - Race
- #5 - Hiding Korok
- #6 - Flowers
- #7 - Boulder puzzle
- #8 - Hiding Korok
- #9 - Hiding Korok
- #10 - Hiding Korok
- #11 - Race
- #12 - Hiding Korok
- #13 - Petals
- #14 - Hiding Korok
- #15 - Hiding Korok
- #16 - Archery
- #17 - Flowers
- #18 - Hiding Korok
- #19 - Flowers
- #20 - Hiding Korok
- #21 - Rock formation
- #22 - Hiding Korok
- #23 - Cube formation
- #24 - Cube formation
- #25 - Cube formation
- #26 - Race
- #27 - Archery
- #28 - Petals
- #29 - Petals
- #30 - Hiding Korok
- #31 - Hiding Korok
- #32 - Tree pattern
- #33 - Petals
- #34 - Rock formation
- #35 - Cube formation
- #36 - Hiding Korok
- #37 - Flowers
- #38 - Flowers
- #39 - Race
- #40 - Hiding Korok
- #41 - Hiding Korok
- #42 - Hiding Korok
- #43 - Hiding Korok
- #44 - Hiding Korok
- #45 - Food offering
- #46 - Flowers
- #47 - Rock formation
- #48 - Hiding Korok
- #49 - Rings
- #50 -Flowers
- #51 - Hiding Korok
- #52 - Rings
- #59 - Cube formation
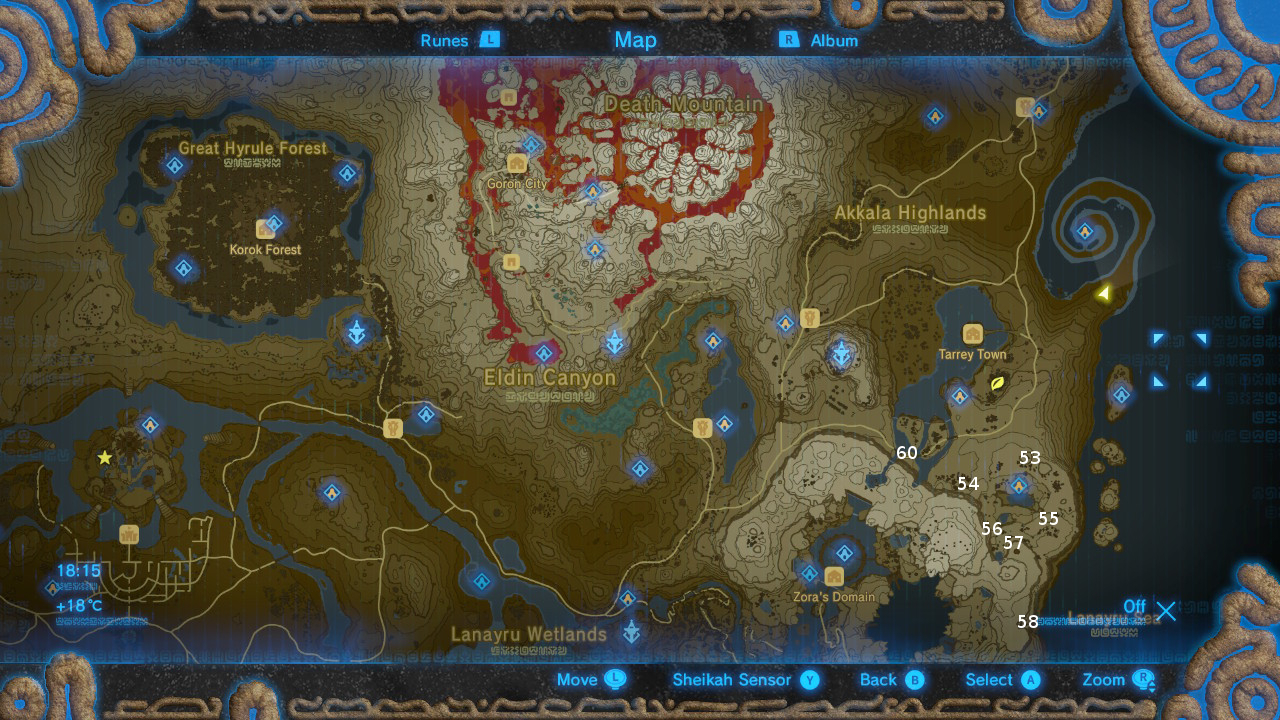
- #53 - Tree pattern
- #54 - Archery
- #55 - Petals
- #56 - Hiding Korok
- #57 - Petals
- #58 - Hiding Korok
- #60 - Hiding Korok
Frankly I've lost count of how many Koroks we've found now, but go find Hestu in Korok forest and make him dance like crazy.
Enjoy all of that lovely inventory space.
Zelda: Breath of the Wild tips | Breath of the Wild cooking recipes |Breath of the Wild Korok Old Man locations | Breath of the Wild Shrine guide | Breath of the Wild Captured Memories | Breath of the Wild unbreakable sword | Breath of the Wild horses tips
When you're done collecting Korok seeds you might want to check out The Legend of Zelda: Tears of the Kingdom, which is undoubtedly one of the most anticipated upcoming Switch games out there right now.

