Destiny 2 Menagerie rune combos and recipes: How to get the gear you want
The rune combos and recipes to get the armor, guns, and rolls you want

Weekly digests, tales from the communities you love, and more
You are now subscribed
Your newsletter sign-up was successful
Want to add more newsletters?
Join the club
Get full access to premium articles, exclusive features and a growing list of member rewards.
Even after all these seasons, Destiny 2 Menagerie rune combos are still the keys to some of the best gear in the game. The Menagerie is neither gone nor forgotten, and as long as its gear can be infused up, it will remain as one of the most consistent ways to farm specific rolls on certain guns. You've got to do more than shoot dudes, though. The Menagerie uses a unique and intuitive rune system that determines what loot you get, and mastering this can greatly speed up the process of acquiring individual pieces of gear.
You can put up to three runes into the Chalice at once, with each rune adding another parameter to your loot. Opening the chest will consume these runes and give you a reward based on which runes you used. There are dozens of possible rune combinations, recipes and even more potential rewards, so in this guide we'll go over all the Destiny 2 Menagerie rune combos and what they give you. Let's start with the guns.
Destiny 2 Menagerie rune combos: The recipes you need to get specific guns
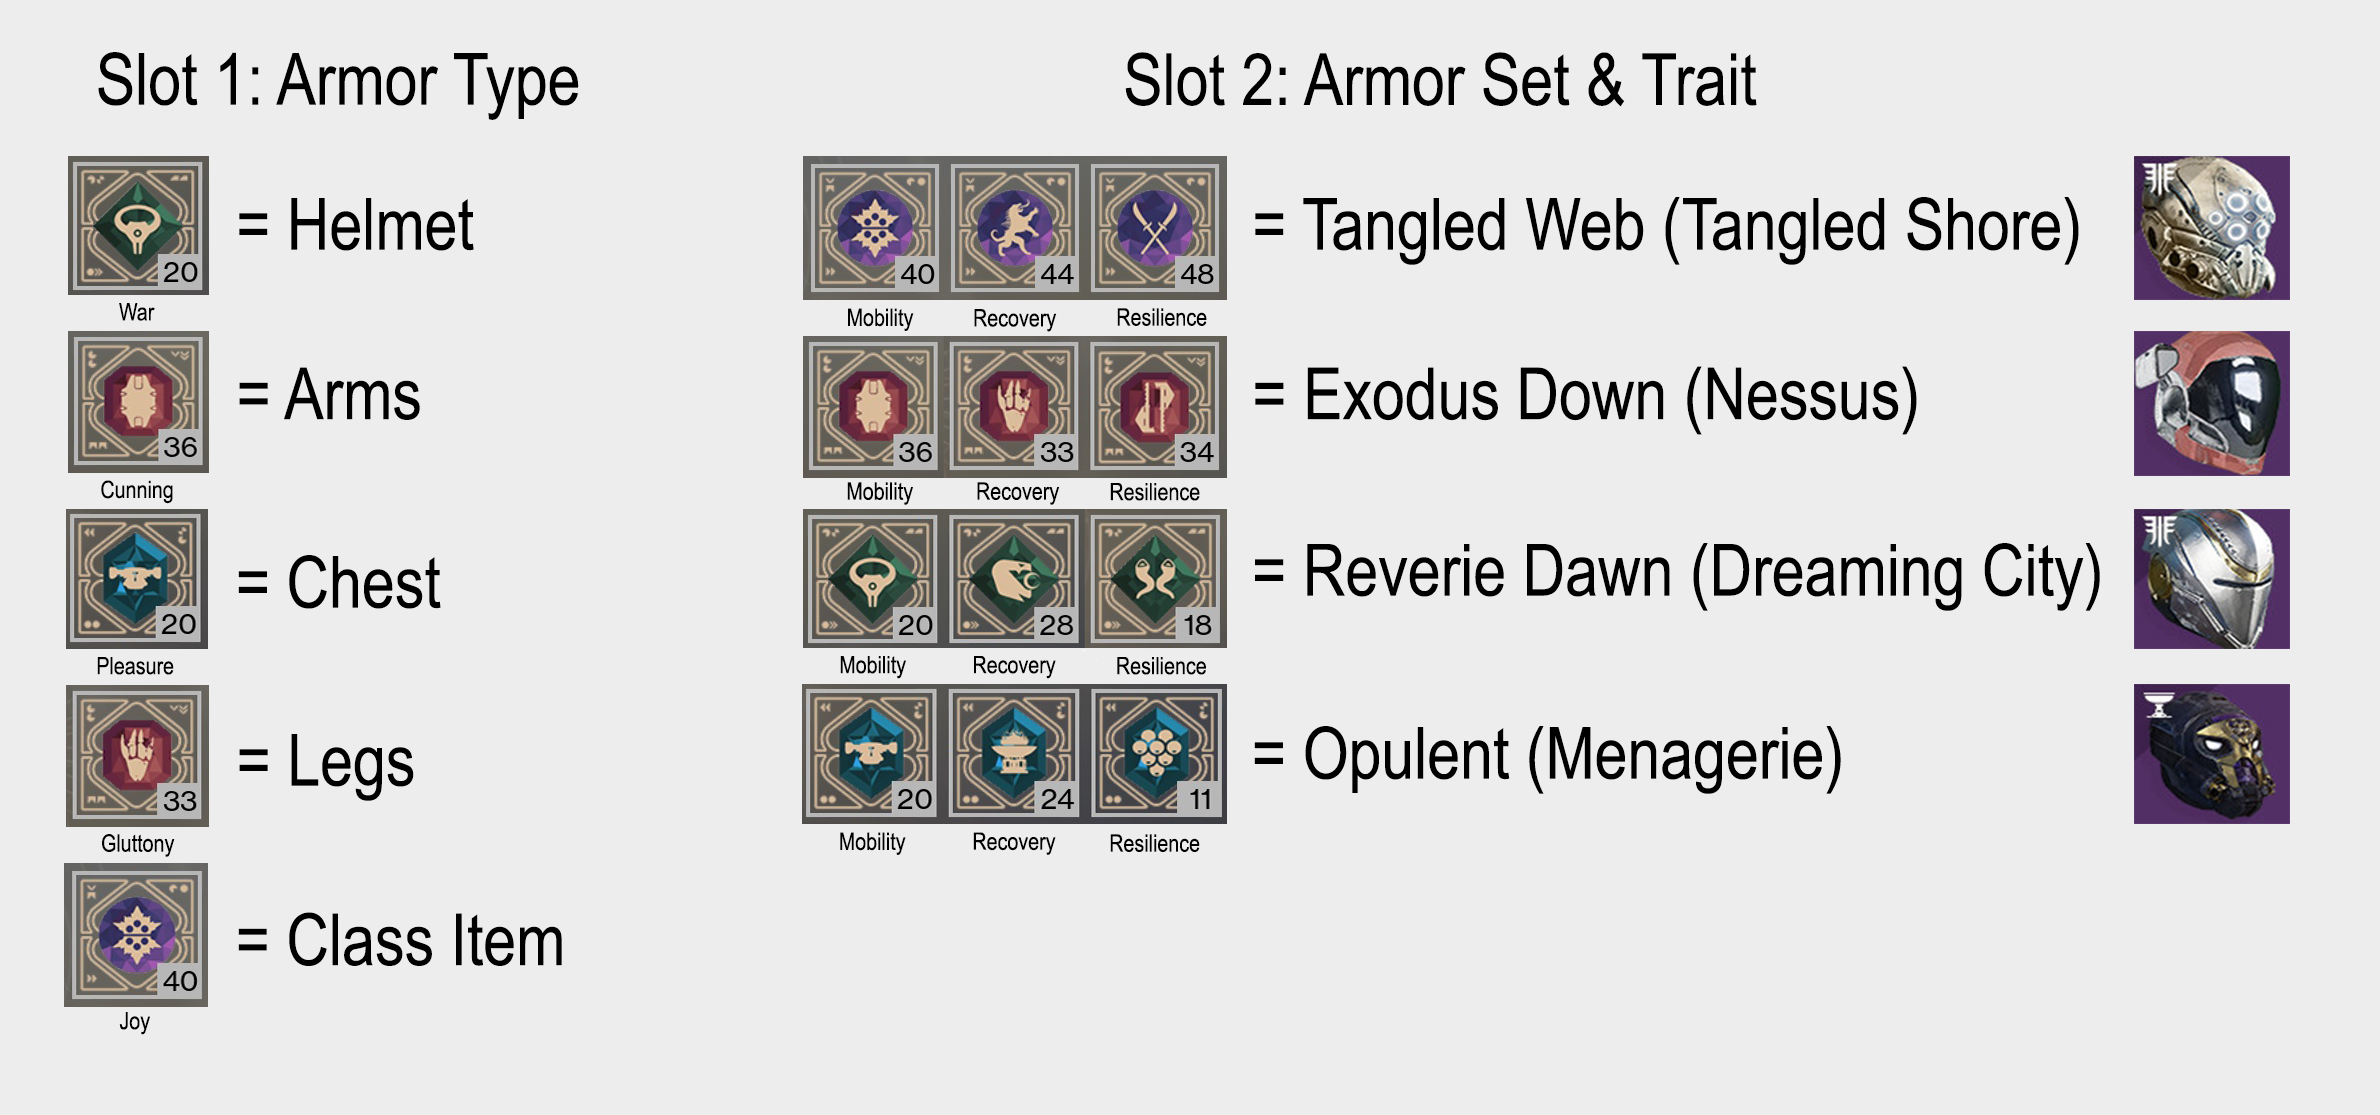
I put together some graphics to show how these menageries recipes and rune combinations work (click the "enlarge" button in the corner for a better look) because I find it's easier to show than to tell. Basically, your first rune determines what type of gun you receive: an SMG, sniper, rocket launcher (or one machine gun), hand cannon, sidearm, fusion rifle, or shotgun. Your second rune changes which SMG, sniper, hand cannon, or so on that you receive. And your third rune sets the Masterwork stat for that weapon.
Article continues belowFor example, if I wanted to get an Austringer hand cannon with a range Masterwork, I'd put a green Desire rune in slot one, any red rune in slot two, and any green rune in slot three. If I wanted an Imperial Decree shotgun with a handling Masterwork, I would use a blue Wealth rune in slot one, any green rune in slot two, and any purple rune in slot three.
If you want to double check your Destiny 2 Menagerie rune combos, try this tool made by Peter Phillips.
Destiny 2 Menagerie rune combos: recipes for specific armor sets
Getting armor from Menagerie recipes follows a similar process, but obviously runes will correspond to different things. Your first rune determines what armor piece you get: helmet, arms, chest, legs, or a class item. Your second rune affects which armor set that piece of gear comes from and determines its stat trait. For instance, putting any purple rune in the second slot will give you Tangled Web armor, but if you want a Recovery roll on that armor piece, you'll need to use a purple Beast rune specifically.
Finally, your third rune sets the elemental resistance for that armor piece. I didn't include these resistances in the above graphic because quite frankly they are a waste of runes and time. The elemental resistances on armor do next to nothing and aren't worth worrying about. For that reason, I never use a third rune when grinding armor in the Menagerie. If you must know, purple runes give arc resistance, red and blue give solar, and green give void.
Weekly digests, tales from the communities you love, and more

Austin has been a game journalist for 12 years, having freelanced for the likes of PC Gamer, Eurogamer, IGN, Sports Illustrated, and more while finishing his journalism degree. He's been with GamesRadar+ since 2019. They've yet to realize his position is a cover for his career-spanning Destiny column, and he's kept the ruse going with a lot of news and the occasional feature, all while playing as many roguelikes as possible.
 Join The Community


