
 Join The Community


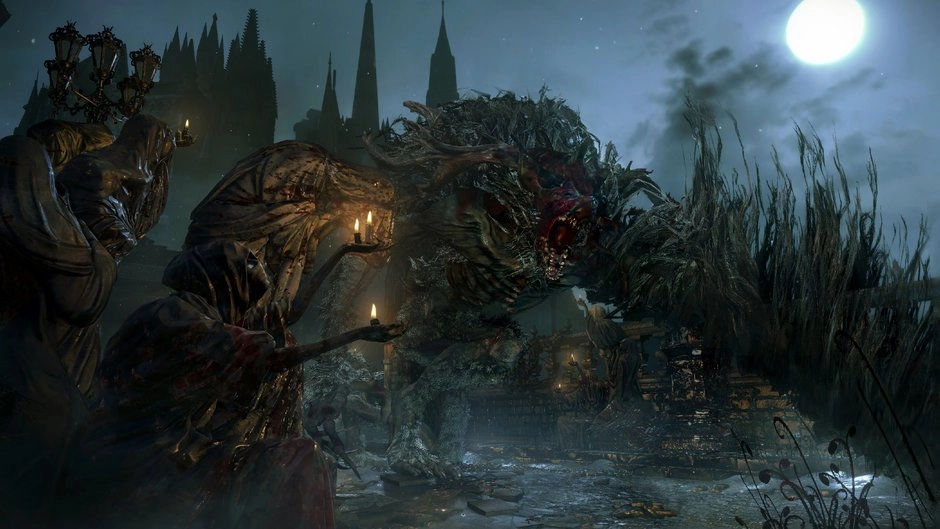
So you’ve made your way through Bloodborne’s opening crawl. “That wasn’t so bad,” you thought. “What’s everyone always going on about, saying this game is so hard?” Then you find it – looming in the full moon’s light, all tentacles and teeth: The Cleric Beast. “Oh,” you say. “I see.”
We’ve got good news and bad news for you: the bad news is that the game doesn’t get any easier from here on out. The good news is that we’ve broken down every single boss you could possibly face in the game and laid out key strategies and tips on how to defeat them. Reading through the guides below may not make the bosses themselves any easier, but they’ll sure as hell give you a fighting chance in the dark and dirty arenas of Yharnam.
Cleric Beast
As long as you don't get greedy, Bloodborne's first boss isn’t too difficult. Start with the tried-and-true 'dodge left and circle the boss' method. After a few strikes, the Cleric Beast will be open to attack. Use this moment to deal a bit of damage, but be sure to pull away before he swings his arms back. This tactic will also help you avoid getting snatched up by the Beast's hand-crushing attack.
The circling strategy will steer you through pretty much the entire fight, but the Beast has a few more tricks up its sleeve. When it punches the ground immediately in front of him, stay back and wait until the punches subside. Finally, watch out for his three-hit combo - it will likely kill you if the whole thing connects. As long as you sidestep and keep your distance during this time, you'll be OK.
Father Gascoigne
You'll find yourself in a small graveyard just before entering the Cathedral Ward. The graveyard's guardian? The cursed Father Gascoigne. This is a far more frenetic fight than the previous boss, but it's winnable. The main tactic is this: keep moving. Father Gascoigne uses the Hunter Axe and Blunderbuss, usually following up a combo with a shotgun blast. Use the trees and tombstones as a shield between the two of you, and heal when you have a free moment - don’t rely on regaining health in this fight. Keep your distance during combos and deal a few blows when you can.
When he's at about 50% health, Father Gascoigne will morph into his beast form. The trees and tombstones will no longer stand in his way, so once again, keep moving. This form relies on swiping and leaping attacks. For swipes, use the same tactics as his human form. When he rears back for a leap, turn and run. You'll get a moment to attack after he lands, but you don't want to get caught in the pounce.
Blood-starved Beast
As you explore Old Yharnam, you'll reach a valley containing an old church. Inside you'll find the vicious Blood-starved Beast. Much like his cousin, the Cleric Beast, the Blood-starved Beast can be taken down without too much trouble as long as you don't get greedy. Also, you must bring Antidote to this fight, as the Beast can poison you with various attacks. (You can find some during the battle, behind the statue in the very back of the church.)
The basic pattern is this: sidestep his swiping attacks, chip away a little HP, and pull back. Use this strategy even after he's powered up - the only real difference is that he'll deal additional poison damage. He may also go into a rage and unleash a fury of attacks, so keep back until he calms down. Finally, try to stay locked on at a short to medium distance from the Beast throughout the fight; his lunging attack will send him off screen, out of your lock-on range.
Vicar Amelia
At the top of the Cathedral Ward resides Vicar Amelia. Upon encountering her, you'll see her transformed into a horrifying, bandage-wrapped wolf monster. Yikes. For as horrifying as she looks, Amelia can be taken down quickly if you're careful. When close, she'll attack with all manner of claw swipes and palm slams. Sidestep these, and use the moment after she attacks to deal some damage of your own. Stay locked on to avoid getting turned around in the relatively narrow chapel. Should you find yourself far from Amelia, use a sidestep to avoid her long-range pouncing attack.
The only real trick up Amelia's sleeve is healing herself. Use this time to deal as much damage as you can, counteracting the amount she'll recover. Soon after, she'll likely enter a rage state. Don't attempt to attack her when this happens - just stay back.
The Witch of Hemwick
As you explore Hemwick Charnel Lane, you'll come across a large, seemingly empty house. Who's inside? The wicked Witch of Hemwick. Bad news, this boss is actually three separate Witches of Hemwick. Good news, they're not very strong. The battle begins with the first Witch summoning a sickle-wielding enemy. This is her only power, so take out the lackey and then pound on the boss herself. She'll teleport away after a few hits, so continue to cut down the minions and pursue the real boss.
After defeating the first Witch, a second will spawn in. The only difference is that this Witch can cast a spell that briefly binds you in place. Keep an eye out for the blue orbs so you can sidestep them, and continue to take out the sickle minions while focusing on the Witch. The third will spawn in before the second dies, but again, all she'll do is summon enemies and teleport occasionally. Keep the camera moving so you know where everyone is in the room, and you'll be just fine.
Martyr Logarius
Forsaken Cainhurst Castle is a completely optional area, but if you manage to find this frozen kingdom, be prepared for a challenge. Atop the castle roof awaits Martyr Logarius. Logarius has a wide array of attacks at his disposal. The most basic are slashes and slams of his giant scythe. These are best avoided by dodging around him. He may also summon an ethereal skull directly in front of him that will then rush you. Another sidestep will do the trick, but the window here is brief. He may also charge up for a massive area-of-effect blast - keep your distance on this one - that also increases his attack and speed for the rest of the fight.
When it comes to range, Logarius has a few options. The first is to summon more of those skulls that home in on you, and the best way to avoid damage is to stay up against him. He may also leap into the air for a pouncing attack. Roll away to avoid damage, then use the window to get in some hits of your own. Finally, he may jam his sword into the ground and summon a cloud of flying blades. These will home in on you too, and the cloud will not go away until you attack the sword planted in the ground. Keep all these attacks in mind, and you'll have a decent shot at taking down the Martyr Logarius.
Shadow of Yharnam
The journey through the Forbidden Woods is long and grueling, but before you can leave the forest behind for the Byrgenwerth, you'll have to get past its guardians: the Shadow of Yharnam. Yes, just like the Witch of Hemwick, the Shadow of Yharnam is actually three bosses in one, and each fights very differently. One is a melee user who attacks with simple sword slices and charges, one is a mid-range fighter who wields a katana-whip and a candle that can spray fire, and the last is a spell caster who peppers the arena with fireballs. Your first step is to pick one to take out first - the melee Shadow is a good bet, since he'll often charge you.
Once you've done considerable damage to the trio (or nearly killed off one of them), snakes will burst from their hoods, and they will power up. This adds fire damage to the melee sword and mid-range kitana-whip. The spell caster will also gain a summoning spell: if you see magic clouds appear, run - a trio of giant snake heads will emerge from the ground and try to bite you. Keep focusing on one Shadow at a time, separating the group as much as possible (you can use the giant tombstones for cover if need be). Avoid getting surrounded, and you'll be able to take down this dark trio.
Rom, the Vacuous Spider
The Byrgenwerth balcony overlooking the lake might seem like a dead end, but leap into the moon's reflection on the water to journey to strange dimension. What's waiting for you there? Rom, the Vacuous Spider. Rom himself is a pushover, but he summons an army of smaller spiders to make trouble for you. The first thing you need to do is take these little pests out. Thing is, they're heavy skulls nullify most frontal damage - you'll have to sidestep around them and attack their abdomens to do any decent damage. Whittle down the mob until you have a clear shot at Rom, then lay down some heavy damage on his soft belly (like the minions, his skull is also defence-heavy).
After a moment, Rom will teleport to another side of the lake, but keep using the same strategy. Once you've done enough damage, he'll gain some actual attacks, so be on the lookout. The first is a barrage of crystals he'll fire at mid to long range. You can outrun or sidestep these, but the best defence is to get close enough that he won't use it. However, being in close puts you in danger of his other attack. When he rolls over, avoid any blue spots that appear on the ground - these will burst upwards with more crystals. Keep killing off the spider squad, and you'll have no problem taking Rom down.
Darkbeast Paarl
Deep under the Yahar'gul Chapel is the Hypogean Gaol - you may have find yourself here after dying at the hands of a spectre much earlier in the game. Through the cave entrance at the back of the prison is a vicious monster: Darkbeast Paarl. If you were transported to this area early on, Paarl would have been pretty tough. But if you've fought the bosses in the order of this guide, he'll be a cinch. His main attacks are claw swipes, easily avoided with a sidestep. Thanks to his lanky structure, you can even roll directly under him to dodge. The only tricky part is actually striking him - unless he's stunned and toppling over, you'll have to aim for his limbs.
After doing enough damage, Paarl will power up, adding bolt damage to his attacks. Continue the same dodge strategy, but be aware that at a medium to long range, he'll also chuck bolt orbs (also avoidable via a sidestep). Attack Paarl in between his own blows, and you'll take him down - opening a handy shortcut back to Old Yharnam! - in no time.
The One Reborn
The street below Yahar'gul Chapel is dangerous, but you can reach Advent Plaza if you fight well. Your prize for making it there? An encounter with the hideous One Reborn. The One Reborn is a very intimidating boss, but the real problem here is the band of witches that rain fireballs down from above - climb the staircases in the back corners of the plaza to reach them and take them out before you do anything else. As for the One, he'll stomp with his many legs up close; at a medium distance, he'll swipe at you from his front half. Your best bet is to let him attack first, dodge, and get in a few hits. If he collapses in a stunned state, use the opportunity to whale on him.
Another thing to watch for is his a blood spell. At close range (even when the One is stunned), blood and bones will rain from dark clouds that appear above him. Watch for him to conjure up some magic above his head - that's the cue for this move. In addition, be ready to retreat if the front part of his body starts glowing brightly, as it's about to unleash a damaging area-of-effect blast. Finally, his back end may spew acid all over the ground, so hurry to where the front half is facing to avoid too much damage.
Celestial Emissary
The Upper Cathedral Ward is a dangerous place, but before you can rest easy in the Lumenflower Gardens, you'll have to defeat its guardian: the Celestial Emissary. This fight is slightly different from others, in that it's more of a mob boss. When the battle begins, several of the big-headed blue aliens will spawn in. They can be fought like normal enemies, but one of them is actually the boss - you'll know when his big HP bar starts going down. Whale on him like any of the other aliens, and he'll only fight back with the puny punches the standard minion throws. Continue to take out the aliens as they spawn, focusing on the ringleader.
When he's at half health, he'll grow several times his regular size. The fight plays out the same, but he'll hit harder, take less damage, and have more reach. Keep this in mind as you continue to damage him, being sure to sidestep his punches and arm slams.
Ebrietas, Daughter of the Cosmos
After reaching the Lumenflower Gardens, you can shatter the window near the lantern and continue down to the Altar of Despair. Waiting for you there is Bloodborne's own flying spaghetti monster: Ebrietas, Daughter of the Cosmos. Ebrietas isn't difficult to damage, but she hits very hard: about two hits will do you in. You can circle around her and attack her body, but you can deal serious injury by attacking her head - the trick is hitting it. Her swipes and grabs are easily avoided with a back step, but you'll need to clear to the side if she swings her tentacles over her head. If she rears back for a charge, you'll also need to clear out of the hard-hitting path. Also watch for her face-planting attack. Move out of the way, then use the free moment to attack her soft head. At a distance, she may also spit blood at you. Keep moving to avoid being hit.
When she hits half health, Ebrietas will power up, giving her a name rage attack - you'll have to keep sidestepping to avoid the many claw swipes and tentacles slashes. She also gain a flying charge attack, so you'll have to dodge in the same manner as her ground charge. Finally, she may create a cluster of stars over her head. When this happens, staying sprinting and dodging, as the stars will shoot right at you like laser beams.
Amygdala
The Nightmare Frontier is quite nasty, but before you can leave, you'll have to face a very freaky boss. You've seen the enormous spider creatures clinging to the buildings in Yahar'gul, and now you'll fight one: Amygdala. Amygdala is huge, which means you can attack her just about anywhere. Unfortunately, her limbs have very high defence - you'll have to aim for the head when she leans down. This means dodging her many swipes and palm pounds, rolling directly under her when possible. At a long range, she'll fire a laser beam at you. You can dodge it by dashing.
After taking enough damage, Amygdala will draw four giant weapons, one for each hand. Use the same strategy of rolling under her slashes, but be aware that her attacks will hit much harder during this time. Stay on the move, attack her head when possible, and you'll conquer the horrifying spider lady.
Micolash, Host of the Nightmare
While ascending Mergo's Loft, you'll reach a strange priest wearing a cage for helmet. This is Micolash, Host of the Nightmare. This boss fight is different from all the others: it's more of a chase than a battle. The first half takes place in a maze of staircases and bookshelves. Micolash will animate the puppets in the area as you explore, so take a moment to take them out if they spawn near you. When you spot Micolash, chase him down until he reaches a dead-end room. In here you'll be able to whale away half his health bar in no time. Just watch out for his midrange tentacle attack or punches - both can be avoided with simple dodges.
After reaching down half health, Micolash will teleport away. Head back to the staircases, out the new exit to the right, and up the spiral staircase outside to reach a second maze. Chase Micolash again - he'll drop off a few ledges this time - until he locks himself behind a large gate. Now you have to head to the top of this area and look for a small passageway that'll drop you into the room with him. When you get there, use the same attack strategy as before, but watch out for this new spell attack: orbs will burst all around the room, so use a dodge roll as best as you can to avoid the heavy damage. Chip away his remaining health to end the madness and win the fight.
Mergo's Wet Nurse
When you finally reach the peak of Mergo's Loft, you'll find the titular baby Mergo in her crib. Or do you? Mergo's Wet Nurse will drop in, ready for battle. The Nurse looks very intimidating with her myriad of blades, but the best place for you to be is up close. This way, you can slide around her while she slashes, opening up her back to your own attacks. She may slice in a whirlwind motion, in a three-slash combo, or in a half circle in front of her. In all of these cases, sidestep behind her and use the opportunity to deal damage. She may also unleash a fury of slashes will marching forward. This will chip away the majority of your health if it connects, so you may want to just back up for a moment.
The only other trick up the Nurse's sleeve is a purple fog that envelopes the entire arena. When this happens, a clone of hers will randomly appear and unleash one of her attacks. This fog goes away after some time, so you may just want to avoid all conflict until it subsides. Otherwise, look for brief opportunities to get a few hits in - just don't let yourself get between the Nurse and her clone.
Gehrman, the First Hunter
After returning from Mergo's Loft, you'll meet Gehrman in the previously locked part of Hunter's Dream. Refuse his offer, and you'll initiate an epic final battle with your mentor. Understandably, this is extremely difficult and fast-paced battle. While two-handing his scythe, Gehrman will regularly attack with sweeping moves, usually two in a row. You need to avoid both before attempting to attack him, and even then, you'll only get in a hit or two before he leaps away. If he switches to one-handing and his blunderbuss, the combos can last four hits: three slashes and a gun blast. Again, you'll need to avoid them all before attempting to do any damage yourself. Even if he doesn't do the full combo, keep your finger on that dodge button for the duration of the fight. You best bet is to sidestep back from his attacks, then dash forward for a hit or two before he leaps away.
Once his health is half drained, Gehrman will power up, adding even more distance to his leaps. The same strategy applies here, but he'll move even faster. He may also charge up for a massive area-of-effect blast. Retreat if you see this happening. Finally, he'll unleash a shockwave move after leaping and hanging in the air. The best way to avoid the heavy damage is to dash directly under him - the shockwave forms wherever he's facing.
Moon Presence
Fighting the Moon Presence can only happen in the game's third (some say "true") ending, achieved only by consuming three One Third of the Umbilical Cord items and defeating Gehrman, the First Hunter. Do this, and the game's ultimate boss will be ready for battle. Despite being the game's final boss, the Presence is actually not too difficult. It moves fast, but leaves itself open for plenty of regain attacks. At close range, it'll attack with grabs and swipes - sidestep around and attack his tails. At a medium range it'll lunge, but you can roll under it if you move quickly.
What you need to watch for is its unavoidable red energy blast - this move reduces your HP to 1, every time. Fortunately, it stands motionless for a while after, so use the time to heal or regain health with some attacks. Finally, the Presence may summons floating orbs. These burst and drop blood onto the battlefield, so be sure to avoid the splash. If you're hit, you won't be able to heal for a limited time.

