SKIP TO:
Puzzles 001 - 030
Puzzles 031 - 060
Puzzles 061 - 090
Puzzles 091 - 120
Puzzles 121 - 153
Puzzle 121: Arrow Flow
Location: Ventilation Room - Flora
Picarats: 40
Solution: Choose the arrow that's one up and one left from the bottom right corner (it's facing right).
Puzzle 122: Password Pieces
Location: Elevator
Picarats: 60
Solution: 081127
Puzzle 123: Cat's-Eye View
Location: Surveillance Floor – Fisheye
Picarats: 50
Solution: 9
Sticker: maid
Puzzle 124: The Final Tile
Location: Surveillance Room – Clive
Picarats: 70
Solution: The spade that's diagonally left and down from the hole in the middle.
Puzzle 125: Connect the Bots
Location: Surveillance Room – monitors
Picarats: 50
Solution: The room three up and three over from the bottom right corner.
Puzzle 126: Ten-Step Solution
Location: Generator
Picarats: 50
Solution:
-Move the second from the top gold block left.
-Move the A down as far as it will go.
-Move the second from the top block all the way right.
-Move the third from the top block up and left to sit next to the other block.
-Move B up two and left.
-Move A into the A slot.
-Move B all the way to the right.
-Move the left block of the side-by-side blocks down one.
-Move the second to the top block to the left.
-Move B into the B slot.
Puzzle 127: A Real Heart Swapper
Location: Generator – Bill Hawks
Picarats: 70
Solution: Swap the tile one right from the middle left side with the tile one left from the middle right side.
Puzzle 128: Reverse Rotation
Location: Generator
Picarats: 80
Solution:
-Replace gear group A with gear group C.
-Rotate gear group B upside-down and move it to the left and above gear group C so that only the two left gears are touching other gears.
Puzzle 129: Block Blockade
Location: Escaping the fortress
Picarats: 70
Solution:
-On the yellow T in the lower left
-On the orange backwards L above the yellow T
-On the long yellow zig-zag piece to the right of the orange backwards L
-On the orange T
-On the little blue backwards L in the lower right corner
Puzzle 130: The Final Puzzle
Location: After ending credits
Picarats: 30
Solution: C
Puzzle 131: A Pricey Pen
Location: Hotel Lobby – Becky
Picarats: 30
Solution: 270
Toy car course: Clean Up
Puzzle 132: Calendar Collage
Location: Arcade Entrance – Max
Picarats: 40
Solution: 1
Puzzle 133: The two Necklaces
Location: Black Market – Segal
Picarats: 30
Solution: This is a sliding puzzle that's pretty easy to figure out once you get the hang of it. We believe in you.
Puzzle 134: A Question of Taste
Location: Gressenheller U – Rosetta
Picarats: 30
Solution: C
Puzzle 135: Four Jams
Location: Anita's Place – Alfie
Picarats: 25
Solution: 1, 4, 2, 3 (Lightest to heaviest = Red, Green, Yellow, Blue)
Puzzle 136: Destination Station
Location: Warehouse Area – Marzano
Picarats: 30
Solution: D
Puzzle 137: Pieces of Chocolate
Location: Southern Street – Minnie
Picarats: 30
Solution: 8
Delivery request: Minnie's Homemade Cake
Puzzle 138: Quirky Clockwork
Location: Casino Lobby – Harold
Picarats: 30
Solution: C
Sticker: tutor
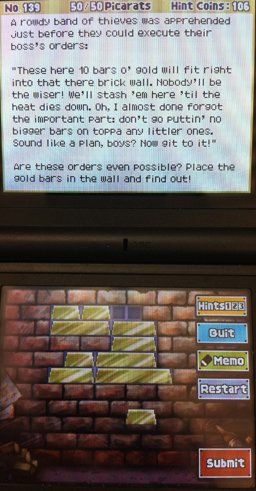
Puzzle 139: Bricks 'n' Bullion
Location: Flatstone St. 2 – Chelmey
Picarats: 50
Solution:

Puzzle 140: Ripple Effect
Location: Warehouse Area – Marzano
Picarats: 25
Solution: 6
Puzzle 141: A Roll of the Die
Location: Casino Floor – Mark
Picarats: 35
Solution: An upside-down heart.
Puzzle 142: The Marked Cup
Location: Casino Floor – Mark
Picarats: 30
Solution: A
Toy Car course: Cash Roundup
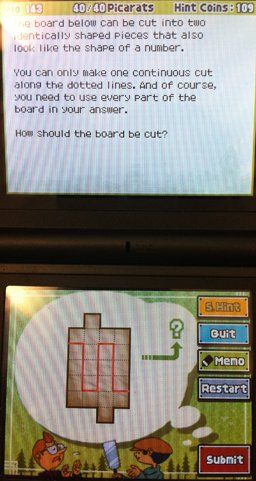
Puzzle 143: Double Digits
Location: Clock Shop Front – Art
Picarats: 40
Solution:

Hidden Puzzle 144: Mr. 8:20
Location: Casino Entrance – Fountain
Picarats: 20
Solution: E
Hidden Puzzle 145: Time Cards
Location: Thames Arms (outside) – water
Picarats: 30
Solution: 20
Hidden Puzzle 146: Birds on a Wire
Location: Green Hospital (outside) – tree
Picarats: 15
Solution: 2
Hidden Puzzle 147: Paving the Garden
Location: Shady Grove – bricks on right
Picarats: 20
Solution: E
Hidden Puzzle 148: Matchstick Math
Location: Azure Avenue – tree on left
Picarats: 25
Solution: 0
Hidden Puzzle 149: Strange Symbols
Location: Casino Storage – Locker
Picarats: 30
Solution: 52
Hidden Puzzle 150: Half as Old
Location: Service Entrance – water
Picarats: 15
Solution: 9
Hidden Puzzle 151: A Difference of 39
Location: The Boss's Room – clock
Picarats: 15
Solution: 98, 59
Hidden Puzzle 152: Cluttered Cans
Location: Iron Bridge – river
Picarats: 30
Solution:
Move the top 2 cans on the far right stack to the middle stack.
Move the top can on the left to the right stack.
Move the top 4 cans in the middle stack to the right stack.
Move the top can on the left stack to the middle.
Move the top can on the right stack to the middle.
Move the top 2 cans on the right stack to the left stack.
Hidden Puzzle 153: An Extra Block
Location: Chinatown Gate – door on left
Picarats: 30
Solution: Small diamond-shaped block
SKIP TO:
Puzzles 001 - 030
Puzzles 031 - 060
Puzzles 061 - 090
Puzzles 091 - 120
Puzzles 121 - 153

