Assault on the Control Room
Skull 7: Fog - After taking the first elevator down you will see that inside one of the rooms is a pipe with a lot of steam coming up it. Above this pipe and inside that small room is the skull. Another grenade jump will be required. Get on top of one of those small ramps and then grenade jump into the centre structure. It may take a few tries so don’t worry if you fail at first.
Skull 8: Malfunction - When you reach the chasm area you will see two bridges. Proceed right towards the broken bridge. If you look slightly to the left and down you will see the skull sitting there on a small pipe. Hop down to get it.
Terminal 5 - This terminal is in a well-known area. Near the end of the level once you get to the bottom of the chasm that has a tank in it, and is at the foot of the large structure you will see that around the one pillar is a hole. Jump down this hole to find the next terminal. You can also just steal one of the Banshee to reach it sooner as demonstrated in the video.
343 Guilty Spark
Skull 9: Recession - After crossing the log in near the beginning, hug the left ledge until you can go no further. Looking down from here will show you the skull sitting between two trees.
Terminal 6 - When you get near the end you will take a elevator to the surface. Upon clicking the button to activate the elevator, turn around and wait a moment until you see the terminal. Proceed to jump off to the ledge where it is found. Make sure to do this quickly. If you get too high the fall will kill you.
Library
Skull 10: Blackeye - After clearing out the flood in the beginning the Monitor will want you to follow him into the circular chamber. Do not go through yet. Inside the right most vent, closest to the wall is where your skull awaits. You must grenade jump on to the raised section closest to the vent then jump from there into the vent. It can be a bit tricky and will require you to not be in red health or else the grenade will likely kill you.
Terminal 7 - After reaching the third floor you will enter this large circular room. You will know you’re in the right spot as the Monitor will begin talking about the flood. Instead of going left, head to the right and proceed to jump over the raised sections until you make it far enough around to reach the terminal.
Skull 11: Eye Patch - When you reach the end, do not walk straight into the centre of the room. Instead proceed left or right around the outside edge. Once you are on the opposite side of the room you will find this skull.
Two Betrayals
Terminal 8 - Right after killing the four Sentinels in the beginning of this level head left or right around the ring walkway. The terminal will be around in the back of this ring.
Skull 12: Pinata - After the large battle near the end of the level you will get into a Banshee. Fly back through the canyon, past the objective until you can go no further. You will end up on the ledge above a tunnel. Here you will find the skull.
Keyes
Terminal 9 - This terminal is hard to miss. When you finally find Keyes, look underneath the raised platform. This terminal will be found down to the side of him in one of those lower trenches.
The Maw
Terminal 10 - When you go through the cryo room on your way to the engine room you will find this terminal. It is one of the computers on the wall. This room will be full of flood so be careful.
Skull 13: Grunt Birthday Party - The final skull is found on the bridge where Cortana instructs you to wait for pick up by Foehammer. Park the Warthog against the one pillar on the right and use it to jump up. Walk along it to find the final skull so you can get the party started.
Terminal 11
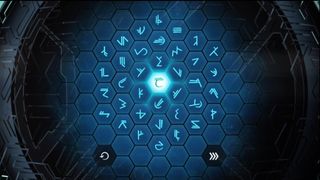
This terminal is a sneaky one. So sneaky that it's not even in the game. To get this terminal you must go to Waypoint. From here press start to get to the main menu. Once there, press X and you will see a sequence of coloured circles. These colours represent buttons on your controller. So push the buttons that are shown and you will come to this screen here:

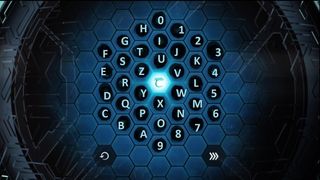
This may not look like much but it is actually a code entry screen. At the end of each terminal you may have noticed some flashing symbols. These are actually the codes you need to enter here. Here is a list of the codes you need:
343GS
HALO4
SPARK
FLOOD
EARTH
DEMON
RINGS
ARRAY
HUMAN
HAVEN

Those are the translated version of the codes along with a translated version of the code input screen. Input each code one at a time then hit the enter button that is found in the bottom right corner of the code entry screen. For entering each one you will unlock that corresponding terminal in waypoint, a background and 7000cr for use in Halo Reach. Upon entering the Haven code you will unlock terminal 11 as well, Threshold.
