Shang Simla

Once you’re back in China, your old friend Shing Hong will immediately let you know that he wants the keystone, so bring it to him. Your next step will be even harder: you’ll have to reach Martial Arts level 10 and break a space rock block. Go to the Academy and train, or buy a training dummy and board breaker (if you haven’t already) and train at home. After much training and fatigue, you’ll be able to report back to Shing, but your efforts weren’t enough; he now tells you to win a Martial Arts tournament and become a Grand Master if you want to continue.
To enter ranked sparring matches, use your cell phone in your inventory, select “Call Sim”, and choose “Challenge spar tournament contender”. Your next opponent will meet you at your vacation home (if you have one) or base camp, and you can challenge him or her to a ranked sparring match. You have to get your sparring rank up to level five; since you’re a Martial Arts level 10 at this point, you shouldn’t have trouble winning, so just keep calling your next opponent until you complete your goal.
After finally becoming the tournament master, report back to Shing Hong. He wants to construct an Amulet of Righteous Protection for you, but he’ll need three pieces of jade. Find them on the map and bring them back to him. Repeat the process with two pieces of platinum. It’s finally time to enter the Dragon Cave and defeat Dong Huo.
Dragon's Maw
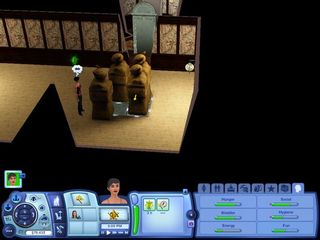
Find the Dragon’s Maw on your map and head over. Open the entrance that you found the first time you were here and go inside. Head down the stairs; since you already explored this tomb, you can see where to put the keystone you found in Champs Les Sims. Walk straight across and through the door, and then into the next room. Use the keystone. It reveals a hidden door next to you; open and go through it. Go down the stairs, clear the pile of rubble, and grab the loot underneath before going through the door at the bottom of the stairs. There are four statues, and three of them are already on switches. Push the fourth one onto a switch, and another door in the room will open, followed by another door becoming unlocked. Go through the doors near the cluster of statues to find a room with one statue. Pull this statue and you’ll find a hole in the wall behind it; inspect it, and the other door in the room will unlock. Go through it.

Clear both piles of rubble here. You’ll find a foot plate under one and a locked door behind another. Step on the plate, and the fire traps on the left will be disabled. Walk past them, and you’ll find a crescent keystone on the ground. Use “attempt to cross” on the fire trap between you and the nearest door, and then use “attempt to cross” on the trap in front of the crescent-shaped keyhole to disable it. Use the keystone. Before going through, turn around and go through the door behind you; use “attempt to cross” to disable the fire traps, pull the statues out of the way to step on both plates, and inspect the holes in the wall by both doors to unlock the center room, which has a relic and some Ancient Coins.
After collecting everything, go through the crescent keystone door. Inspect both statues to find out they are loose, and pull the one on the left forward. Slip past it and through the door to find a room with a treasure chest; grab the loot, and go back to the room with two statues. There are three staircases here. Go down either the right or left one, and pull the statue onto the switch to disable a fire trap. Go back up the stairs and down the middle staircase; pull this statue onto the switch to disable the other trap. Walk through the door at the end of the hall.

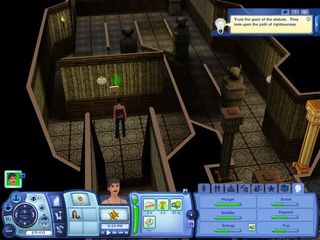
You’ll find a sign here that reads Trust the gaze of the statues. They look upon the path of righteousness. Inspect the wall opposite the one with the sign on it, next to the statue, to find a secret door; loot the treasure chest within. Now make your way around the hallway, walking in the direct path that each statue is facing; this way, you’ll avoid fire traps and disable the ones in the floor as you walk past them. When you find a door, go through it. Grab the Ancient Coins, and again make your way through this hall by following the gaze of the statues. When you come to the corridor at the end, inspect the wall to find a secret door and go through. Inspect the wall at the end for another secret door; go through again, and make your way by following the statues once again.
When you get to the area with the fire and electrical traps, inspect the wall near the torch for a secret door and go through. Grab the treasure from this room, including some underneath a boulder you can smash with the Axe of Pangu. Read the sign for a cryptic message from Dong Huo. Go down the hallway illuminated when you read the sign; inspect the wall and go through the secret door. Go down the stairs. Head through the only door in this room to find yourself in a room with many mirrors, and walk into the larger side room. Inspect the statue in the middle, and pull it to disable the fire traps in the room behind it. Head into that room, and push the middle statue there off the switch; now the fire traps from the room you just came from have been disabled. Take the crescent keystones previously hidden by the fire traps, and go back to where you disabled the second set of traps. There are two single statues facing each other; pull the one nearest the wall to find a treasure chest. Loot it, and use a keystone in the panel nearby. Go through the secret door that’s triggered, and use the second crescent keystone in the panel. Walk through the door to your right.
You need to activate all the floor panels in this room to seal in Dong Huo’s spirit. Start with the one near where you came in, then the next one is revealed to the left. There are two behind the tomb, next to statues. The fifth is on the right side of the room. This will reveal the sixth plate, which is next to an unmarked tomb, from which a mummy will appear! Fortunately, he’s slow-moving, so you can sneak past him and step on the plate. The next one is on the other side of the room. Jump into the dive pool behind you and swim through to reach it. Another mummy will pop out on the other side of the room. Wait until the mummies have cleared, and swim back through the pool and head to the next plate. A new one will be revealed directly in front of Dong Huo’s tomb. Finally! He’s sealed in there forever, but his mummy will pop out. Avoid the mummies—or, if you’re confident, let them attack you and fight them—and check out the chests in the red room to the left. Two doors behind you will open after looting the middle chest. Go through and up the stairs. Keep going up the stairs until you reach the top, step on the panel, and go through to find yourself near the entrance to the cave. Go back to Shing Hong to complete the mission.

