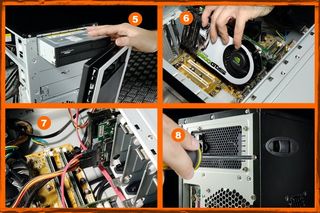
5) The DVD-RW
Reach into the top drive-bay at the front of the chassis and pop out one of the optical-drive-bay covers on the front panel. (You may also have to remove a partially punched-out disposable metal panel in the case itself.) Now slide the DVD-RW in from the front until the front sloped-edge is neatly lined up with the rest of the drive-bay covers. Now just as you did with the hard drive, take four round-head screws and screw two into each side to secure it to the drive bay.
6) The graphics card
Locate the PCI-Express slot on your motherboard: this is where that lovely 8800GTS is going to sit. Now hover the card over the slot, as this will help you work out which of the backplates you need to remove to fit the card. When you’ve popped these out, take the card and slide it into the slot until it clicks into place (there’s a retention bracket at the far end of the PCI-E slot). Using a pair of hex-head screws, fasten the card’s backplate to the chassis backplate.
7) Hook it all up
Run down this list, and place the correct power-blocks from the PSU into their respective component sockets:
Motherboard: Long 24-pin ATX block and four-pin CPU power block.
DVD-RW: 4-pin flat Molex block and IDE ribbon cable to motherboard IDE socket.
Hard drive: Flat SATA power block and SATA data cable to any available SATA port on motherboard.
Graphics card: Six-pin PCI-Express power block.
8) Shut up shop
A tidy case means better airflow means better cooling, so you might like to fasten adjacent wires together with plastic cable-ties. In fact, we don’t care whether you might like to do it or not: just do it. It’ll keep your cables away from spinning fans, and keep things tidy for when you next delve inside. Now all your components are securely in place and hooked up to the PSU, replace the side panels of your case. Pat yourself on the back: you’ve just built a PC, and saved yourself a grip of cash.
Use the next page as a handy reference map for placing all the components.
