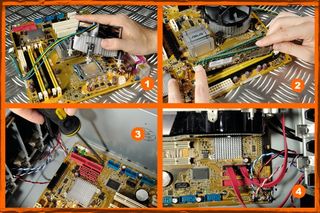
1) The CPU and heatsink
Raise the lever beside the socket, and carefully seat the CPU: it only fits one way. Lock the arm back into place. Place the heatsink/fan block over the CPU slot, ensuring that its power cable can reach the power pins on the motherboard. With a flathead screwdriver carefully press on the leg-locks to seat each of the heatsink’s legs into its hole in the mobo, locking them with a 90 degree twist.
2) The RAM
Open two of the DIMM sockets on the mobo, just below the CPU socket. Use identically coloured ones, as you want your memory running in dual-channel mode - by popping down the clips at either end. Orient the RAM stick so the cutaway on the bottom matches a tooth in the slot. Press firmly but carefully on each end of the stick, until the retention clips spring back into place.
Memory matters
Your motherboard will recognise the speed of your memory from the word go, so you shouldn’t have to alter the timings in the BIOS at all - until you come to overclock it, that is. We recommend running your memory in dual-channel mode for a cheap speed-boost; simply install both sticks into the same coloured DIMM slots to achieve this.
3) The motherboard
Replace the flimsy metal backplate in your case with the one that came with your mobo. Place the motherboard into the case, so that the rear ports of the motherboard (USB, etc.), match up with the backplate holes. Screw the board into the chassis using the hex-head screws. Plug the fiddly wires for the various case switches and LEDs into the motherboard, and any USB ports.
4) The hard drive
Locate the lower drive-cage in the chassis, and slide the drive into place, with the power and SATA cable terminals facing back into the chassis, and the screw-holes on the drive visible. Now screw it into place using two of the round-headed screws that came with your motherboard. Take the right-hand side panel of the chassis off, and do the same the other side.
