Laser Grid Security

Interact with Gwen using the indicated button. Spider-Man places her on his back again. Now carry her through the open hallway on the first floor and continue through the hallways until you reach a laser grid security system (8). Notice the single panel in the laser grid which is void of lasers (in the top left section). Once you interact with the floor console, quickly enter Web Rush mode, look at the opening in the grid and release Web Rush when you see a yellow silhouette of Spider-Man sitting on the open grid window or on the wall beyond the opening. You instantly Web Rush to that location. Once there, quickly jump down and enter the open hallway on the other side of the laser wall.
Ventilation Turbines
To get through the large vent system (9) you must use your web to gum up the huge turbines. Web-Shoot the fans until they stop rotating. Quickly run between the blades before they start to spin again. Notice that you can use Web Rush mode to quickly approach and interact with consoles in one slick move. Do this on the console at the end of the turbine tunnels.
Laser Grid Wall 2
Through the turbine shaft you reach another laser grid wall challenge. Complete the challenge as you did in the previous laser grid room: interact with the floor console (10) and Web Rush through the opening in the laser wall. Quickly jump down from the wall and head through the open door before it closes. If it does close, return to interact with the floor console again and try once more, but move more quickly.
Air Duct
n the next dead-end hallway (11) you can find and remove an air duct cover by pressing the indicated interact button (similar to performing a Web Rush). Spidey jumps up on the wall below the cover and Web-Strikes it to the ground. Enter the shaft and follow it to an open chamber full of Medical Sentries.
Audio Evidence
Find the second Audio Evidence collectible on the console on the far end of the laser security room near the exit.
Web-Retreat Tutorial

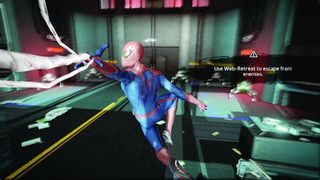
Spider-Man enters a large room (12) occupied by six, Medical Sentries, designed to kill cross-species. He lands in a dangerous position surrounded by these enemies. This is when you should use a Web-Retreat. Press the indicated button and a web shoots out of your left hand and takes you to the nearest safe spot, high above the immediate threat. Sometimes this is not enough to escape danger, but these enemies have no projectiles and can do nothing to reach you now.
Stand Off From Stuck Wall
After sticking to a wall, click the left control stick to make Spider-Man stand off the wall with his arms stretched backwards and on squatted legs. This allows you more head mobility and a better view of the area around you. It also gives you a better position from which to launch your next Web Rush or Web-Strike.
The tactic in this battle is to practice attacks and retreats. While stuck to the wall, pick your target while in Web Rush mode and attack. Try to finish off one robot before Web-Retreating again. Use dodges if things get hairy and shoot quick blasts of Web-Shots to temporarily disable the surrounding enemies.
Objective: Get back to Gwen
After the battle, return to Gwen by heading through the open doors on the first floor. Interact with her in the first laser grid wall room where you left her (8). Spider-Man again picks her up and carries her. Return to the room where you battled the Medical Sentries and enter the now open Security B 217 medical room.

Spider-Man delivers Gwen safely to the Quarantine (13) and is concerned about the bite on her arm and the infection now in her system. She claims there is no antidote for this mutated strain of the virus. Before Spider-Man leaves to find Smythe and the others, Gwen suggests he pick up the Os-Phone from a nearby table. You can use this to communicate with Gwen. A new upgrade becomes available after your conversation. Access the Os-Phone by pressing the Back button (Xbox 360) or the Select button (PS3).
THE OS-PHONE
The first page to open when you access the Os-Phone is the Character Upgrades page. You have one upgrade available and five options to choose from: Attack Damage, Surprise Attack Power, Combat Boost, Web-Bounce and Web Rush Timer. We suggest upgrading Attack Damage first.
You can also browse the page to the right and upgrade one of your Tech Upgrades. The available upgrades are: Web-Strength, Rapid Fire (Web-Shoot), Wall Blast, and Web-Reach. Web-Strength and Web-Reach are good first upgrade options.
By paging all the way to the Map (the map appears when you are outside of a building) you can listen to the Audio Evidence you collected in this level. When you exit out of the Os-Phone, the mission ends.
MANHATTAN: 4 Hours After the Incident

When control returns to you after leaving Oscorp Industries, Spider-Man has flung himself off the top of a tall skyscraper and is gracefully dropping towards the ground. Press the Web-Swing button to swing from the nearest building and continue to press the Web-Swing button until your web catches hold of another nearby building. Continue swinging in the direction indicated on the mini-map located in the lower right corner of the screen. You can hide this map by pressing Up on the Direction Pad. This also brings the map back when needed. You can access the large Manhattan map by accessing the Os-Phone and browsing to the leftmost tab. You can set waypoints and zoom in and out of the map to help you navigate to targeted locations.
Web Rush
Instead of Web-Swinging everywhere through the city, you also have the option to use Web Rush. When you press and hold the button, time slows down and as you look around you find multiple landing locations marked by yellow Spider-Man silhouettes. This can get you moving through the city more quickly and with more precision than with Web-Swing. However, you must be careful because real time eventually catches up to you and a Web-Swing is often all that saves you as you plunge to the ground from a failed Web Rush target.
